Needing more than a spark test?

E = 9.613e-15 J
t = 13e-6
C = 230e-12
Q^2 = E * 2 * C
Q = sqrt(E*2*C) = 2.1e-12 coulombs
Q = i * t
i = Q/(t/2) = Q/6.5e-6 = 2.1e-12/6.5e-6 = 3.235e-7A

3.235e-7A * 1e9 nA/A = 323.5 nA = 0.3235 uA

You slipped 3 orders of magnitude. This is assuming the numbers are as you stated. If this is true, you have lots of current to play with, a veritable walk in the park!
Hmm.. I think we actually agree.
I get the same answer as you, which is 3.235e-7A
3.235e-7A is indeed 0.3235 uA.

Moving the decimal 3 places to the right turns uA into nA
323.5nA is what I said.
It is huge, and would deliver 32.35mV from a 100K gain in the first stage

Noise from √(4 * k * T * B * R)
k = 1.380649E-23
T = 295 (about room temperature)
B = 300KHz (the pulse has that content)
R = 100K (say) for the TIA stage
Noise = 22.1uV

S/N ratio = 1463.8 => 20log(1463.8) => 63.3dB (for the 60KeV)
It's a great big fat clean signal.
------------------------------------------------------------------------------------
Now to go again, but this time for a 1.5KeV energy.
I am thinking from #885 that the S/N will be 32dB less than what we get from the big fat pulse. 63-32 = 31dB ?
That would still be a noise-free signal
If the original energy was 60 keV and the new energy is 1.5 keV, then the amount in dB's is 10*log10(1.5/60) = -16 dB. We use 10, because we are dealing with energy, (power) not voltage or current ratios. So the S/N is 63-16 = 47 dB. Pretty high!
 
One of my friends is assembling his own SMT circuit boards using a solder mask in a 3D printed frame. For a relatively small fee, some PCB vendors will provide a mask for printing solder paste. JLCPCB may.

That doesn't lessen the pain of placing the components, although I have seen some DIY pick and place efforts. At least you're not trying to (1) hold them down in the right place while (2) soldering a few package pins.

But solder paste and a reflow oven (or hot plate) are about the only option if you're dealing with QFN style packages. I have soldered them down (up to 48QFN packages) by pre-tinning the PCB footprint _AND_ the package pins, then carefully placing the package on top of the footprint. Higher-viscosity solder flux helps to keep the package in place for this. From there they would go to a hot plate. If done correctly, the solder would melt and align everything via surface tension, but it didn't always work. And even if alignment was OK sometimes a pin or two or three (etc.) wouldn't make contact to the footprint. The edges of QFN packages also have the pins exposed, althoughthey're co-planar with the molding compound so in that case we would try to solder the edge with a fine-tipped soldering iron. That rescue procedure requires solder flux to keep from shorting adjacent pins together.
 
If the original energy was 60 keV and the new energy is 1.5 keV, then the amount in dB's is 10*log10(1.5/60) = -16 dB. We use 10, because we are dealing with energy, (power) not voltage or current ratios. So the S/N is 63-16 = 47 dB. Pretty high!
:)
Of course. I was using voltage ratio 20*log10(60/1.5)
Which way up, (1.5/60) or (60/1.5) does not matter, it only changes the sign to a (-) or (+) . Using 20 instead of 10 for power ratio is what hiked the 16 into 32.
This is great -even more noise free!

This surprises me. Having as much as 12dB signal above the noise racket is enough for very clean signals, and here we have a big excess.
So far, it's not a true S/N. We have only calculated how much comes from the 100K Rf.
The actual scenario will and in the input noise voltage 4.3 nV/√Hz, and the current noise 5.5fA/√Hz at the input, and then add in the noise coming from the photodiode.

We may be 47dB clear from the √(4 * k * T * B * Rf) noise of molecules bashing around in the Rf resistor, but we will be looking at a whole lot of other additional amplified noise. Thankfully, from any place downstream of the first TIA stage, there is not much in the way of noise that can add to significantly degrade the S/N. The S/N is "locked in" by then

I am so looking forward to trying this, and getting at the real signal.
[Reminder to self - include built-in test points access. You can't connect most scope probes to this stuff! ]
 
Last edited:
:)
Of course. I was using voltage ratio 20*log10(60/1.5)
Which way up, (1.5/60) or (60/1.5) does not matter, it only changes the sign to a (-) or (+) . Using 20 instead of 10 for power ratio is what hiked the 16 into 32.
This is great -even more noise free!

This surprises me. Having as much as 12dB signal above the noise racket is enough for very clean signals, and here we have a big excess.
So far, it's not a true S/N. We have only calculated how much comes from the 100K Rf.
The actual scenario will and in the input noise voltage 4.3 nV/√Hz, and the current noise 5.5fA/√Hz at the input, and then add in the noise coming from the photodiode.

We may be 47dB clear from the √(4 * k * T * B * Rf) noise of molecules bashing around in the Rf resistor, but we will be looking at a whole lot of other additional amplified noise. Thankfully, from any place downstream of the first TIA stage, there is not much in the way of noise that can add to significantly degrade the S/N. The S/N is "locked in" by then

I am so looking forward to trying this, and getting at the real signal.
[Reminder to self - include built-in test points access. You can't connect most scope probes to this stuff! ]
Believe me, it's all too easy to lose SNR. Seen it frittered away in many a beginner's design. I don't think you will have that problem.

Re: Test points. The best one's I have ever used were miniature test jacks that one plugged in the scope probe. They were coaxial. They were a little expensive, but worked extremely well. In ancient days I used them on high speed ECL. No bounce, no ringing. Probes didn't fall out. To use them one unscrewed the plastic barrel that surrounded the probe, revealing the ground shield. The ground shield contacted the outer conductor, whereas the probe tip contacted the inner. Had horizontal and vertical versions.

All that said, the best test points are the one's you have and can access. I'm saying this in retrospect, since I just spun a board. Yes, I forgot the test points! My previous board spin was in the 1980's, so it seems I forgot about them. Next spin, I will put them in. Haven't even received the boards yet, and am a tad worried about testing.
 
@GreyhawkUSA30340 :)
If you made it here, you probably have figured out what is going on. I should post my KiCAD circuit here as soon as possible, even without the PCB layout, just so we can get on with it.
 
"Progress" for me has been to transfer all my XRF S/W to a more-modern laptop. The one I'd been using to develop code for lower-performance Arduino clones wan't able to support the Teensy4.x line of "Arduinos". My new one sports an SSD, is much faster and is smaller/lighter. There were a few bumps on the way to installing Ubuntu on it but it appears to be working OK now. My front-end pulse acquisition code compiles OK, so does the code for the host computer. I anticipate needing to debug both sets of code, hence the need for a decent lab computer.
 
"Progress" for me has been to transfer all my XRF S/W to a more-modern laptop. The one I'd been using to develop code for lower-performance Arduino clones wan't able to support the Teensy4.x line of "Arduinos". My new one sports an SSD, is much faster and is smaller/lighter. There were a few bumps on the way to installing Ubuntu on it but it appears to be working OK now. My front-end pulse acquisition code compiles OK, so does the code for the host computer. I anticipate needing to debug both sets of code, hence the need for a decent lab computer.
Hi Mark
In passing, could you let us know your preferred connection set between the Teensy and the TLA with A-D converter board. It already has a set of connections for GPIO plug-in for Raspberry Pi, ( if they are ever to be seen in the wild again)! I have a set of terminals that end on a set of link pads in a row, right opposite a set to plug onto a Teensy, and the idea was to be able to use short high impedance links so it becomes a very flexible kind of "patchboard".

That said, I have the other idea, which I think might be a nicer build, and that is to be able to directly connect a Teensy as a daughter board. It occurs to me that you might have the need to have the Teensy some way from the TIA, via cable or ribbon. Even if a Teensy, or come to that, any of the computing things are used, it may pay to have the pins allocation as flexible as possible, and being able to change one's mind about which goes where might be handy. It may also ease "adding features".

I am also thinking to make connection to Beaglebone reasonably easy.
My current setup consists of 3 modules.

1. The front end analog component, which includes the AM241 exciters, modified pocketgeiger and signal conditioning boards.

2. A Teensy 4.0 with the pulse acquisition/processing S/W. The on-chip 12-bit A/D will be used to acquire the pulse, although I expect a final version to use a separate 16-bit A/D running at 1MSPS or faster (this is why I spent some time on coming up with a fast parallel digital I/O scheme for a Teensy4.x board). The Teensy will communicate to the host computer via its USB interface.

3. A host computer running a command-line based program that can set the Teensy's acquisition parameters and output a CSV style file for generating spectra. The CSV files can be processed/displayed using Excel (actually the Libreoffice equivalent), gnuplot, scipy, octave, whatever.

As you can see, this setup is designed for prototyping -- definitely not a portable item -- because it still isn't clear to me what the final system might be. IMHO at this stage flexibility in being able to refine each portion is more important than anything else.
 
Well I finally got all the pieces connected up. It appears that so-called "geiger mode" of operation works -- if I change the trigger level the count rate changes. But the pulse processor is NOT working. The pulse-width discriminator is rejecting every pulse as being too short. I found one significant bug but haven't had time to modify the code & try it out.

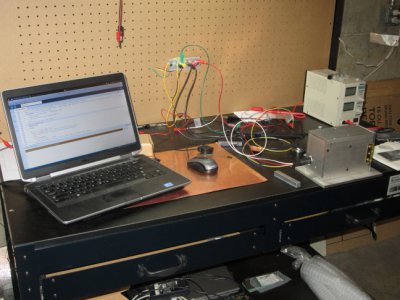
Here's a photo of my current setup:

XRF setup.JPG

The Teensy board is behind the laptop.

I got the electronics workbench at harbor freight when it was on sale. It also has an overhead shelf for storing equipment. My metalworking stuff is about 180 degrees the other way, the opposite corner of our basement.

Along with the workbench my electronics "lab" currently consists of a number of power supplies, a Hantek 1GSPS 'scope, a DS212 10MSPS mini-oscilloscope, a DVM , a function generator and a soldering station. I also have a fairly decent collection of transistors, assorted digital/linear IC's and passive components. While it's pretty limited as far as bandwidth goes, the mini-scope is handy for debugging things that are directly connected to the mains, since it is battery powered. I've been repairing the temperature controllers on a friend's food dryers and those are definitely "hot" boards...

Fairly basic stuff, although I also have an SDR "stick" I've used to debug RF problems with wireless motion sensors, remote entry car keys, garage door openers etc. At some point it would be nice to have some RF gear -- spectrum analyzer, RF generator, maybe one of those inexpensive VNAs -- but so far I really haven't come up with a good justification to spend the $ for that stuff.
 
Back
Top