New mill Wells-Index 745

Thanks @dmittz for the replies. Your project looks absolutely fantastic. I love the look of the wiring and enclosure etc. It would be awesome to hear some additional details about the VFD if you wouldn't mind sharing. Make/Model... Would love to see the inside of the box too. I'm interested to know how the automation guy did the RPM as well.

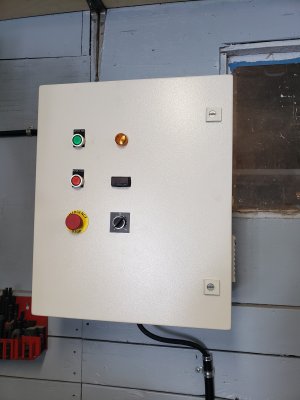
And just to understand how you have the buttons set up... I see a Motor Run and Stop as well as a potentiometer (lower right) and the emergency stop. So does that mean to power on the VFD, you'll set the 4 position 220 switch to the Mill/VFD position and then use the motor run/stop buttons to turn on/off the spindle/VFD? And the potentiometer to control the speed of the spindle by varying the frequency? If so, I assume the physical on/off switch (upper left of the head) doesn't do anything now or is just always in the on position. I guess i'm indirectly asking if you're planning on using the gearing in the head at all for high/low speed torque scenarios or if you're leaving the gearing to a mid-range setting and then using the potentiometer to adjust torque/speed.

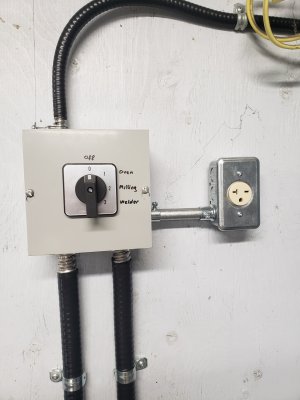
I opted against using the potentiometer method to control the speed of my motor as I figured the gearing in the head of mine would be a better (or at least more native) method of controlling the torque/speed of the spindle than manipulating the speed of the motor by varying the frequency/Hz. I'm not suggesting that's a wrong approach as i've read of others doing the same although mostly on machinery that had lower torque requirements. Things like wood lathes and drill presses. In my situation, that effectively means I need 3 positions to control my mill (On (fwd), Off, On (rev)). It's hard to make out in my picture from earlier in the thread but there's a grey 3 conductor wire that goes to a 3 position switch on mine. I programmed the VFD accordingly based on which position it was in.

Thanks again for sharing the great content.

20200818_113534_resized.jpg
Yes, to power the mill the switch is set to 'milling' which powers the VFD
20200818_113543_resized.jpg
20200818_113641_resized.jpg
SO the buttons are motor on, motor off, emergency stop disconnects power to the motor but not VFD. The variable speed can be used to apply between 0% and 100% speed/power to the motor. And the tach displays the motor speed.

The belt system is fully functional. and can be used to adjust speed mechanically, the variable allows adjustment between belt ranges or for less demanding milling/drilling can be used as the sole speed control if desired. For max torque the motor would be run at 100% speed and the belt engaged at the proper speed range.
20200818_113749_resized.jpg
20200818_113756_resized.jpg
The switch on the side of the head is still functional. It is a secondary off switch and also determine if the spindle/motor is turning forward or reverse.
20200818_113556_resized.jpg
Some of pictures inside the box:
20200818_113650_resized.jpg
20200818_113714_resized.jpg
20200818_113717_resized.jpg
 

Attachments

  • 20200816_151019_resized.jpg
    20200816_151019_resized.jpg
    918.2 KB · Views: 7
  • 20200818_113534_resized.jpg
    20200818_113534_resized.jpg
    711.1 KB · Views: 6
  • 20200818_113534_resized.jpg
    20200818_113534_resized.jpg
    711.1 KB · Views: 7
20200818_113704_resized.jpgAlmost forgot here is a close up of the VFD. The automation specialist is giving a 5 yr warranty on all parts and install so he must be confident it will last.
 
Also forgot to add the VFD has a 'soft start feature, so instead of just turning on full power the motor gently spools up to the desired power level which takes about 2.5 seconds.
 
I added on more very small finishing touch to the mill. The forward/reverse switch was a bit hard to reach because it was missing a rod that was suppose to hang down. Anyway I decided to fix that. I had a little bit of solid round stock bar laying around so I used my south bend 9a lathe to machine the end down to 1/4 then used a die to tap some threads. It worked perfectly. Now I have a handle on the switch that I can reach. I might powder coat it wrinkle black but you almost can't tell the difference since the rid was already a 'blackish' color.
20200828_155120_resized.jpg20200828_155105_resized.jpg
20200828_155158_resized.jpg
 

Attachments

  • 20200828_155120_resized.jpg
    20200828_155120_resized.jpg
    499.1 KB · Views: 8
So now that the mill is 'operational being that I can turn it on and have ensured if functions, its time to start making it functional.

I am really starting from the ground up as far as tooling and accessories. All I have is an chinese swivel vise (no handle), a older 14N jaocbs drill chuck, a phase 2 (chinese) keyless chuck and 4 well used HSS end mills. That's it. SO as it stands all I can do is drill holes or super light end milling. Can't even tram the head or vise yet.

So I've ordered a noga magnetic base swivel dial indicator holder with Miyoto dial indicator and a Noga centering dial indicator holder, once they arrive I can do the traming and I'll post some pics.

I've also got a push style oil gun for lubricating all the ways ordered, hopefully it arrives soon. I Also have 1 gallon of way oil that just arrived

I ALSO ordered 4 Lyndex endmill holders 3/8, 1/2, 5/8 & 3/4. The 1/2 one just arrived the others are either on order or in shipping. To go with the holders I go a 20 piece 2 and 4 flute ti coated HSS endmill set, which just arrived. The cutters are just basic (chinese) but I needed something to get me started and I'd rather cheap out on the cutters than the holders and other tooling.

Finally, I've ordered a spindle light, dounut light that attaches to the spindle with magnets so I can see. This is the real deal american one (not Chinese knock off) so it comes with a lifetime warranty. Can't wait for it to arrive!

ANYWAY enough talk, time for the pictures of the first batch of tooling.

50W way oil
20200902_105511_resized.jpg

20pc ENDMILL SET:
20200902_110517_resized.jpg

1ST of 4 Lyndex endmill holders to arrive: (this one is 1/2).

20200902_110158_resized.jpg20200902_110216_resized.jpg20200902_110221_resized.jpg
The salesman at KBC spoke very highly of the Lyndex endmill holders. And I don't think he had any reason to sell them to me vs the Collis or KBC house band I was also looking at aside from my request for good quality. TiR is advertised as 0.0002 hardened body, made in Japan. when I gave it a quick test it threaded smoothly on the draw bar and was an excellent fit on the endmills, set screw was smooth so I'm happy with it.

ONCE, all my other orders arrive i can get it tramed and turn this into a functional mill at least for basic operations!
 
Last edited:
dmittz,
Fabulous, just drop dead beautiful work sir.
You sir are a perfectionist.
I would love to own an Index.
Bravo.
 
dmittz,
Fabulous, just drop dead beautiful work sir.
You sir are a perfectionist.
I would love to own an Index.
Bravo.
Thank you Janderso, that's very kind of you. I'm trying my best with the skills and budget that I have.
 
So a few more things for the mill arrived today.

Made in usa vinyl sticker (actually printed by a Canadian company, lol).

Put it on the mill above the information plate20200904_125134_resized.jpg
20200904_125555_resized.jpg
MORE importantly my NOGA swivel dial gauge holder arrived... one is for in the spindle the other is a magnetic base. Also included is a miyoto metric dial indicator.

20200904_125625_resized.jpg
20200904_125726_resized.jpg
20200904_130823_resized.jpg
20200904_125744_resized.jpg
With tightening the single knob you can loosen/ tighten all the joints at once. VERY nice quality, made in Isreal. The miyoto metric dial indicator seems very nice also, made in Japan.

After a super quick check the vise is out .030 and the head is surprisingly bang on left/right but out quite a bit front to back so I will be spending some time tramming in the near future! STAY tuned for a tramming update.
 
So today I got a chance to do the tramming on the mill. I trammed the head to the table.

It quite something but as I've showed before even being a 1969 model not a single cutter mark on the table...
20200905_120638_resized.jpg

I used my Jacobs 16N drill chuck (made in usa) to hold the noga dial indicator holder. I trust it more than the 'phase 2' keyless chuck I have...
20200905_120932_resized.jpg

ANYWAY, I did the front to back tramming first got withing .002mm front/back...
20200905_130907_resized.jpg
Next I did the side tilt and got to withing about 0.01mm
20200905_133148_resized.jpg
I also decided to dismantle and clean/oil my 'china' milling vise...
20200905_141627_resized.jpg
AFTER, inspection the quality is pretty disappointing, many casting flaws, ways are not machined flat etc... One day I want a good quality vise but since this came with the mill and I don't have the budget for a new KURT vise, a clean and oil is the best I can do.

I Did my best to tram the vise got it to about 0.03mm over 6inches, the jaws have some high and low spots so that was the best I can do for now.

20200905_145750_resized.jpg
I'M still awaiting 3 endmills, my spindle light and push style oil gun but its getting real close to being a functional machine that I can actually use!
 
Take the swivel base of your vise off. You may find the vise is closer than you think..
 
Back
Top