Newb with a rough Atlas 618

I picked up a new to me, very good condition, backgear. Couldn't find just the backgear for any less than $100, so I opted to purchase a whole headstock for $150. Good thing too. Upon disassembly, I see the geartrain side threads of my spindle are pretty shot. The spindle in my parts head stock is pretty much pristine.

Anyone have experience painting ZAMAK?

How about advice on the removal of the indexing pin from the headstock? My spare headstock is more pretty than the original, but the indexing pin leaves a bit to be desired, would like to swap it out.
 
I just finished restoring one of these lathes. And what I have found that works well for me, is to break the lathe down into component assemblies. Start with just doing the tailstock. Disassemble, clean, paint, fab/replace any worn or broken parts, re-assemble, and set aside for the next assembly. Also, consider replacing the 2 brass nuts and the half-nuts in the carriage assembly.

Good luck

Fred
 
I picked up a new to me, very good condition, backgear. Couldn't find just the backgear for any less than $100, so I opted to purchase a whole headstock for $150. Good thing too. Upon disassembly, I see the geartrain side threads of my spindle are pretty shot. The spindle in my parts head stock is pretty much pristine.

Anyone have experience painting ZAMAK?

How about advice on the removal of the indexing pin from the headstock? My spare headstock is more pretty than the original, but the indexing pin leaves a bit to be desired, would like to swap it out.

Do be careful cleaning it, or you may have more painting to do. I don't know if it is the paint used or adhesion to Zamak, but I accidently stripped the paint right off a few small parts using Dawn Platinum and my ultrasonic cleaner when my intent was just cleaning off decades of dried oil and grease.

I use regular brush on Rustolium a lot for metal stuff. It seems to hold up pretty well on steel anyway. Not enough time has passed on the parts I stripped to judge long term durability of Rustolium on Zamak.
 
Old Atlas lathes are a rabbit hole for sure. Here’s how my Atlas 10” ended up:

IMG_0202.jpeg

Full tear down and rebuild. Color was chosen simply because I like it. Spray can, Rustoleum metallic turquoise. Dc motor conversion with variable speed control and jog. I do have a reverse switch on it, but don’t use it often because its a thread on chuck.

I don’t even want to think about how much time and money I have in it, but its just about perfect now for the tasks I need done. I probably could have bought a new import lathe for the same money, but this one has a bit of me in it after all the work and its always a conversation starter when someone drops by the shop. I really like the hints of “art-deco” styling in the castings and the way the paint accentuates the curves and shapes.

I just make things at home for myself (mainly car hobby stuff) so I don’t need a big 2,000 lb monster taking up too much space in my small shop.

Not in the pic is the solid plinth I made to replace the top compound. That was the biggests improvement (short of the dc motor) I made to the lathe. It made the whole process much more rigid and is one of the reasons I can part on this “little” lathe without chatter. trying to part with the top compound installed is a nightmare. I only install the top compound when I need it to perform a specific operation I can’t do with a solid plinth to hold my AXA QCTP.

Was a lot of work, but its in great shape now. I used it for a couple years just replacing worn parts as I went along before the full tear down and rebuild.

I have a 3d printer and printed some 3d ABS change gears for it. They work fine and even helped quiet down the gear train “ringing”. I would recommend them. I downloaded the 3d print files from thingiverse.com

I also have an original Atlas milling attachment. Ulmadoc on this forum sold it to me many years ago at a very reasonable price. It was useful before I bought a benchtop mill as it gave me some extended capabilities. But it was limited to small work or things like making key slots. I haven’t even installed it since buying the benchtop mill. I’ll probably strip it down and paint it like the rest of the lathe because it sits on the same bench behind the lathe and its mostly just for looks now.

But if you don’t have a mill or don’t plan to buy one in the near future, a milling attachment can be useful. Its just very limited in what it can accomplish.

The original Atlas ones seem to go for stupid money these days. Unless you run across a screaming deal, save your money for a mill further down the road and use the wait time to get some experience running that lathe. That experience will also serve you well if you do buy a mill later down the road.
 
Last edited:
I went from this:

to this:

after finding the the rusting hulk in a scrap yard. It look time, some bench work and eBay surfing, but it was totally doable. By the way, find one of the Altas/Craftsman lathe manuals. The best book on learning to use a lathe for the amateur.
 
Old Atlas lathes are a rabbit hole for sure. Here’s how my Atlas 10” ended up:

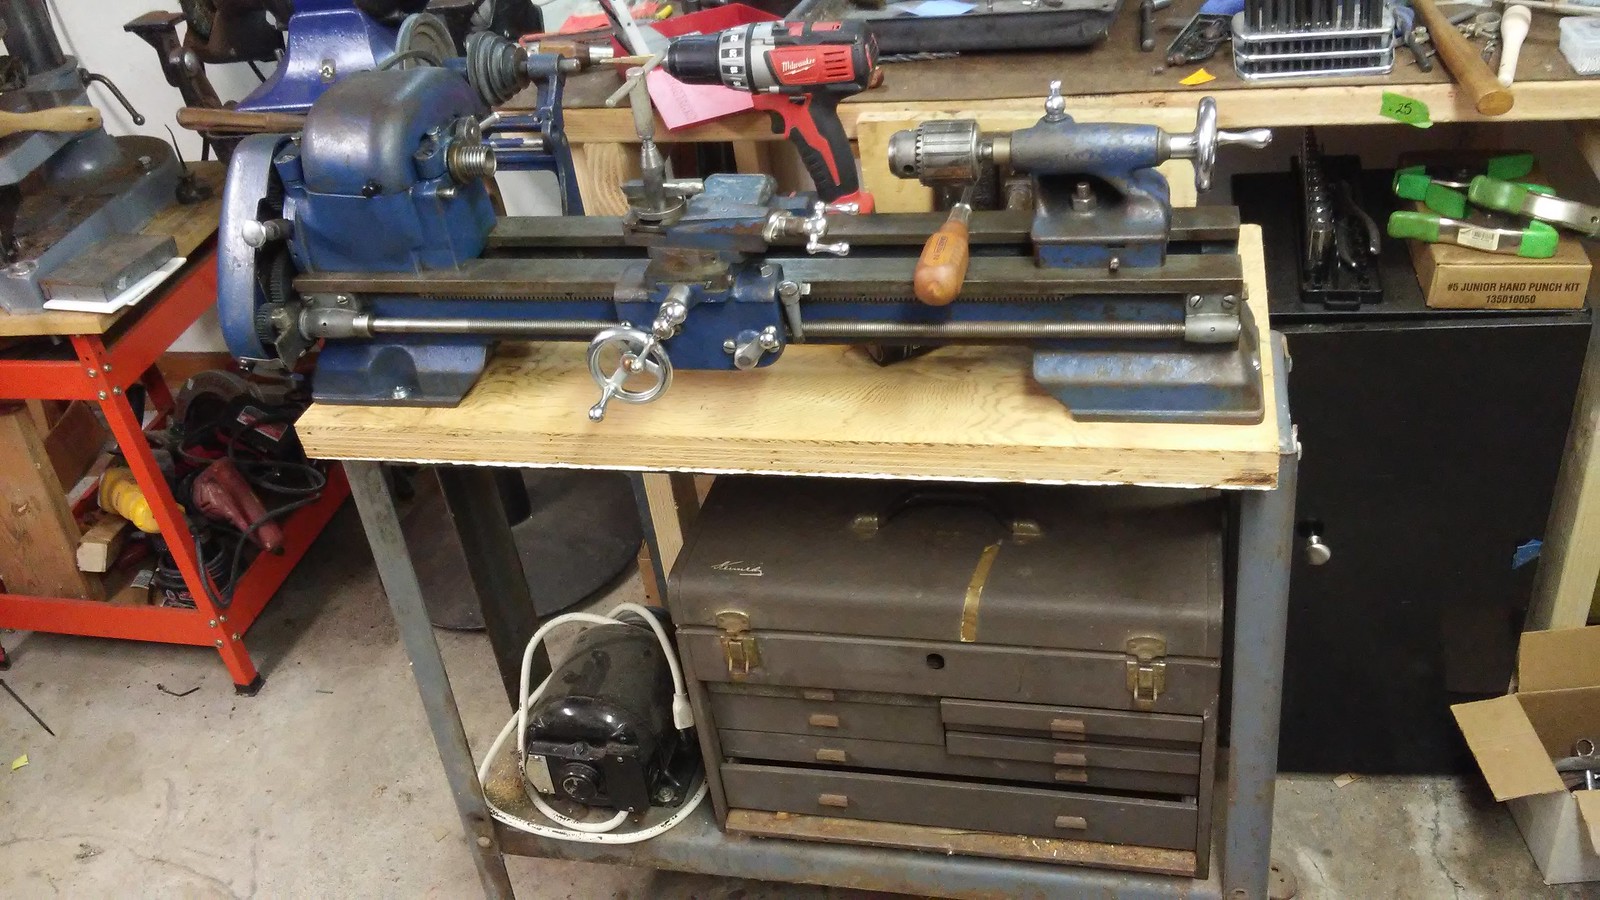
View attachment 458618

Full tear down and rebuild. Color was chosen simply because I like it. Spray can, Rustoleum metallic turquoise. Dc motor conversion with variable speed control and jog. I do have a reverse switch on it, but don’t use it often because its a thread on chuck.

I don’t even want to think about how much time and money I have in it, but its just about perfect now for the tasks I need done. I probably could have bought a new import lathe for the same money, but this one has a bit of me in it after all the work and its always a conversation starter when someone drops by the shop. I really like the hints of “art-deco” styling in the castings and the way the paint accentuates the curves and shapes.

I just make things at home for myself (mainly car hobby stuff) so I don’t need a big 2,000 lb monster taking up too much space in my small shop.

Not in the pic is the solid plinth I made to replace the top compound. That was the biggests improvement (short of the dc motor) I made to the lathe. It made the whole process much more rigid and is one of the reasons I can part on this “little” lathe without chatter. trying to part with the top compound installed is a nightmare. I only install the top compound when I need it to perform a specific operation I can’t do with a solid plinth to hold my AXA QCTP.

Was a lot of work, but its in great shape now. I used it for a couple years just replacing worn parts as I went along before the full tear down and rebuild.

I have a 3d printer and printed some 3d ABS change gears for it. They work fine and even helped quiet down the gear train “ringing”. I would recommend them. I downloaded the 3d print files from thingiverse.com

I also have an original Atlas milling attachment. Ulmadoc on this forum sold it to me many years ago at a very reasonable price. It was useful before I bought a benchtop mill as it gave me some extended capabilities. But it was limited to small work or things like making key slots. I haven’t even installed it since buying the benchtop mill. I’ll probably strip it down and paint it like the rest of the lathe because it sits on the same bench behind the lathe and its mostly just for looks now.

But if you don’t have a mill or don’t plan to buy one in the near future, a milling attachment can be useful. Its just very limited in what it can accomplish.

The original Atlas ones seem to go for stupid money these days. Unless you run across a screaming deal, save your money for a mill further down the road and use the wait time to get some experience running that lathe. That experience will also serve you well if you do buy a mill later down the road.
Wow! Looks fantastic!!
I agree, I prefer not to buy a Chinese lathe, or Chinese anything, really. Plus, I'll learn about the lathe tearing it down, cleaning it and reassembling it. And absolutely, the art deco notes in the design are very cool.
My compound is in terrible, rough shape. One of the flanges making up the T- slot has been broken clean off and is patched back on with machine screws and some brazing. I'm keeping my eyes peeled for a replacement, I'd rather not pay the $150 that seems to be the going rate right now.
 
I went from this:

to this:

after finding the the rusting hulk in a scrap yard. It look time, some bench work and eBay surfing, but it was totally doable. By the way, find one of the Altas/Craftsman lathe manuals. The best book on learning to use a lathe for the amateur.
So cool. You found it in a scrap yard? Nice! What a piece you've saved from oblivion.
I consider that a service to mankind, TBH.
A preservation of history, resources, and the human labor invested in producing the tool.
And, now you've obviously invested that much more bringing it back from the brink.
These machines have so much inherent character, and they only gain more from the attention of those who appreciate them.
 
Wow! Looks fantastic!!
I agree, I prefer not to buy a Chinese lathe, or Chinese anything, really. Plus, I'll learn about the lathe tearing it down, cleaning it and reassembling it. And absolutely, the art deco notes in the design are very cool.
My compound is in terrible, rough shape. One of the flanges making up the T- slot has been broken clean off and is patched back on with machine screws and some brazing. I'm keeping my eyes peeled for a replacement, I'd rather not pay the $150 that seems to be the going rate right now.

This is the common flaw with "raise from the dead" machine projects, the fixing can easily add up to or even exceed the price of a really nice example. With $1000 being about the upper end of pricing for these particular lathes and $500-600 being pretty common for a decent one, at your starting point of just over $100, you've got some room to get there but not a lot.

So long as you look at the project as part of the experience, then the end price is not so important and you will have a nice little lathe with an above average personal connection. Striping down, cleaning and making repairs can provide a lot of education towards understanding how the machine works.

If looked at as a cost savings or worse an investment, these kinds of projects often fall well short.

Looks like you are taking the learn from it angle.
 
Wow! Looks fantastic!!
I agree, I prefer not to buy a Chinese lathe, or Chinese anything, really. Plus, I'll learn about the lathe tearing it down, cleaning it and reassembling it. And absolutely, the art deco notes in the design are very cool.
My compound is in terrible, rough shape. One of the flanges making up the T- slot has been broken clean off and is patched back on with machine screws and some brazing. I'm keeping my eyes peeled for a replacement, I'd rather not pay the $150 that seems to be the going rate right now.
Take the top compound off and make yourself a solid plinth:

fr_4346.jpg

It's just a piece of round stock turned to size, a recess in the bottom for the cross slide dovetail and a threaded hole in the top for the QCTP bolt. Couple threaded holes for the cinch pins and you're good to go.

Then get a QCTP and getting your tooling "on center" is a doodle. My 10" uses an AXA QCTP, bu tI think a 618 needs a slightly smaller 0XA QCTP. A bit more uncommon, but should also cost a bit less.

With that done, you'll have a more usable lathe (or at least easier to use) and you can take your time to source a new/used top compound slide at a price you can live with.

Sadly, you're unlikely to find one much less than 150 bucks, but you never know if you're patient enough about it.
 
Take the top compound off and make yourself a solid plinth:

View attachment 458669

It's just a piece of round stock turned to size, a recess in the bottom for the cross slide dovetail and a threaded hole in the top for the QCTP bolt. Couple threaded holes for the cinch pins and you're good to go.

Then get a QCTP and getting your tooling "on center" is a doodle. My 10" uses an AXA QCTP, bu tI think a 618 needs a slightly smaller 0XA QCTP. A bit more uncommon, but should also cost a bit less.

With that done, you'll have a more usable lathe (or at least easier to use) and you can take your time to source a new/used top compound slide at a price you can live with.

Sadly, you're unlikely to find one much less than 150 bucks, but you never know if you're patient enough about it.
Oh that's clever
 
Back
Top