

-
Welcome back Guest! Did you know you can mentor other members here at H-M? If not, please check out our Relaunch of Hobby Machinist Mentoring Program!
You are using an out of date browser. It may not display this or other websites correctly.
You should upgrade or use an alternative browser.
You should upgrade or use an alternative browser.
PM30 CNC conversion begins
- Thread starter theNOTORIOUSmo
- Start date
- Joined
- Jun 25, 2020
- Messages
- 26
It's only been December of 21 since I last updated this! So 8 months. I was a little worried when I saw 2 years as I didn't think I've procrastinated that much.
As for progress, I've gotten the servo and driver working. Just took 2 drivers and almost 4 months due to shipping time. decided on a 7500 top speed (just to keep it in the constant torque range) so I have the 100 to 40 htd pulleys. belt and spindle bearings are also on hand. Just need to make the motor mounts and that will be it.
Having a second kid at the end of December, and getting slammed at work has really eaten at my free time. And what time I do have with the machine, I'm making small batches of parts for stuff I sell so I don't want it down.
My goal is when I take a week or two off in November I will get the mounts done, rewire the cabinet, and finally drop mach3 for Linuxcnc.
So this will happen, along with a high speed secondary spindle which is why i dropped the 10k idea. Just need life to stop getting in the way...
Last edited:
My apologies! I had reached page 4 of 4 and saw no further appends after the one that I referenced. But now that you've responded and I look again at this forum, I can see and catch up with several more appends since then. Weird, but again THANKS.
And congrats on the second kid.")
Heading off on 2 weeks of vacation tomorrow, and will catch up when I return.
And congrats on the second kid.
Heading off on 2 weeks of vacation tomorrow, and will catch up when I return.
- Joined
- Jun 25, 2020
- Messages
- 26
Well i'd figure i would update this to keep it alive and show i haven't failed miserably yet. It's been almost a year since i started buying parts and i am now finally getting around to doing this. For starters, I finally got rid of mach 3 and am finally going with LinuxCNC. Looking back, i should of just done that in the beginning. But with going to LinuxCNC, that means i need to redo the cabinet. And to help out the next guy who will probably have to trouble shoot something if it goes wrong (that guy being me!) I am taking the time to label everything and make it look better.
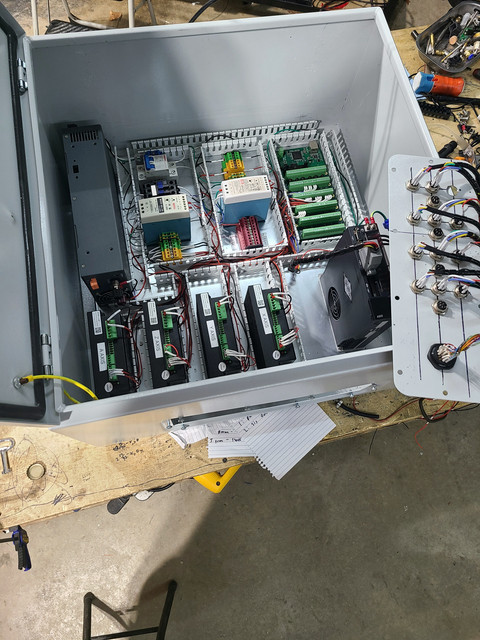
I forgot how long this takes. And even using a much bigger enclosure, i feel like im already out of room. I'll post a wiring diagram once i make. doing it mostly for me so i can tape it in there, but also incase anyone wants it to help them out.
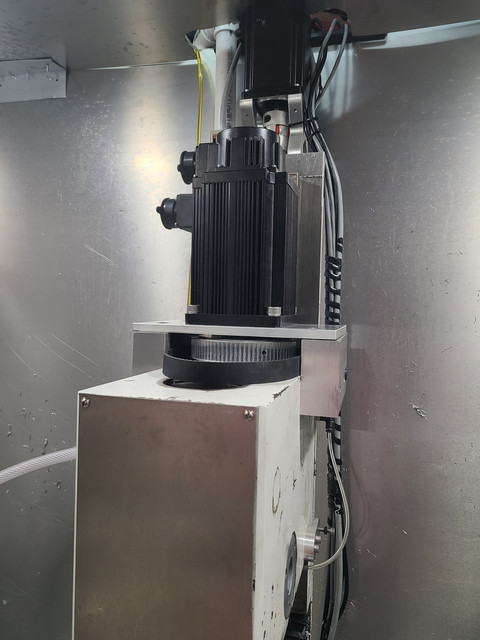
The other big part is that i made simple mounts for the motor to go up top. They are nothing special and definitely don't look fancy at all, but they do get the job done and i added tramming screws into them so i don't have to tap the head into alignment anymore.
Finally the most important piece of this is the spindle. After taking the spindle completely apart, i realized that the upper part that drives the splines and lets the quill go up and down only uses maybe an inch of it at the bottom. Seeing that and knowing that i dissembled the quill a long time ago, i went with a different route. I decided to turn the splines down so i can drive it directly from a pully and completely get rid of the backlash now.
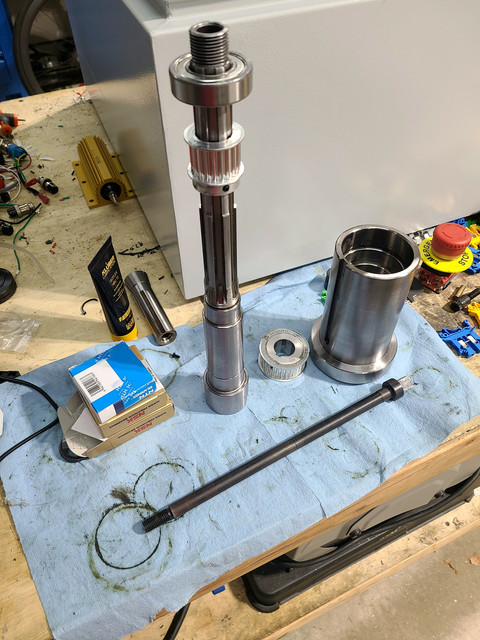
The pully on there is a 20t and the drive pully is an 80. But i had to take so much material out of the 20t pully that there really isn't enough room to broach it out to shove a key in there comfortably. Its a nice press fit on there, but having a key instead of just setscrews on there just makes me feel better. So i may go with the 100t and 25t pully i got as a backup to keep the ratio to an even number. That integer multiple will allow me to use the index pulse if i ever decided to start rigid tapping (not sure if that is necessary for normal tapping or only required if peck tapping?). Last change to the spindle is that I also will be adding a bearing on the top to help support the shaft. A plus with that is that it will give me the added benefit of having a place to mount an air cylinder for a power drawbar.
That's really it for the update for now. This project is still alive and i would like to get this thing up and running before spring comes around. Once i get done with the wiring which is the easy part, i'll move onto trying to configure the 7i95. There isn't too much documentation on this board, so i'll throw up those files too incase anyone can use them
I forgot how long this takes. And even using a much bigger enclosure, i feel like im already out of room. I'll post a wiring diagram once i make. doing it mostly for me so i can tape it in there, but also incase anyone wants it to help them out.
The other big part is that i made simple mounts for the motor to go up top. They are nothing special and definitely don't look fancy at all, but they do get the job done and i added tramming screws into them so i don't have to tap the head into alignment anymore.
Finally the most important piece of this is the spindle. After taking the spindle completely apart, i realized that the upper part that drives the splines and lets the quill go up and down only uses maybe an inch of it at the bottom. Seeing that and knowing that i dissembled the quill a long time ago, i went with a different route. I decided to turn the splines down so i can drive it directly from a pully and completely get rid of the backlash now.
The pully on there is a 20t and the drive pully is an 80. But i had to take so much material out of the 20t pully that there really isn't enough room to broach it out to shove a key in there comfortably. Its a nice press fit on there, but having a key instead of just setscrews on there just makes me feel better. So i may go with the 100t and 25t pully i got as a backup to keep the ratio to an even number. That integer multiple will allow me to use the index pulse if i ever decided to start rigid tapping (not sure if that is necessary for normal tapping or only required if peck tapping?). Last change to the spindle is that I also will be adding a bearing on the top to help support the shaft. A plus with that is that it will give me the added benefit of having a place to mount an air cylinder for a power drawbar.
That's really it for the update for now. This project is still alive and i would like to get this thing up and running before spring comes around. Once i get done with the wiring which is the easy part, i'll move onto trying to configure the 7i95. There isn't too much documentation on this board, so i'll throw up those files too incase anyone can use them
Last edited:
- Joined
- Dec 26, 2015
- Messages
- 2,079
What a fun project. I will follow it with interest.Well i'd figure i would update this to keep it alive and show i haven't failed miserably yet. It's been almost a year since i started buying parts and i am now finally getting around to doing this. For starters, I finally got rid of mach 3 and am finally going with LinuxCNC. Looking back, i should of just done that in the beginning. But with going to LinuxCNC, that means i need to redo the cabinet. And to help out the next guy who will probably have to trouble shoot something if it goes wrong (that guy being me!) I am taking the time to label everything and make it look better.
I forgot how long this takes. And even using a much bigger enclosure, i feel like im already out of room. I'll post a wiring diagram once i make. doing it mostly for me so i can tape it in there, but also incase anyone wants it to help them out.
The other big part is that i made simple mounts for the motor to go up top. They are nothing special and definitely don't look fancy at all, but they do get the job done and i added tramming screws into them so i don't have to tap the head into alignment anymore.
Finally the most important piece of this is the spindle. After taking the spindle completely apart, i realized that the upper part that drives the splines and lets the quill go up and down only uses maybe an inch of it at the bottom. Seeing that and knowing that i dissembled the quill a long time ago, i went with a different route. I decided to turn the splines down so i can drive it directly from a pully and completely get rid of the backlash now.
The pully on there is a 20t and the drive pully is an 80. But i had to take so much material out of the 20t pully that there really isn't enough room to broach it out to shove a key in there comfortably. Its a nice press fit on there, but having a key instead of just setscrews on there just makes me feel better. So i may go with the 100t and 25t pully i got as a backup to keep the ratio to an even number. That even multiple will allow me to use the index pulse if i ever decided to start rigid tapping (not sure if that is necessary for normal tapping or only required if peck tapping?). Last change to the spindle is that I also will be adding a bearing on the top to help support the shaft. A plus with that is that it will give me the added benefit of having a place to mount an air cylinder for a power drawbar.
That's really it for the update for now. This project is still alive and i would like to get this thing up and running before spring comes around. Once i get done with the wiring which is the easy part, i'll move onto trying to configure the 7i95. There isn't too much documentation on this board, so i'll throw up those files too incase anyone can use them
- Joined
- Jun 25, 2020
- Messages
- 26
Yep. When I used the angle, I for some reason treated it like square tubing and measured it off from the top. So i was short about 3 inches... or at least that is the only thing I can think of how I messed that up. I did make a cover for it to seal that hole up, but when I realized that I would have to cut all the connectors and splice them back together to put them through cable glands. Just didn't seem worth it.
As for the pvc, I am debating on just using a pass through for the flood and the one-shot system so it goes up from the tray. But will probably hold off until something leaks. Hopefully it will never as that is low on the list of things I feel like doing.
As for the pvc, I am debating on just using a pass through for the flood and the one-shot system so it goes up from the tray. But will probably hold off until something leaks. Hopefully it will never as that is low on the list of things I feel like doing.
- Joined
- Apr 14, 2022
- Messages
- 2
@theNOTORIOUSmo you ever get it working with linuxcnc? I'd love to see the hal/ini/etc, if you'd be willing to share. I've also got a pm30 with cl86t's, and probably the same 5mm pitch screws you do.
- Joined
- Jun 25, 2020
- Messages
- 26
It was working great when I had it, but unfortunately about 9 months ago there was a fire and I pretty much lost everything. Ill try to see if I saved it to a cloud account. But I think my backup was on a separate PC which was destroyed.@theNOTORIOUSmo you ever get it working with linuxcnc? I'd love to see the hal/ini/etc, if you'd be willing to share. I've also got a pm30 with cl86t's, and probably the same 5mm pitch screws you do.