

-
Welcome back Guest! Did you know you can mentor other members here at H-M? If not, please check out our Relaunch of Hobby Machinist Mentoring Program!
You are using an out of date browser. It may not display this or other websites correctly.
You should upgrade or use an alternative browser.
You should upgrade or use an alternative browser.
POTD- PROJECT OF THE DAY: What Did You Make In Your Shop Today?
- Thread starter wachuko
- Start date


- Joined
- Dec 18, 2019
- Messages
- 6,470
That's coming out very well!I ended up with a 3/8"x12"x12" plate...
View attachment 395177
View attachment 395179
All leveled and ready to tag weld....
View attachment 395174
View attachment 395175
View attachment 395176
Have to confess, had to stifle a laugh when I saw the carpenters level (having struggled with leveling my lathe). A carpenter's level and a machinist's level are so different in sensitivity. But for this use, a carpenter's level is fine. Is the table that the saw is sitting on level? Might want to check that first before tacking.
- Joined
- Aug 6, 2015
- Messages
- 3,900
Yes, yes... the table is leveled, hahahahaha... I did check that firstThat's coming out very well!
Have to confess, had to stifle a laugh when I saw the carpenters level (having struggled with leveling my lathe). A carpenter's level and a machinist's level are so different in sensitivity. But for this use, a carpenter's level is fine. Is the table that the saw is sitting on level? Might want to check that first before tacking.
") I laugh because I checked AFTER setting everything up... But yeah, looks like I did level it when I made it and installed it there... home made workbench...
I laugh because I checked AFTER setting everything up... But yeah, looks like I did level it when I made it and installed it there... home made workbench... And yes, for this purpose, any level would have been fine... I just needed it in the ballpark...
- Joined
- Mar 23, 2021
- Messages
- 357
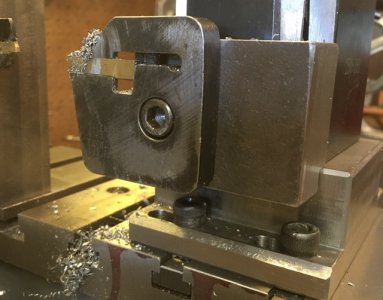
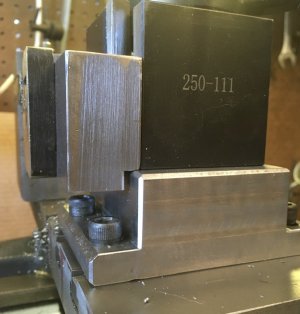
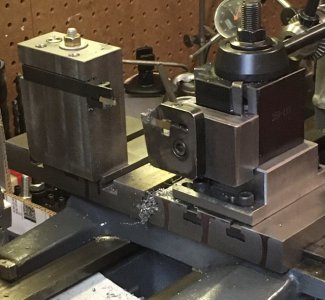
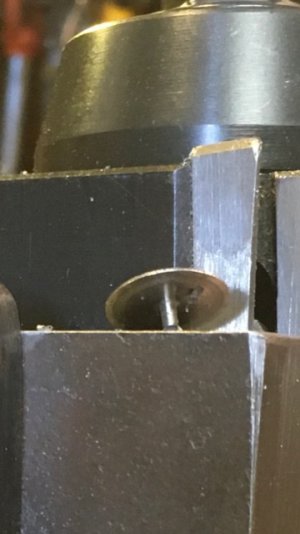
Made myself a carriage stop.
Most of the time I’m not using the prox. stop that Mark made for me, and when it’s on the way it tends to activate when lots of chips are falling in its path. So I end up keeping it hanging off the chip drawer below unless I’m using it.
I wanted this stop mainly as a safety device just so I don’t inadvertently crash should I get side tracked, or as I did last time when I be grabbed the wrong handle
I didn’t need the adjustable aspect of it, but I did need an offset so it’s not hitting the way wiper first. Threaded it at 20 tpi so it’s .050 per revolution should I need to know for some reason. Doubt I ever will, but it was fun to make the addition non the less.
The block is aluminum and the plate is steel with a registration pin to keep it from spinning. I just used the basic dimensions of the PM stop as a guide.
I am also going to put a lever handle bolt on the prox. stop as I'm tired of having to grab a wrench every time it needs moved.
- Joined
- Aug 6, 2015
- Messages
- 3,900
That came out amazing!! How many did you make? I need one...Made myself a carriage stop.
Most of the time I’m not using the prox. stop that Mark made for me, and when it’s on the way it tends to activate when lots of chips are falling in its path. So I end up keeping it hanging off the chip drawer below unless I’m using it.
I wanted this stop mainly as a safety device just so I don’t inadvertently crash should I get side tracked, or as I did last time when I be grabbed the wrong handle
I didn’t need the adjustable aspect of it, but I did need an offset so it’s not hitting the way wiper first. Threaded it at 20 tpi so it’s .050 per revolution should I need to know for some reason. Doubt I ever will, but it was fun to make the addition non the less.
The block is aluminum and the plate is steel with a registration pin to keep it from spinning. I just used the basic dimensions of the PM stop as a guide.
I am also going to put a lever handle bolt on the prox. stop as I'm tired of having to grab a wrench every time it needs moved.
View attachment 395185
View attachment 395186
View attachment 395187
View attachment 395188

Last edited:
- Joined
- Aug 6, 2015
- Messages
- 3,900
I am done for now... welded, edges deburred, corners rounded... I also filed in a v-shape where the blade enters...


Later in the week I will remove it and then give a coat of paint to the bracket and under the table, leaving the top bare metal...
Maybe later I will make some jacks to place in the back corners??

Later in the week I will remove it and then give a coat of paint to the bracket and under the table, leaving the top bare metal...
Maybe later I will make some jacks to place in the back corners??
- Joined
- Dec 3, 2017
- Messages
- 1,916
I made another parting tool holder. I bought this insert holder years ago. I don't know what it belongs on, but at one time I had a holder made for it. I used to use it all the time. So when the larger lathe went away, I kept it. But evidently the holder it was on wasn't suitable. So I made this one today. I'm always looking to avoid anything extra on a tool. Building it to the correct height at the start, means I never have to set height again. It also means I avoided drilling and tapping five holes. I tried it already of course. It works like a charm. Thanks for looking.
Attachments
- Joined
- Oct 7, 2020
- Messages
- 2,116
Nice work Jake, looks great!Made myself a carriage stop.
Most of the time I’m not using the prox. stop that Mark made for me, and when it’s on the way it tends to activate when lots of chips are falling in its path. So I end up keeping it hanging off the chip drawer below unless I’m using it.
I wanted this stop mainly as a safety device just so I don’t inadvertently crash should I get side tracked, or as I did last time when I be grabbed the wrong handle
I didn’t need the adjustable aspect of it, but I did need an offset so it’s not hitting the way wiper first. Threaded it at 20 tpi so it’s .050 per revolution should I need to know for some reason. Doubt I ever will, but it was fun to make the addition non the less.
The block is aluminum and the plate is steel with a registration pin to keep it from spinning. I just used the basic dimensions of the PM stop as a guide.
I am also going to put a lever handle bolt on the prox. stop as I'm tired of having to grab a wrench every time it needs moved.
View attachment 395185
View attachment 395186
View attachment 395187
View attachment 395188
- Joined
- Jul 14, 2017
- Messages
- 2,448
Today i found couple of hours to spare and spent them in the big garage working on the scenic. Little by little managed to drag the body over the drive train. Had to use pry bars to move it in place and managed to bolt it down. Now i need to connect everything to the engine.


- Joined
- May 13, 2019
- Messages
- 1,016
I made a mounting plate for my rotary table so I could mount my 4-jaw lathe chuck.
Top of plate with chuck.

Back of plate.

Mounted on rotary table.

Top of plate with chuck.
Back of plate.
Mounted on rotary table.