POTD- PROJECT OF THE DAY: What Did You Make In Your Shop Today?

It takes a lot of power to mark or cut metal. The run of the mill blue laser heads aren't going to get there.

I've run a couple of 1064nm (not um) spot welding lasers. These come with a microscope head with cross-hairs in them. Have welded copper, inconol, steel, and other somewhat exotic metals with them. But the peak power is stupid high. You crank it up high enough and turn the spot size down (.5mm dia) you can punch a hole through a 3/16 allen wrench in two or three hits. Just blows right through.

There is/was a crazy russian guy making Diode pumped (DPSS) NdYAG laser heads for CNC machines. I almost bought one, but the war in Ukraine happened, and that fell through. The average output power of that was 10W, but peak power 50KW. You could cut 1mm or 2mm copper, brass, stainless etc. You could also mark stainless. The safety aspect of running a long focal length 50KW+ laser in the home shop was enough of a concern that I'm sort of relieved it fell through. It would have been nice to be able to laser cut thin sheet metal at home...
 
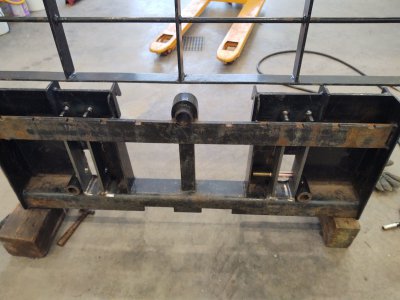
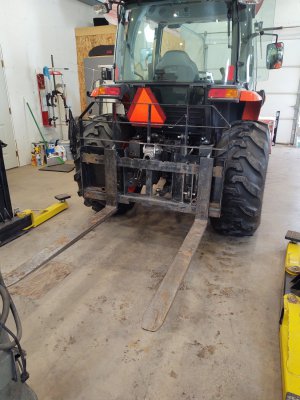
Today I actually completed a project! (As opposed to just fiddling around!) Finished adapting the bobcat quick disconnect forks for the loader to 3Pt attach also. Wit the blower on the tractor, can't use the forks in the winter. That, and the lift capacity of the forks on the loader is sometimes a limiting factor for moving things.
Plates.jpg

Had some 3/8 plate plasma cut, and made a couple of 7/8 pins from grade 8 bolts. Cut some holes, and welded them into the frame Then built the top link attach point. Decided to add a extra link on the top link so it could flex, which would allow the forks to tip 'up hill' if necessary (for grabbing something off a slight incline). The hardest part was getting the four bar linkage correct and not messing with the rest of the functionality. Didn't want to loose the bale spear or supports, or be in the way for the bobcat QC hardware.
Forks.jpg

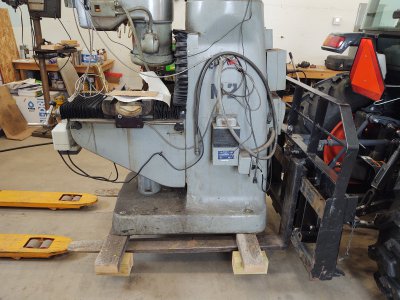
Moment of truth was seeing how it lifted a bridgeport. It didn't even blink. I've had trouble moving this mill with the tractor before. It's at the max capacity of the loader from above choked up on it. Now I should be able to idle it from here back to the house shop when it's done.
Lift.jpg

It won't go really high, maybe 18". But that's plenty for most things that need to be moved from one place to another when there's snow on the ground.
 
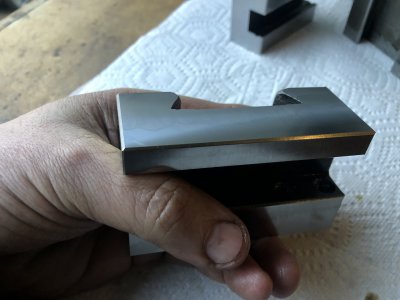
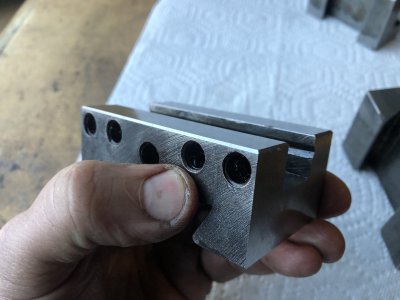
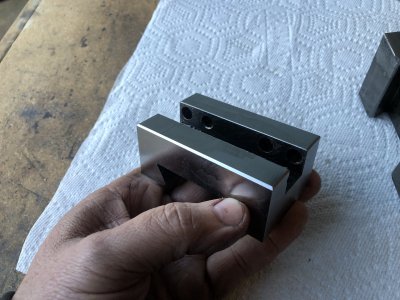
@mattthemuppet2 gifted me three quality CXA tool holders which had some pitting.

Today I carefully face milled & chamfered most of the sides. Part of this involved face milling off “Yuasa” and “Japan” markings.

I did not mess with the dovetails, & the top of the tool holders were not pitted (and thus did not require face milling).

I still need to chamfer a few edges, & then gun blue these tool holders.

1F0B7D89-41AC-42B9-BD04-C5B7DB7E3551.jpeg

D7D3D04E-20F2-4948-BE42-8FA7021CDEFA.jpeg

AE3CC476-F13E-4120-9ED0-0DE9EB588375.jpeg

Question:

How do I prep the sides that are already factory gun blued (or “factory oxide finished”) when I go to gun blue the workpiece?
 
Last edited:
So, been looking for a Harig punch grinder for a while. Just couldn't manage to find one for a good price. Also been watching the cheapo chinese punch grinders. Some have been getting good reviews. Well, now there's a rash of units that look like absolute junk for less money. Bit the bullet and bought one of the last ones that looked well made.

Free shipping, and a 30 days return window, how bad can it be? It finally showed up. Left it in the box to warm for a day and started looking at it yesterday. Was surprised to see it has a rack/pinion drive for the V block. Fit and finish are actually very nice. Grinding looks really good, it operates smoothly. Until I tried to move the V block. It was tight, which is actually what I was hoping for. That I can hone to fit, loose is a much bigger problem. Spent a few minutes honing the sides of the V block down (same on each side) on a 600 grid diamond plate. Got it to move real nice.

Tonight is the moment of truth. Throw it on the surface plate and start checking it out. Big concern is the v block squareness, and how well its centered (esp. considering I honed the sides). Well, let's just say it won't be going back.
View attachment 435231

"Left to Right" (90 to -90) it appears to be within a fraction of a tenth. Dialed in, the runout on a carbide endmill appears to be a tenth. But honestly I think that might be the endmill. Some of the runout seems to move a when rotating the endmill. Clamping pressure might be bowing it, I think it's slighty tapered, and other oddness might be going on. In any case, I'm having trouble finding anything wrong with this thing. So, yeah very pleased. Everything that needs to be good is pretty darn good. (Maybe not quite as good as a harig, but it's probably better than me on the surface grinder! lol)

The T slot nut to hold the V block in place is a little rough. I'll probably surface grind that, and maybe have to hone the T slot face just a little bit. Might lap the nut to the T slot. Probably replace the few screws with quality hardware, but overall for the price Zero complaints.


Then, someone handed me a bag 'o goodies today. Looks like a Michelson Optical interferometer. Bummer is it's missing two very fine pitch screws on the fixed mirror. Those may be hard to find, or even make! #6-80 or something stupid.
View attachment 435232
Can you share a link to the one you purchased? Thanks
 
Tuba players who use large instruments (by tuba standards) often prefer to use a short stand so they don’t have to hold the instrument in their lap. The best of these are made by a German company, König & Meyer, and by a job shop for a music store in Baltimore that serves the pro market. I have one of each, and prefer parts of each.

A tuba-playing friend also prefers the saddle from K&M and the stand from Baltimore Brass. The BB saddle is plastic with a foam pad, while K&M is steel dipped in heavy rubber. But these are not interchangeable. It’s not hard to adapt them, but my friend is not handy. I offered to make an adapter for him.

The tubing used in the stand is 3/4” OD steel tubing with an inside diameter a bit less than 5/8”. The opening in the K&M saddle is 0.640”.

I pondered just drilling out the K&M saddle to make it fit over a 3/4” tube. But the hole in the saddle has a square bottom and would have to be plunge-reamed to keep the bottom of the hole square. I could have done that, but my reamers only go up to 5/8”. And a 3/4” reamer would not fit in either my drill press chuck or in the tailstock of the lathe. And fixturing the saddle to bore it out wouldn’t be easy—it’s rubber-covered and no way to clamp it down rigidly. And, of course, I don’t own a mill.

So, I made an adapter in the lathe from 3/4” 12L14 stock. It fits inside the tubing and is secured there with a taper pin. And the part that sticks up out of the stand has very little slop inside the K&M saddle.

Hot off the lathe:
IMG_9986-dsqz.JPG


In my friend’s K&M saddle:
IMG_9987-dsqz.JPG


This part goes inside the tube of the stand. It was a zero-clearance light press fit, but I didn’t want it working loose and installed a taper pin.
IMG_9988-dsqz.JPG


I used Brownell’s gun bluing to hide the taper pin. The pin is a standard No. 2 taper pin, hammered in place and then trimmed and ground smooth.
IMG_9992-dsqz.JPG


IMG_9997-dsqz.JPG


Here it is in the application:
IMG_9999-dsqz.JPG


Holding my own large tuba:
IMG_0001-dsqz.JPG


Rick “a Saturday quickie” Denney
 
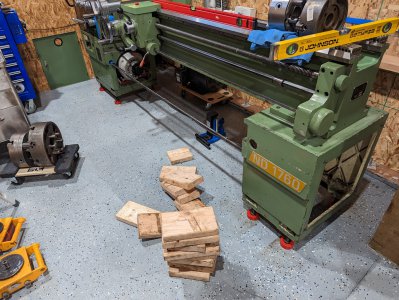
Today I finally (finally) got the lathe set down. I sourced some special M24x1 jack screws and ground the heads conical on the Sheckel, then turned some biscuits from steel with a conical recess to match. Now I have fancy machine feet for my uneven concrete! No more wood blocks, baby. I roughed it in with some carpenter's levels (well, the yellow one is from Austria and the red one is German, and the two agree by ein haar- must be the common language). I think I got 3 hours of push-ups, sit-ups, low crawl, crab walk, bear crawl, and whatever else the coach could think up in the process. Eventually, my Starrett 98-6 said I done good across 16 points, and I'm ready hit the recliner.

PXL_20230129_220604169.jpg
 
@mattthemuppet2 gifted me three quality CXA tool holders which had some pitting.

Today I carefully face milled & chamfered most of the sides. Part of this involved face milling off “Yuasa” and “Japan” markings.

I did not mess with the dovetails, & the top of the tool holders were not pitted (and thus did not require face milling).

I still need to chamfer a few edges, & then gun blue these tool holders.

View attachment 435428

View attachment 435429

View attachment 435426

Question:

How do I prep the sides that are already factory gun blued (or “factory oxide finished”) when I go to gun blue the workpiece?
wow, those look so much better than when I pulled them out of the bucket of oil and whoknowswhat that I found them in! I would black oxide them instead of gun blue, I think it makes for a more durable and oil retaining coating. Ammonium nitrate in boiling water works really well. For prep, wire wheel the old surfaces and clean everything thoroughly with degreaser, then dawn dish soap, then acetone and then isopropyl alcohol.
 
Today I finally (finally) got the lathe set down. I sourced some special M24x1 jack screws and ground the heads conical on the Sheckel, then turned some biscuits from steel with a conical recess to match. Now I have fancy machine feet for my uneven concrete! No more wood blocks, baby. I roughed it in with some carpenter's levels (well, the yellow one is from Austria and the red one is German, and the two agree by ein haar- must be the common language). I think I got 3 hours of push-ups, sit-ups, low crawl, crab walk, bear crawl, and whatever else the coach could think up in the process. Eventually, my Starrett 98-6 said I done good across 16 points, and I'm ready hit the recliner.

View attachment 435440
So were you able to turn the lathe with your machine skates? It looks like you have modified them.
 
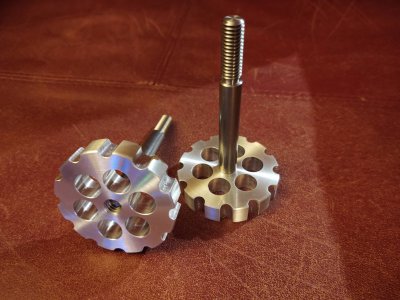
Close to a year ago I installed a DRO on my Grizzly 8x30 knee mill. I chose to put the X axis scale on the operators side of the table to avoid losing any Y axis travel. That has been fine, however it made access to the table locks really awkward as they were under the scale. So today's project was to make a couple of extended table locks...

IMG_20230129_185832311.jpg

I think a ball end mill would be the right way to cut the gripper indentations, but I only have a 7/8" one, so I cut these by plunging and end mill. This left a pretty poor surface finish. I'll probably do some more hand work to clean them up. I'm gathering materials to get set up for anodizing, and I expect these to be the first parts I'll try to anodize.

-Pete
 
Back
Top