

- Joined
- Dec 20, 2021
- Messages
- 894
This probably isn't very clear from the pictures. Once the whole thing is together it may make more sense.
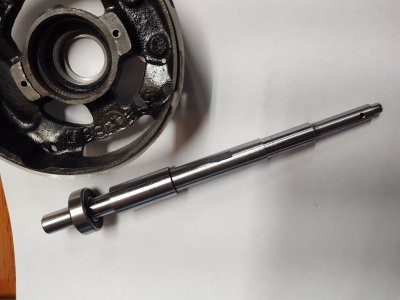
It's a custom RustyBolt-ImpactSocket-SubaruTimingIdlerPulley-LugNut-Recessed-Light-tumbler hub (fidget spinner).


It's drive hub made with spare/scrap junk for the tumbler project. Digging around the junk boxes, came up with a bunch of junk to make a drive hub for a 5 gallon bucket to make a the tumbler I've been trying to hack together. The concept started here when I stumbled across an aluminum recessed light.

And quickly morphed into a hex driven drive hub with this junk from the scrap bin.


And with a little turning, the rear bearing support, made from an old impact socket, lug nut, and subaru timing belt idler pulley.
The socket presses into the idler pulley recess.

This whole contraption should support the rear of the bucket. The front will be supported on two rollers.
Hopefully the gearbox drive, and shaft modification hold up (from earlier). I'll replace the small screws with some bolts or some big GRK screw once the geometry is settled.

Last thing to come up with is a flex coupling from the gearbox to the bucket. I'll probably start with some rubber hose clamped on the gearbox output and the rusty bolt hex drive. Don't really want to buy anything and the load should be pretty light so hose might be ok. It only has to last last a few weeks, and then will probably sit on the shelf forever.
It's a custom RustyBolt-ImpactSocket-SubaruTimingIdlerPulley-LugNut-Recessed-Light-tumbler hub (fidget spinner).
It's drive hub made with spare/scrap junk for the tumbler project. Digging around the junk boxes, came up with a bunch of junk to make a drive hub for a 5 gallon bucket to make a the tumbler I've been trying to hack together. The concept started here when I stumbled across an aluminum recessed light.
And quickly morphed into a hex driven drive hub with this junk from the scrap bin.
And with a little turning, the rear bearing support, made from an old impact socket, lug nut, and subaru timing belt idler pulley.
The socket presses into the idler pulley recess.
This whole contraption should support the rear of the bucket. The front will be supported on two rollers.
Hopefully the gearbox drive, and shaft modification hold up (from earlier). I'll replace the small screws with some bolts or some big GRK screw once the geometry is settled.
Last thing to come up with is a flex coupling from the gearbox to the bucket. I'll probably start with some rubber hose clamped on the gearbox output and the rusty bolt hex drive. Don't really want to buy anything and the load should be pretty light so hose might be ok. It only has to last last a few weeks, and then will probably sit on the shelf forever.


 Mr. Cool as well.


