POTD- PROJECT OF THE DAY: What Did You Make In Your Shop Today?

My metal cutting bandsaw has crowned wheels with tires and uses a bearing just below the table to absorb the pressure from feeding material. I have had to replace the tires one each wheel once in 7 years or so and I do have to adjust the bearings from time to time and whenever I change blades (not often)
 
This one is a long time coming. Back in 2018, I bought a few 4"x4" beams about 8 feet long in order to make a table for my brother in law. The wood was all heavily weathered, so I couldn't possibly know what species I was buying. I bought about 10 beams, hoping I could cobble something together. Most was pine and spruce, and that went into building the table (with success). There were three beams that were walnut, and those were re-sawn and planed into 1/2" boards, squared up, and turned into panels. Some was darker walnut, some was pale, but both were gorgeous grain.

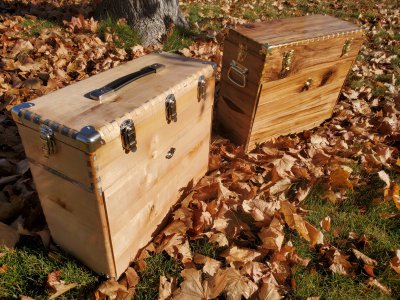
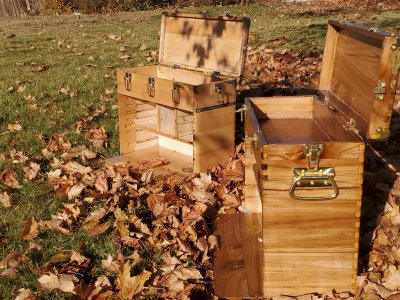
The panels were box jointed and cut to make two Gerstner-style chest carcasses (a third one is incomplete, but I might need to make the drawers for these two before I finish that one). There is absolutely no stain on these - it's a clear lacquer. The darker walnut had cracks filled with metallic gold epoxy (it was heavily weathered, so there were a lot of cracks), and used brass hardware to complete the shell. The pale walnut was done with nickel hardware and metallic silver epoxy to fill voids - and that one is really singing to me.

20231117_134950.jpg
20231117_135222.jpg

There are too many flaws in my opinion, such as gaps on the front panel fitment, a side board splitting out when gluing up so extra scores and cracks had to be done to repair that, and even me cutting a rabbet on the wrong side (see the silver stripe on the pale one above). Still, they are acceptable enough that I can get one of these turned into the gift it was intended for.

It was quite an ordeal to go from beams to custom made boards to panels to a final chest. I learned a lot, found a lot of tricks, and figured out how Gerstner does quite a bit of stuff, and that means I can do some repairs on my Gerstners if I need to. (I recently scored an un-used golden oak 52 from someone to go with my golden oak 42, and the 52 also had a B62 base - I think I have too many tool chests). The length of the project with my spare time kinda turned these into chores instead of fun projects, so I'm definitely glad this first phase is complete. I'm dreading doing drawers.

Now to finish the other carcass and make a lot of little tiny drawers.
 
This one is a long time coming. Back in 2018, I bought a few 4"x4" beams about 8 feet long in order to make a table for my brother in law. The wood was all heavily weathered, so I couldn't possibly know what species I was buying. I bought about 10 beams, hoping I could cobble something together. Most was pine and spruce, and that went into building the table (with success). There were three beams that were walnut, and those were re-sawn and planed into 1/2" boards, squared up, and turned into panels. Some was darker walnut, some was pale, but both were gorgeous grain.

The panels were box jointed and cut to make two Gerstner-style chest carcasses (a third one is incomplete, but I might need to make the drawers for these two before I finish that one). There is absolutely no stain on these - it's a clear lacquer. The darker walnut had cracks filled with metallic gold epoxy (it was heavily weathered, so there were a lot of cracks), and used brass hardware to complete the shell. The pale walnut was done with nickel hardware and metallic silver epoxy to fill voids - and that one is really singing to me.

View attachment 467154
View attachment 467155

There are too many flaws in my opinion, such as gaps on the front panel fitment, a side board splitting out when gluing up so extra scores and cracks had to be done to repair that, and even me cutting a rabbet on the wrong side (see the silver stripe on the pale one above). Still, they are acceptable enough that I can get one of these turned into the gift it was intended for.

It was quite an ordeal to go from beams to custom made boards to panels to a final chest. I learned a lot, found a lot of tricks, and figured out how Gerstner does quite a bit of stuff, and that means I can do some repairs on my Gerstners if I need to. (I recently scored an un-used golden oak 52 from someone to go with my golden oak 42, and the 52 also had a B62 base - I think I have too many tool chests). The length of the project with my spare time kinda turned these into chores instead of fun projects, so I'm definitely glad this first phase is complete. I'm dreading doing drawers.

Now to finish the other carcass and make a lot of little tiny drawers.
Wow. You are a harsh critic of your work. They look light years nicer than anything I could do. You should be proud of this, it's quite an accomplishment. I'd be tickled and eternally grateful to receive a gift like this. Not a hint, but wouldn't mind one at all!
 
Wow, they look super! It’s funny, we can spend a lot of energy being overly critical of our work, especially when we’re trying something new. It’s as if we somehow expect that since we’re skilled at “x” and “y” we should also be magically masterful at “z” too. We forget that everything new is a learning experience, and with those curves come a few hiccups along the way.

The chests are looking great, I’m sure anyone lucky enough to be a recipient of one would be honoured. :encourage:
 
I just noticed, it looks like you carved, or engraved your avatar into the front panel. Nice, more pics. How'd you do it?
 
Was looking around for one of these in the house and garage, and it simply vanished. I know I have (more than) one somewhere. What was it?

A valve core remover, like for automotive tires. I looked up some basic dimensions for a Schrader valve and was able to find dimensions for the valve but not the core. The core has a flat part and I couldn't get in and measure it. So I sort of bluffed it as I went along. A 1/16" slitting saw was not wide enough. Fortunately, I had left the tool in the vise on the mill and had a bicycle inner tube to try it on. So I opened up the slot by 0.020" by offsetting the saw +0.010 and -0.010". Then it fit! I then drilled out the end with a 0.081" drill for about 0.1" for some clearance for the button on the valve core.

Then I decided to knurl the end for a little more grip. Seeing as the 1144 rod was only 1/4" diameter, I used my knurler on my mini-lathe, which is a straddle knurler type. I don't yet have one for my 10x22. That's another project, but not for today.

So here it is. A couple hours in the shop, and I'm one of the few Stress proof valve core removers owners in the world! Probably ought to be committed, but you all understand the disease. :) No drawing, just free form and getting it to fit. No files were harmed in this design, steel or electronic!

Roughly the dimensions are 0.200" diameter, turned down for 0.250", then 0.160" diameter for 0.150". About an 0.082" wide slit maybe 0.140" deep. The knurling, beats me, I just did some and added a couple of rings spaced 0.220" apart, because that is what would work for me without moving the part in the ER collet.
View attachment 465990
Even after washing my hands a few times, that sulfured cutting oil stinks! I use that on my knurler, works great, but it do stink. It's hard to get my phone to focus on the right thing, so please excuse my finger.
View attachment 465995

Couple years ago, I made one from an old screwdriver. Found one that had the right diameter to fit inside the valve stem, and cut a slot with a cut off wheel. Works great, as long as I put it back in with the tire tools.


Sent from my iPhone using Tapatalk
 
I just noticed, it looks like you carved, or engraved your avatar into the front panel. Nice, more pics. How'd you do it?
I picked up a laser engraver on Amazon, and used that to do the "inlay". The burn on the logo made the sooner epoxy turn dark, but the gold seemed to be resiliant.

Sent from my SM-T500 using Tapatalk
 
This one is a long time coming. Back in 2018, I bought a few 4"x4" beams about 8 feet long in order to make a table for my brother in law. The wood was all heavily weathered, so I couldn't possibly know what species I was buying. I bought about 10 beams, hoping I could cobble something together. Most was pine and spruce, and that went into building the table (with success). There were three beams that were walnut, and those were re-sawn and planed into 1/2" boards, squared up, and turned into panels. Some was darker walnut, some was pale, but both were gorgeous grain.

The panels were box jointed and cut to make two Gerstner-style chest carcasses (a third one is incomplete, but I might need to make the drawers for these two before I finish that one). There is absolutely no stain on these - it's a clear lacquer. The darker walnut had cracks filled with metallic gold epoxy (it was heavily weathered, so there were a lot of cracks), and used brass hardware to complete the shell. The pale walnut was done with nickel hardware and metallic silver epoxy to fill voids - and that one is really singing to me.

View attachment 467154
View attachment 467155

There are too many flaws in my opinion, such as gaps on the front panel fitment, a side board splitting out when gluing up so extra scores and cracks had to be done to repair that, and even me cutting a rabbet on the wrong side (see the silver stripe on the pale one above). Still, they are acceptable enough that I can get one of these turned into the gift it was intended for.

It was quite an ordeal to go from beams to custom made boards to panels to a final chest. I learned a lot, found a lot of tricks, and figured out how Gerstner does quite a bit of stuff, and that means I can do some repairs on my Gerstners if I need to. (I recently scored an un-used golden oak 52 from someone to go with my golden oak 42, and the 52 also had a B62 base - I think I have too many tool chests). The length of the project with my spare time kinda turned these into chores instead of fun projects, so I'm definitely glad this first phase is complete. I'm dreading doing drawers.

Now to finish the other carcass and make a lot of little tiny drawers.
Beautiful work; don't be disappointed by the flaws in the wood (nature's fault, not yours) and any construction issues resulting from those flaws – think of them as uniqueness.

Can never have too many tool boxes: that would imply you could have too many tools!
 
Back
Top