Prusa Bed Leveling for Dummies

Have you completed the XYZ calibration? With no print sheet and just a sheet of office paper. I have did that twice, I don't think I needed to do it the second time.

I also adjusted the Z height a few times and what it sounds like is your's is not low enough. When I first got mine setup, I noticed that the z pattern was not solid. I kept lowering it until I had a solid Z pattern and the rectangular section at the end would come off as one piece.
Yes, I did the xyz cal, per the instructions. I think I got fooled by the the paper getting jerked by the fast bed movement. I thought the head was catching the paper, but it probably was just the bed moving the paper not the head. I think I may do the xyz cal again and tape the paper to the bed. Since the head was high, I had to lower Z a lot to get a single rectangular piece to print correctly. I think that the lead screws aren't quite level, I need to check that with some shim stock.
 

That's a good place to start, though it is printer-agnostic. I don't have a prusa, but if you have a tilt along the X and have dual-Z screws, you may well have one out of sync. I would test with a feeler (even just paper), and with motors disabled, adjust the other Z screw.

Things like extrusion testing are a good idea, particularly with finicky filament. PLA will let you get away with a lot, but ABS and PETG can be irritating if you aren't tuned up.
Yes, PETG kicked my behind. PLA was ok, but PETG wouldn't print well for me. It highlighted everything that was wrong. I'll play with the printer some more tomorrow. Was in the shop the last few days.
 
Ok. Please ignore if I talk down to you, I don't know your Prusa knowledge. The MK3* will know the contour of the build sheet, and compensate for it with the base layers. We're not talking about clearly viable variations. There should be a summary at the end of the XYZ calibration telling you what degree the bed is warped, and if in Prusa tolerances, or is a calibration utility? Also, watch the z hight (LCD) while printing.. it's constantly changing, compared to something without the automatic contour tracking like an ender 3, you will only see the z height on the current layer level.

Also, you need to set the first layer on each steel sheet.

Their tech support is amazing, and you only need your order number and serial number, both should be easy to get.
My Prusa specific knowledge is limited. My background is technical but that doesn't mean I know about the internals or design of 3d printers. I could see a clear indication of a difference of filament squish over the sheet over a distance of about 3".

I did perform an xyz cal, but I have moved the printer to a new location to be more convenient. I will do another. I will do a sanity check with some shims to first check if I have a z height issue along the x axis. I'll use some feeler gauges for that.

I don't recall seeing a summary at the end of the xyz cal but I will look for it this next time.

Thanks for everyone's patience with me. I tend to ask some simple yet fundamental questions to help me get the big picture. Once I get that it's usually easy for me to proceed. This technique has worked well for me as a radar engineer so I use it on problems that seem large and complex at first glance.
 
At least for PLA things are set up right. Started over, did an xyz calibration, it told me the axes were perpendicular. Then the z height calibration. I found the Prusa zigzag with the square was insufficient to set the z height. I ended up using the 75mm square pattern and dialed it in. Took a while, but I think it is ok now.

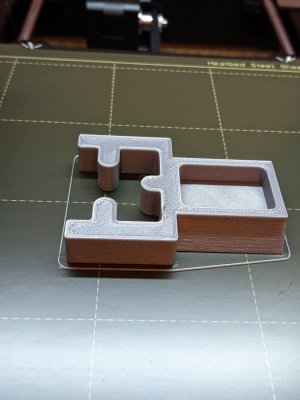
Printed a version of @vtcnc's AXA toolholder holders. Had to do a couple of prints to get the fit I wanted, but think they will be ok to try out on real toolholders. The holders slide onto 1.5" 80/20.
PXL_20221203_150625436.jpg
 
At least for PLA things are set up right. Started over, did an xyz calibration, it told me the axes were perpendicular. Then the z height calibration. I found the Prusa zigzag with the square was insufficient to set the z height. I ended up using the 75mm square pattern and dialed it in. Took a while, but I think it is ok now.

Printed a version of @vtcnc's AXA toolholder holders. Had to do a couple of prints to get the fit I wanted, but think they will be ok to try out on real toolholders. The holders slide onto 1.5" 80/20.
View attachment 428566

That looks really good.

Mechanically, If things are set up right for PLA, they are probably set up right for PETG. Many like to add a little more Z height for PETG to prevent it from sticking so tightly, but I just spray on some Aqua-Net as a release agent.

You PLA results tend to further point in the direction that your PETG issues are more speed/temp and settings issues than they are problems with your 3d printer.
 
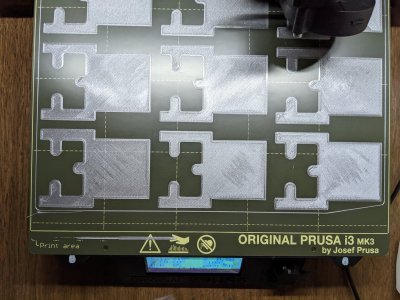
Went for broke and am printing up 9 more holders. Here I can see the effects of the bed not really being flat enough (I think). Here's part of the first layer. The top 6 are ok. The bottom 3 are not as ok. The bottom right corner is ehh. This is what I have been "battling". I'm sure there are other problems, but the print quality of the first layer seems like the head is not quite compensating for the plate level.
PXL_20221203_182650003.jpg
So far the print is mostly ok. Think I may have to load a new reel of filament during this print. How long does the printer pause before giving up?
 
I can see what you're talking about. I have never printed that close to the edge or for that matter having the print sheet being that full to know what mine is doing.
 
I can see what you're talking about. I have never printed that close to the edge or for that matter having the print sheet being that full to know what mine is doing.
If I have to, I won't use the bottom right corner. But it would be nice to be able to use most of the sheet, especially for things like this, where you would like a few pieces. I don't know if there is a way to compensate for this in software.

Might have to be a "real physical" hardware thing, I think it is known as the nylock nut fix. I think that means removing a spacer and replacing with a M3 nylock nut and adjusting it fractional turns. Was hoping to avoid that, but may have to go there.
 
Back
Top