Prusa Bed Leveling for Dummies

Which Prusa? Mini or Mk3s? I have both and an MMU2s.

Also, not sure what you're referring to here? "Adjusting the bed screws is a pain if you have to swap the sheet on and off"? I've never adjusted bed screws on a Prusa.

After having recently assembled the Mk3s+, I can’t see the wisdom in trying to make adjustments with the bed screws. You can only shim up with the current design. And there are enough anchor points that I feel any tweaking of the bed plate there could cause more undesired effects.


Sent from my iPhone using Tapatalk
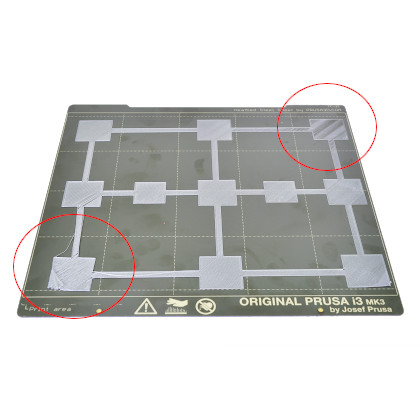
It's not set up for precision leveling, that's for sure. Would need to redesign it if one was serious about it. The bed on mine is unflat enough that it can be clearly seen on the printed layer. Over the full surface the filament can go from just right to almost individual strands weakly adhering. Basically it reduces the effective max size to about 60% of full size. Most of the time it doesn't matter. When I printed 9 AXA tool holder holders ;) it was obvious that the surface varies a bit. Before I removed the holders I numbered them. The corners on the right side are much lower than the middle element of the 3 x 3 array. This matches the bed leveling visualizer display (plug-in) in Octopi.
 
That’s good troubleshooting technique. I’ll have to try that when I do a multi-part, full bed print.

Edit: although, I don’t have the Octopi accessory. What is that and where do you get it? I’m hesitant to modify anything based on my experience with Creality.

Sent from my iPhone using Tapatalk
 
Octopi is based on a Raspberry Pi computer card. It allows you to remotely send files to the printer, see where the printer is, ie, which layer is it at, and to stream video remotely to your computer. You can also abort the job from your PC. It's rather nice in many ways. The down side, these days, is it is difficult to buy Raspberry Pi's these days due to the chip shortages.

I think you can use an Orange Pi, if you can figure out how to do set it up.

Octopi itself is a downloadable image that fully includes setting up the Raspberry Pi itself. Just download the image, burn a microSD card, insert in the RPi and turn it on. Optionally you can plug in a cheap webcam. The Prusa came with a USB cable. Plug one end into the Prusa, and the other into Octopi. You open up a window in your browser that points to Octopi, typically octopi.local, and you have a full web interface to your printer. You need an RPi3 or higher to run it. I am using an RPi3B and it works fine. It really is quite nice. If you have a spare suitable RPi, I highly recommend it. I used it from the get go, don't like dealing with SD cards.

Octopi has a bunch of software plug ins that can add capability. One of them was a print bed visualizer for flatness.
 
Does the Prusa use Marlin firmware? If so, see if the BTT bed leveling sensor can be mounted up. I put it on my Ender5 and haven't touched, or even checked the bed level since.
 
Octoprint is the software. It can be installed on any computer running web server. It communicates with the printer through the USB port. Usually you set it to store and handle the Gcode, and the software drip-feeds it to the printer one line at a time.

Octopi is a complete Linux installation with webserver and Octoprint preinstalled for Raspberry Pi single boards.
 
Does the Prusa use Marlin firmware? If so, see if the BTT bed leveling sensor can be mounted up. I put it on my Ender5 and haven't touched, or even checked the bed level since.
It uses an earlier version of Marlin. There's a sensor used, but it doesn't seem to be quite good enough for full sheet first layer uniformity. For a
1 2 3
4 5 6
7 8 9
pattern, 3&9 are low and 6 is less low. 1, 4, 5, & 7 are mostly ok.
 
Layer is ok on one side and too high on the opposite side of sheet.
The correct Z height is different for each side of my textured build sheet. Once dialed in, my Prusa i3MK3S has produced hundreds of near-perfect parts. About 40 spools of Overture PETG through it. It did take some fiddling at first.

My approach to the Prusa is to only use one filament. Overture PETG in my case.
 
Sorry to hear you're having problems. I'm a brand new user of the same printer, but have only printed the Prusa logo, a beer bottle opener, and a whistle, all in PLA. I have not used much of the print bed. My biggest issues were assembly blunders that required print head disassembly and getting the filament stuck on retraction - above the feed rollers. I'm 2 for 2 on that. Those little square 3mm nuts are easy to lose.

I too am a little confused by the bed leveling feature. There is discussion in the manual as to lowering the probe slightly, but not clear how that would help your situation.

Did you read thru the user comments on this page?


Interesting that so many folks fixed their problems by tightening the center screw last.

Since the advanced leveling procedure appears to allow reporting of individual heights, maybe use that data and check if particular screws are either loose or tight compared to the others? Another thought is to lay a thin parallel bar on the bed with a bright light behind it to possibly get a visual indication of which spots are high or low?

I'm interested to see how this problem gets corrected.

TomKro
 
It would seem the bed correction is for tilting sort of thing, but not true auto-leveling. So on average the bed is correct, but there are zones which are high or low. This was seen when I used a plugin for Octopi which plotted the bed surface. The only way I can see to correct this is to add leveling adjustments. I have enough variation in the heated bed that some areas are squished too much and some areas are too far away. It makes a large print look crummy in my opinion.

I read that page and found it unsatisfactory for a new user. It was difficult to follow, so I didn't do anything. At the time, I did not have the knowledge to proceed. Not sure I do even now.

I'm with you on the assembly. Found it kind of fiddly and it put me in awkward positions. I only discovered some of my screw ups, much later in the assembly, forcing me to backtrack and correct the errors.

However, it mostly works, except for a nice even finish on the bed for large parts. For small stuff it is ok. If it annoys me enough, I will fix it - somehow. I like the idea of a straight edge and viewing optically. Once can see some very small stuff that way.
 
Back
Top