Replacement backflow valve piston

I applaud you for building the part, I to have been known to stand at my lathe for a couple days making something I could have bought, do it just out of spite or curiosity I guess.
Oh, there's an element of this :big grin: Honestly, $75 (including postage) for a minimal rebuild kit, is what drove me to considering this. That kit has less than $25 worth of parts even with inflation.

I have steam heat with a low pressure boiler. The steam pressure is less than 1 psi. Usually run it at 1/2 psi. Have a pressure cutoff at 1.5 psi. High pressures are not needed for residential heat at all. My water pressure is far higher than steam pressure. Nonetheless, I do see the need for the backflow valve. Sure wouldn't want that stuff contaminating my potable water system.
 
It matters little what your boiler pressure is regarding backflow prevention. What matters is that the pressure is more than zero and your boiler is potentially full of toxic or poisonous liquids. That is why a more sophisticated backflow preventer. If your domestic water pressure is zero because you have turned off the water to do a repair and the valve to the boiler malfunctions or is accidentally opened your potable water system is now contaminated.

If you have a lawn sprinkler head that is below the water level of a puddle containing dog poo, fertilizer, weed killer, etcetera, and your neighbors house catches fire and the fire department hooks up a pumper and pulls a negative pressure on your water main, your backflow preventer protects your potable water system.

Water main breaks are also a source of negative pressure. I once saw a local water towers center pipe collapse because of one.
Thanks for the education. It's quite helpful to learn these things. Certainly makes me appreciate the function of the valve better.
 
Have received some 1.5" aluminum rod stock, and some pieces of 1.5" diameter brass. So I can start. I'm trying to come up with an order of operations that makes sense. This part has a lot of potential for being unholdable after a few operations if I don't think it through. Think I will make the bottom of the float first. To machine the spring guides (the funny ears), think I will make a piece to insert into the bottom so I can clamp it in the chuck. That way the piston walls won't collapse. Here is a drawing of the valve piston, or more like a chicken scratching. Hope I haven't left out a critical dimension. Think I will have to make a soft jaw for the vise to do the milling. That will be fun, never made a soft jaw before.
 

Attachments

  • piston.pdf
    462.4 KB · Views: 6
That will be fun, never made a soft jaw before
Not knowing the official method, I've just bolted a couple of blocks of maple or hickory in place of the jaws and used the mill to cut the needed shape. It has worked but I've never used it for heavy or repeat work. One off quick & dirty. Softer woods might undergo compression while in use and not hold as well. I've got a set of aluminum jaws that have gotten kind of beaten up, but still work OK for things that can be held on sort of flat surfaces. Scrap Aluminum that I melted and cast.
 
Here is a drawing of the valve piston, or more like a chicken scratching. Hope I haven't left out a critical dimension.

I understand what you’re trying to reproduce an existing part but that part bears the hallmarks of an injection-molded part and you would probably benefit from determining the critical surfaces and designing your replacement around those only. It may be fun to copy it, just maybe think about what can change to facilitate your operations.
 
I understand what you’re trying to reproduce an existing part but that part bears the hallmarks of an injection-molded part and you would probably benefit from determining the critical surfaces and designing your replacement around those only. It may be fun to copy it, just maybe think about what can change to facilitate your operations.
The part most definitely is injection molded. I've made a few changes to the design to be easier to machine. The ears seem to be a spring guide on the inner angle and an assembly aid on the outside. Likewise, the button on the bottom is what a different spring seats on. That spring has it's own spring guide that fits in side the piston. This is the reason for the anular slot forming the button. The spring guide fits in the ring. I'm on the fence regarding narrowing the piston walls. Only reason I can see for it is to reduce friction.
However, the fact that the wall is reduced could be because it was needed to function correctly. On the other hand, perhaps they were trying to reduce material cost! Since this valve prevents potable water contamination, I'd rather err on the side of caution.
 
Not knowing the official method, I've just bolted a couple of blocks of maple or hickory in place of the jaws and used the mill to cut the needed shape. It has worked but I've never used it for heavy or repeat work. One off quick & dirty. Softer woods might undergo compression while in use and not hold as well. I've got a set of aluminum jaws that have gotten kind of beaten up, but still work OK for things that can be held on sort of flat surfaces. Scrap Aluminum that I melted and cast.
Suspect there's no official method, but what ever works for you. I have some aluminum I can use. I'm trying an alternative idea to machine the ears first and the piston skirt second. That way I can get tapers done while there's something solid to hold onto.

I will then make a washer disc and cut it in quarters, so there are four sections, like a pie slice. Then I can flip the piece and use a four jaw chuck in the lathe with a jaw on each section. The four pieces should act like a collet.

Hope to use a simpler holder for slicing the ears on the mill. That should just be a simple split hole in aluminum jaws. Simple drilling and boring to fit. This paragraph should be before the previous one. Kind of hard to edit on a phone.
 
Good things and bad things. One bad thing - seemed to misplace the spring! I don't know how I did that. The spring is of decent size. It's somewhere here... Hope I find it in the next few days. I'll have to order the whole rebuild kit to get the silly spring, if it remains unfindable.

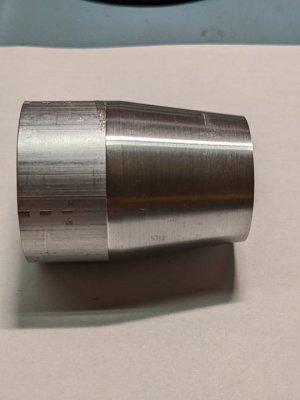
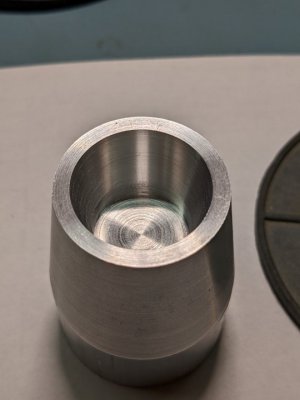
Good thing, did a little lathe work. Made the tapered part of the float valve. I did a test fit, into the assembly and found I need to shave off some more of the external taper. I was off in the dimensions. Drilled the center with a 1/4" drill, then a 1/2" drill and used a boring bar to enlarge the hole to 18.22mm. Made the bottom of the bore flat, which caused a bit of vibration initially, but worked out ok. First bore I've been able to get a fully flat bottom. Pretty happy to have done this first in aluminum. Kind of takes some of the pressure off.
PXL_20220418_000341276.jpgPXL_20220418_000323098.jpg
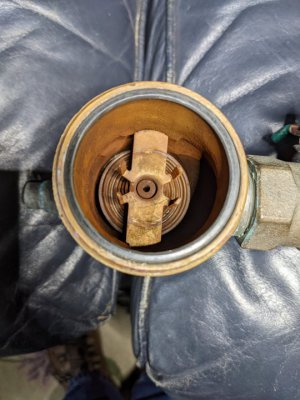
These metal fingers are why I need to make the button with a moat around it on the bottom of the piston.
PXL_20220417_144932384.jpg
The spring I lost sits on this. The top of the spring presses against the piston button. The fingers fit inside the piston skirt.

Running out of ideas where that spring could be...
 
Well, egg in my face... Feel kind of silly. For two things actually.

1. Could have sworn there was a spring under the piston. However, the parts breakdown of the valve doesn't show one. My wife remembers me showing her a spring! I remember that too. But - parts breakdown doesn't show it! This valve seems like someone, besides me has been in it. For one thing, a screw is missing on the cap, and that hole has stripped threads in the plastic. Maybe I did pull out a spring... But according to the factory, no spring should be there.

2. Pulled out a large o-ring out of the bonnet and was noting how flat it was. Think it is a candidate for replacement. Put it back and screwed on the bonnet to the valve. I unscrewed the bonnet a few minutes later and couldn't find the o-ring. You know what happened. But I didn't (at the time). So I started looking all over the floor and the couch for it for quite a while. After a few minutes gave up, noting that an o-ring should be easy to replace. Screwed the bonnet back on, and it felt like it was seating on something. Unscrewed and looked inside the valve, seeing nothing. Shined a flashlight in there and saw the o-ring stuck in the other surface. Must of been tired.
 
Back
Top