

-
Welcome back Guest! Did you know you can mentor other members here at H-M? If not, please check out our Relaunch of Hobby Machinist Mentoring Program!
You are using an out of date browser. It may not display this or other websites correctly.
You should upgrade or use an alternative browser.
You should upgrade or use an alternative browser.
South Bend 9A gut check
- Thread starter chunkstyle
- Start date
- Joined
- Jan 26, 2011
- Messages
- 632
As you learn how to use the lathe you can work around the difference in wear, many machinist do that in shops. The wear is mostly near the chuck on most machines. You can use a longer piece of stock to get to the spot that is most useful. If your gearbox works just clean it up because it can be a pain to take apart and put together. The shafts have tapered pins and mine were facing the wrong way to get out because my gearbox was frozen up and took awhile to free up to take apart. My whole 1968 SB9A was rusted and nothing moved, but all gears and wear parts were like new.
Paul


Paul
- Joined
- Apr 11, 2014
- Messages
- 18
Thanks everybody.
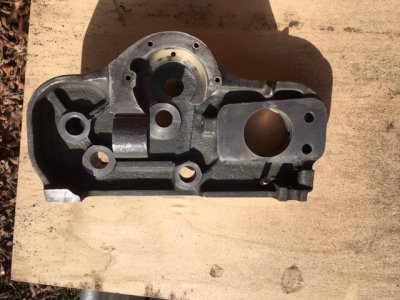
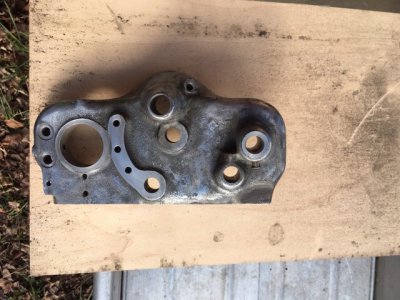
In for a penny, etc.. I decided to go ahead and throw in a paint job. Cleaned up the oil ways and cleaned up the old crud. Paint on the sunny side is so-so. chips easily and there's always a bit of dirt under it. Not the best prep. Slightly better than a tractor. I'll leave the wear worry for now and concentrate on the rehab. Appreciate the SB instruction book link.
Apron progress so far. Thought I'd have more time to undertake the project with the work stoppage but I'm managing to stay busy in the shop so I'tll be catch as catch can.
Using lacquer thinner, wire wheels, Die grind sander disks. Don't have any chemical stripper so it will be softening with the thinner and elbow grease for now.
Half nuts were fairly worn so they were sent out for rebuild while the apron work gets done.
Again, the help here is appreciated.
Attachments
- Joined
- Apr 11, 2014
- Messages
- 18
If I get within the front porch of your lath, PJ, I'll be happy with my efforts. THat lathe and bench look really nice to my eyes. Why the Link belt? Was there any advantage to that type over a traditional leather belt or something you had on hand?
- Joined
- Feb 5, 2018
- Messages
- 637
Hey pjf134, is that a Citation in the background of your pic?
Joe
Joe
- Joined
- Jan 2, 2014
- Messages
- 8,852
Why the Link belt? Was there any advantage to that type over a traditional leather belt or something you had on hand?
There are a few advantages with link belts:
1) reduced vibration since the links can shift a little they can help compensate for some mis-alignment
2) you do NOT have to remove your lathe spindle bearings and the stack of shims to put it on
3) you can keep 10 feet of this "on the shelf" and replace nearly any belt you need to (in the same belt width)
-brino
- Joined
- Jan 26, 2011
- Messages
- 632
The first pic is when I first got the lathe and picket it up with the 94 s10 and unloaded it by myself. The 84 Citation 2 was my everyday driver back in 2011. Both chevy's are gone now and have been replaced. Somewhere in the photo gallery here is some pics as I was rebuilding the lathe. The link belt on the lathe works great and it takes about 2 minutes to install and is quiet and does not slip. The motor belt has to be a v belt so it will slip if something goes wrong. I did work about 2 hours a day for about 4 or 5 weeks to get it to that shape and the drawers were later on. The lathe is dirty now because of use. I had to take the gearbox all apart because the oil dried up in it and was stuck with the taper pins going the wrong way too.
Paul
In the photo gallery 115 are some pics of the resto.


Paul
In the photo gallery 115 are some pics of the resto.
Last edited:
Takes a lot of wear to really affect diameter variance due to tool drop.
Raised this question about mine (barely visible ridge, I can feel it- like yours) on PM a few years back when I acquired it.
I forget the math involved...but it takes a lot of carriage drop to get to big numbers.
Mag base on the tailstock, dial indicator on the front left corner of the saddle, both tight to the headstock.
Preload the indicator, zero out and begin cranking towards the far end of the bed. This will "map" the bed for you.
More important to make sure the bed is straight with no twist (machinist level) and tailstock is properly aligned.
Bed wear/tool drop is only a factor when turning longer lengths- and can be compensated for as mentioned once you learn your machine- where you need to hold tighter tolerances.
- Joined
- Apr 11, 2014
- Messages
- 18
Hi all.
Just an update on the progress of the lathe. Started in on the apron first and found the half nut threads were pretty worn. Sent them out to be rebuilt and the results look pretty good to my eyes. I disassembled everything, cleaned, oiled, re-wicked, reassembled and painted. the thread dial is off and being re-painted.

Saddle is getting disassembled now and I've determined the cross feed nut also needs to be replaced. Threaded the nut onto the screw by hand and checking for slop and there is noticeable play on any section of the screw.
Just an update on the progress of the lathe. Started in on the apron first and found the half nut threads were pretty worn. Sent them out to be rebuilt and the results look pretty good to my eyes. I disassembled everything, cleaned, oiled, re-wicked, reassembled and painted. the thread dial is off and being re-painted.
Saddle is getting disassembled now and I've determined the cross feed nut also needs to be replaced. Threaded the nut onto the screw by hand and checking for slop and there is noticeable play on any section of the screw.
- Joined
- Apr 11, 2014
- Messages
- 18
While I was working on the apron I was ruminating on building a new bench. I decided to simply augment the original cabinet with some drawers.
The original cabinet is built between two cast iron trestle style legs that are connected by 1.25" steel rods running between them and thru bolted. It's not elegant but is built like a bomb shelter. The previous owner built his cabinetry around the steel rods and left a large cavity between the cabinet and tabletop. I simply built a chest of drawers to fit into the cavity and stow all the tooling that came with the lathe.

The left bottom drawer needs a drawer pull. All the material was left over plywood from a current job I'm doing in the wood shop.
The original cabinet is built between two cast iron trestle style legs that are connected by 1.25" steel rods running between them and thru bolted. It's not elegant but is built like a bomb shelter. The previous owner built his cabinetry around the steel rods and left a large cavity between the cabinet and tabletop. I simply built a chest of drawers to fit into the cavity and stow all the tooling that came with the lathe.
The left bottom drawer needs a drawer pull. All the material was left over plywood from a current job I'm doing in the wood shop.