Thoughts on Tormach pcnc-440?

@burtonbr i tried the engrave and the only option was the minus sign. I tried a bunch of those strung together but there was a small gap between each one.
@RJSakowski I did end up just not dialing it. Either way, I'm just new to CNC and Path Pilot, I'll get better but just from the start it seemed limited. Also, what do you recommend to engrave steel? Drag tool? That looks beautiful what ever you used!
I used a carbide engraving tool. Since Chinese characters vary in width and can come to a virtual sharp, the tool I chose had a a 22.5º taper. I set my CAM up to do a roughing waterline which means that it will machine everything on a given plane with the proviso that it will not cut into the part. Iset the depth increment at .001" with a maximum depth of .040". This resulted in a 22.5º angle on the sides of the engraving and variable depth depending on the width of the character at any given point. The Chinese charcter portion had 229,874 lines of code. I had to run the English text portion as a second program due to line number limitations of the SprutCAM post processor.

The text portion was run with a a 1mm carbide end mill using the same strategy but but running a .0025" depth of cut to a final depth of .050". I probably could have pushed the end mill harder with an increased depth of cut but I played it conservatively as it was the only piece of brass that I had.There were 189,576 lines of code in that portion.

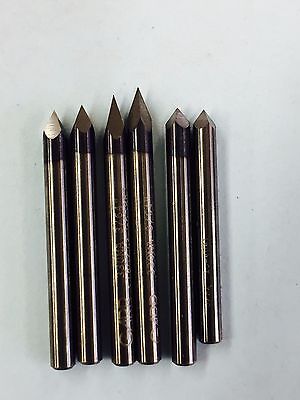
These are similar to the engraving tools that I used.
 
@GunsOfNavarone , I use the jog/shuttle a lot because I am not a typist. When I went to high school, boys took shop and girls took typing. My eyesight isn't improving lately either. I get by on line thanks to the backspace key and spell check but when running the CNC, a mis-typed character in the MDI can be disastrous.
 
For those of you with the passive probe, does that essentially set the WCS for me? I mean, i understand it's and edge finder, and as long as it finds x, y and z on one corner, you're good to go, but it goes a step further and finds all four corners? I'm just trying to justify the cost with potential benefits.
 
For those of you with the passive probe, does that essentially set the WCS for me? I mean, i understand it's and edge finder, and as long as it finds x, y and z on one corner, you're good to go, but it goes a step further and finds all four corners? I'm just trying to justify the cost with potential benefits.
I have a Wildhorse econoprobe. As you mentioned, it works like an edge finder in x, y and z. For x, y, I set it about 1/2" off the corner and tap the "find corner " button. It defaults to the inside left side of a vise jaw, but another button walks the selection around the 4 corners. You can also pick up just one edge. The routine finds x, then y.

For z, I set the probe about 1/2" over the work and hit the "set z" button. The routine brings the probe down at 25"/min feed rate, touches, then backs off and repeats at a slower rate (4"/min).

I always trigger the probe manually first just to check it's plugged in correctly though I leave it plugged in all the time.

I guess you can find the coordinate of an edge by slowly jogging the probe into the work. Pathpilot will halt movement if the probe is tripped. It might have that function built into the edge finder routine, not at my machine to verify. Would make sense that Pathpilot would find an edge without changing coordinates also, I just haven't used it.

I really like the probe. It also has routines to find the center of a boss or pocket. Definitively a time saver though they run close to $200 (or closer to $1000 for the Tormach one).

Bruce
 
Last edited:
@BGHansen I had never heard of them before, much less money than any other I've looked at. Every thing I need from them is still just under $150?? INCLUDING tool height setter??
I
 
Here's a link to the one I have. I bought an extra probe tip and a couple of other things too. Just ran a check on a 3/8" shaft, Tormach interface, combo ETS/probe, standard 2" long 1/8" diameter probe at $132.40. I can't find a copy of my invoice, but probably paid $160 or so with the extras.

I did remake one part of mine. The body of the probe is 2 pieces of aluminum, I'll call them the body and the attaching plate. Those two thread together. Mine only had about 1/8-turn of thread engagement, granted, on a 2+' diameter. I'd learned to rotate the probe in the spindle clockwise to always tighten the body into the attaching plate. That is after turning it CCW a few times and having the body and top plate spring apart. I turned a new top plate with better thread engagement, but still turn it CW so the body is always tightening into the top plate.

I don't use mine as a tool setter as I have a Tormach ETS. To use the econoprobe as an ETS, you unscrew the probe tip and screw in a touch plate. You also have to remove the mounting shaft that goes to the top plate. You could make a table mount adapter that would allow the TTS tool holder to drop into (like the Tormach surface plate with the hole in it for tool measurements). Then just unscrew the tip, screw in the plate, and set the probe upside down in the adapter to save a step.

The cumbersome thing in my current set up is the probe and ETS logic are reversed, one is Normally Open, other is Normally Closed. I have to go to the setting tab to change between the two before probing or using the ETS. Frankly, for a onesie tool measurement, I've found it quicker to manually measure the tool length on the Tormach surface plate and height gauge. The height gauge has a USB plug to directly dump the measurement into the tool offset table, but I just manually type the number in. An advantage of using the Econoprobe for both would be not having to change the settings between NO & NC logic.

Not to belabor it (but too late. . .), Millfast Products makes a box for around $100 that auto-switches between the two logic states. Advantage would be my ETS and passive probe could both be plugged into the controller and I wouldn't have to fiddle with the switch logic in the settings menu. I have one of their remote E-stops on my 1100 and would love to get the switch box but they have been out of stock since before Christmas and don't respond to emails.

Bruce


Well, I bought the probe and ETS...I know who I'm hitting up with question! Joking aside, I have no Idea what you say you need to fiddle with, I really haven't so much as looked at the probe tab at this point...no idea how it works.
 
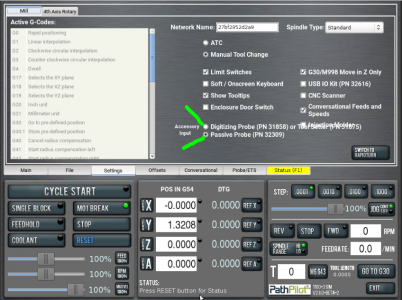
It can be overwhelming, but it's all logical and makes sense (eventually). I bought my Tormach used from a seller in Fort Lupton, about 30 miles North of you. PathPilot has a settings tab for some basic set-ups. One is selecting between a Digitizing Probe/ETS or Passive Probe. The difference between the two settings (as the machine controller sees it) is the switch state when tripped.

Need to go to the Settings page to switch between a NO digitizing probe/ETS and a NC passive probe
1596728103361.png

I think off the top of my head that the passive probe is normal closed. In the non-tripped state, the switch is closed or "the light switch is on". When tripped, the switch is opened. The logic on the Tormach ETS is the opposite, in the non-tripped state the switch is open or "the light switch is off". Tripping the ETS completes the circuit or turns the light on. Kind of a pain to have to flip-flop between these settings. That's where the Millfast Product auto-switch box would be nice. Both the probe and ETS can be plugged in and the box senses when either is switched the box tells the PathPilot control that a switching event has occurred.

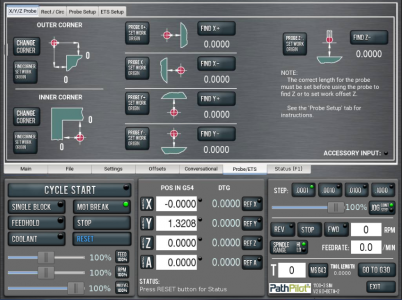
Here's the screen for the X/Y/Z probe. It's pretty quick to find an outside or inside corner (LH side of screen). One button changes the corner, other starts the controller to find the corner and set X/Y to zero.

The middle section is for finding an edge. The left side buttons (probe set work origin) finds the edge and zero's that axis. The right side button just touch the edge and don't change the axis zero.

The RH side is for Z. Same gig here, hit the LH button to find Z and set the Z to zero. The RH side finds the Z coordinate at the work under the probe.
1596728384767.png


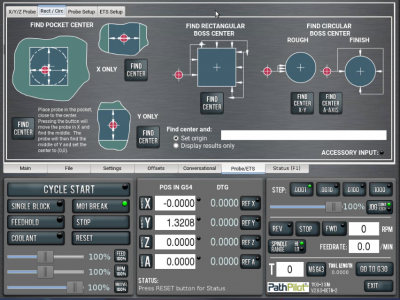
Here's the screen under Probe/ETS for finding the center of a pocket or boss. They work pretty slick. Set the probe Z to just into the pocket or next to a boss and hit the appropriate button.
1596728678969.png


Good luck and happy probing, with your mill that is.

Bruce
 
@BGHansen That's funny about Ft. Lupton, that sounds like where I purchased my PM-727m. They have a lot of huge industrial machines there for sale correct?
Anyway, being that I will use the probe as a ETS and probe, I won't have this issue beow and need to understand where/how to make this setting change?
"The cumbersome thing in my current set up is the probe and ETS logic are reversed, one is Normally Open, other is Normally Closed. I have to go to the setting tab to change between the two before probing or using the ETS. Frankly, for a onesie tool measurement, I've found it quicker to manually measure the tool length on the Tormach surface plate and height gauge. "
Thanks again for the 411 on IronHorse, I think this will be a big help getting parts set up accurately. I'm currently ONLY cutting wood as it more forgiving, not to mention cheaper.
 
Back
Top