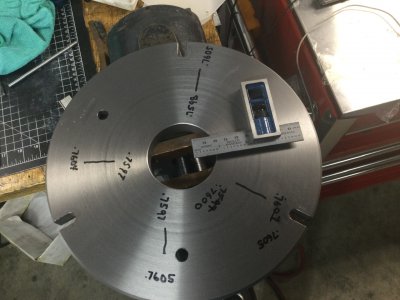
[How do I?] Turn accurate parallel faces on a disk

Your stops should be near the periphery of the disk as opposed to where you are right now. Any errors where you are measuring now will be multiplied at the edges. Also, a four legged chair almost never sits on a flat floor as opposed to a three legged chair, which always does. If you're trying for 0.001" or better, I believe that you're going to need to modify your setup some.

Also, there was a good point made about the SHCS not necessarily being flat on the top. A better approach would be to turn off the socket part of the screw and put a slight radius on what remains. You only want one point on each screw to make contact with your flat.
I'm going to implement the single point stop idea, that makes a lot of sense to me.
 
The rim is thicker than the center but just a little about a thou. or so at most.

Do you know why this is? Could it be the "four legged chair" effect? Cumulative errors from supports not being near the edge? Since this is cast iron, there is no way for it to deflect that much from just a cut. (I'm assuming that your setup is rigid enough to prevent the tool from moving.)
 
Do you know why this is? Could it be the "four legged chair" effect? Cumulative errors from supports not being near the edge? Since this is cast iron, there is no way for it to deflect that much from just a cut. (I'm assuming that your setup is rigid enough to prevent the tool from moving.)
I'm not familiar enough with lathe construction to be sure but... 1/2 thousands of an inch over 5" radius (10" disk) seems really very good to me. Am I wrong? That happening on two sides gives close to a thousands of an inch on overall thickness. Maybe my lathe is junk? I'm of the opinion that I tuned this disk to a better than what one would expect from an engine lathe. I'm not sure how much better a quick job on a Blanchard grinder would be. I'm serious, if my perspective is wrong, I will certainly want to look at what problems my lathe has. I was under the impression that a lathe would normally setup to face with a slight taper to the center. Also, the cutting pressure could well increase as the cutting speed reduces at the center of the part.
 
I was under the impression that a lathe would normally setup to face with a slight taper to the center. Also, the cutting pressure could well increase as the cutting speed reduces at the center of the part.

That's not supposed to happen. The crossfeed is exactly perpendicular to the spindle axis. There should NEVER be a taper (a lathe wouldn't be of much use if it did). Also, you only took a skim cut, so there wasn't all that much cutting pressure from the tool. One question, tho, did you lock the apron when you did the cut? If you cut center to rim, the cut could push the carriage back slightly if not locked. If you cut rim to center, I'm at a loss to theorize as to why the rim is thicker than the center. My best guess would be one of the two issues we discussed in an earlier post (the chair and the none single point supports).
 
@SLK001 , I appreciate your input! What you have said has really caused me to think and ask around. I totally enjoy finding out I'm wrong. From what I can find, I'm not wrong here. I think the 7 tenths edge to center is a very good outcome. I have read and seen where a lathe is designed to never produce a convex surface as that is a very bad flaw.

I did lock the carriage, at least some.

im really open to ideas and your comments had me feeling like I might be a little dumb and missing something. (I am a little dumb so never totally confident in what I think I know). You challenged me to check into this a little further.

check out Tom Lipton's video on turning a disk, I was just pointed to that by others. I friend who has owned and run a very successful shop since the middle seventies told me he would consider a repeatable setup for a part like mine to be under 2 thou as a "minor miracle.
I took a few measurements again this morning after dismounting the chuck.
1255757C-70C0-4BBD-9946-B8CCA0AB00F3.jpeg
 
Another problem I see is with your measurement setup. It appears that you are placing your disk on a surface plate and indicating it that way. If so, you don't have a bottom reference with it like that (because you don't know if the bottom is flat). Get three precision ball bearings and place them underneath your disk in three places (I know, a BB is not ideal, but it is something you most probably have readily available) near the edge at 120º apart. NOW you can make those measurements. A lot of your variations could be from the relatively rough surface finish.

You also got a consistent enough 0.0007" difference to make me believe that the carriage moved slightly during your cut. And "yes", a 0.0007" outcome is acceptable, but you wanted it "flat" and also wanted comments on techniques, etc. I just wanted to give you different options on ways to accomplish your task.

Also, in a production shop, they are more interested in production over precision. If the part meets the print tolerances, the part is in spec. Anyone who was wasting time getting a round like this "flat" would probably be fired.
 
That's not supposed to happen. The crossfeed is exactly perpendicular to the spindle axis. There should NEVER be a taper (a lathe wouldn't be of much use if it did). Also, you only took a skim cut, so there wasn't all that much cutting pressure from the tool. One question, tho, did you lock the apron when you did the cut? If you cut center to rim, the cut could push the carriage back slightly if not locked. If you cut rim to center, I'm at a loss to theorize as to why the rim is thicker than the center. My best guess would be one of the two issues we discussed in an earlier post (the chair and the none single point supports).
I'd humbly have to disagree on that. It's not uncommon for the crossfeed to be angled a very, very minute amount in towards the chuck, to counteract the the forces trying to push the carriage away from the chuck. Much like some vertical mills will have the knee angled slightly high in the front(towards the operator) to compensate for the weight of the vice, workpiece, etc pushing the knee down. The factory spec sheet on my Lagun specifically shows the knee .0005" "higher" in the front, compared to the back. Not carved in stone, but I'd not make the blanket statement that its "not supposed to happen". There's got to be some amount of error in the how close to square the carriage dovetails are to the bed ways, and that error should favor towards the chuck/headstock. JMHO.
 
I'd humbly have to disagree on that. It's not uncommon for the crossfeed to be angled a very, very minute amount in towards the chuck...

Well, it is exactly perpendicular to the spindle axis to the limits of human ability. To be able to move, there has to be some slop in the dovetails. But the cutting forces are pushing the entire cross slide to the rear of the lathe (ie, parallel to the spindle axis) and to the back of the dovetail, so any facing cut should not have much of a detectable deviation. Your mill front is truly scraped in higher like you said to compensate for gravity. The net result is very close to true perpendicularity in actual use..
 
I'm not familiar enough with lathe construction to be sure but... 1/2 thousands of an inch over 5" radius (10" disk) seems really very good to me. Am I wrong? That happening on two sides gives close to a thousands of an inch on overall thickness. Maybe my lathe is junk? I'm of the opinion that I tuned this disk to a better than what one would expect from an engine lathe. I'm not sure how much better a quick job on a Blanchard grinder would be. I'm serious, if my perspective is wrong, I will certainly want to look at what problems my lathe has. I was under the impression that a lathe would normally setup to face with a slight taper to the center. Also, the cutting pressure could well increase as the cutting speed reduces at the center of the part.
That could be caused by cross feed wear.
ABOM79 has a recent video about such.
 
Well, it is exactly perpendicular to the spindle axis to the limits of human ability. To be able to move, there has to be some slop in the dovetails. But the cutting forces are pushing the entire cross slide to the rear of the lathe (ie, parallel to the spindle axis) and to the back of the dovetail, so any facing cut should not have much of a detectable deviation. Your mill front is truly scraped in higher like you said to compensate for gravity. The net result is very close to true perpendicularity in actual use..
Not interested in a big debate on this, but there is only one infinitesimal point in the travel of the crossfeed where the cutting forces are pushing the entire cross slide straight away from the head stock. At all other points it is leveraging it, due to the load being off center. You've not only got the cross slide dovetails being pushed, you've also got the compound slide, and the carriage being pushed cockeyed. The only way there is not going to be some measurable movement happening is if the clearances are so tight, that there can't even be so much as a film of way lube between the surfaces. In which case, you wouldn't even be able to move the cutter.

In a nutshell, there is going to be some amount of slop, if for no other reason than to be able to actually move the compound, cross, and carriage slides. So, it's advantageous to skew that error in the direction of the headstock to increase your window of acceptable error. As cutting pressure increases, there's a period where the mechanical accuracy actually improves to the null point, and then begins pushing away from the head stock. If it were set up to be perfectly perpendicular( which doesn't exist ), then as cutting pressure increases, the accuracy has no where to go, but downhill, or in this case push the cutting tool, further and further away from the work piece.
 
Back
Top