What have you done in your shop lately?

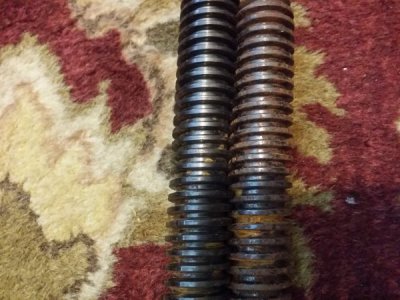
I looked at these threaded rods, looks like acme thread. I was curious about cutting an internal nut for it. So I thought with standard threads, putting two rods together side by side would line up the threads perfectly.

I tried these and to my surprise, they don't.

The threads don't sink all the way to the bottom. I then tilted one a little and it worked. I wonder if rust has anything to do with it. Probably not though.
 

Attachments

  • 1559316130477-1776322879.jpg
    1559316130477-1776322879.jpg
    61.3 KB · Views: 67
What you observed is normal for Acme threads. Look one of the rods from one side. Note whether the tops or the bottoms of the threads are closer to a particular end. Now look at the other side. Note that the threads "lean" the opposite way. So two threaded rods next to each other won't quite mesh perfectly. Tilting one of them (at twice the "lean" angle) will allow meshing.

60º threads will mesh a lot better, because the 60º "face angle" is much larger than the "lean" angle.
Thanks. That explains it.

Today, I was researching on how to get my 15x30 regal servo shift lathe to do metric threading. There were some articles on hobby-machinist.
Unfortunately, mine doesn't include the metric gear. Reading the message was a little confusing for me with the 127 tooth idler gear, since the idler gear doesn't do anything at all.

Then I read the following page:

http://conradhoffman.com/metricthreading.htm

which gave a lot of good info. With regard to the idler gear, it's two gears translation. So 127 to 100 ratio. With a common lead screw of 8 TPI, gives a pitch of 3.175 mm. When reduced by 1.27 ratio, it goes down to 2.5mm pitch. As a result, any integer multiple or fraction of the leadscrew's pitch would translate to the same ratio of that 2.5mm pitch.

For the article above, near the end, the section ""You Have to Keep the Half Nuts Engaged for Metric Threading" - Not!", I didn't really understand what's the problem or the explanation. I suppose all that means is that a user must always go back to the exact same thread dial, versus going a fraction of the dial, but I am only guessing.
 
I think that means you have to keep the half-nuts engaged and back the lathe out of the cut by running in reverse. not sure what the ''NOT!'' means
 
I think that means you have to keep the half-nuts engaged and back the lathe out of the cut by running in reverse. not sure what the ''NOT!'' means
The "not" part is confusing, then the part below it describing how to disengage and engage the half nut. The article also said keeping the half nut engaged is "It's really simplified advice for the unskilled neophyte and is only a half truth".
That means it's not completely necessary.
I think the part running it in reverse to always keep the screw and head in sync is the jist of the technique, but not sure.
 
Last edited:
The "not" part is confusing, then the part below it describing hie to disengage and engage the half nut. The article also said keeping the half nut engaged is "It's really simplified advice for the unskilled neophyte and is only a half truth".
That means it's not completely neccessary.
I think the part running it in reverse to always keep the screw and head in sync is the jist of the technique, but not sure.
Ok, read it again and I begin to get it.
Release the half nut, but engage it when the dial reverses less than one turn, in effect, keep it down all the time, but also allow quick disenagage the cutter at the end so no crash/collision.

To help myself understand how it works, it breaks it down into multiple thought processes.

1. I can disengage then engage the nut as many time as I want, as long as the lathe is not running
2. I can disengage then engage the nut as long as the lathe stops running "instantly".
3. Since #2 is impossible, if I can disengage it, then engage it back exactly the same spot, whether the lathe running or not, it would work.
4. To get to a same spot of everything in the "system", when shut down the lathe, if it runs 10 more turns, it has to "unturn" that many before re-engage it again.
5. The 10 turns above can be "counted" as the thread dial goes back to the same spot as before as long as it's less than 1 complete thread dial rotation.
 
Last edited:
Ok, read it again and I begin to get it.
Release the half nut, but engage it when the dial reverses less than one turn, in effect, keep it down all the time, but also allow quick disenagage the cutter at the end so no crash/collision.

To help myself understand how it works, it breaks it down into multiple thought processes.

1. I can disengage then engage the nut as many time as I want, as long as the lathe is not running
2. I can disengage then engage the nut as long as the lathe stops running "instantly".
3. Since #2 is impossible, if I can disengage it, then engage it back exactly the same spot, whether the lathe running or not, it would work.
4. To get to a same spot of everything in the "system", when shut down the lathe, if it runs 10 more turns, it has to "unturn" that many before re-engage it again.
5. The 10 turns above can be "counted" as the thread dial goes back to the same spot as before as long as it's less than 1 complete thread dial rotation.

OK o_O I think I get it. I have never cut metric threads with an Imperial leadscrew. I always heard that you have to keep the half-nuts engaged, but I could be wrong about that.
 
My own take: What nnam says is true. But to be able to disengage and correctly re-engage the half nuts requires careful attention. Keeping the half nuts engaged is the "stupid but bulletproof" way to do it.

Of course, as nnam pointed out in his #3 comment, it's unrealistic to expect most lathes to stop instantly. However, there are exceptions. I use a VFD on my lathe and have a braking resistor hooked up. So I can set the deceleration time to something very short, like ½ second. Assuming I thread at around 60 RPM, that's ½ turn to stop. I'm in the process now of modifying my carriage stop to include a "stop now" microswitch. Once this is installed, I expect I'll be able to stop very consistently, maybe as good as ±⅛ turn from the set point.
 
I virtually only cut metric threads with my 8tpi lead screw using the 127/120 change gear combo.
I have become a dab hand at stopping the lathe with it coasting to a stop as it hits the end of the cut.
I do keep the half nuts engaged and reverse back as the thread dial is not very good so I removed it ages ago.
I also plunge in at 90' not 29.9 as I use a solid plinth rather than a top slide (just to improve rigidity in this flexi lathe)
This example has an M10x1.25 thread on each end of the stainless shaft.
shaft2.jpg
I tried Conrads method but didnt like it as I find this very easy, even for a 250mm long thread.
There are other explanations like his that may make it clearer but I never saved the addresses.
 
I virtually only cut metric threads with my 8tpi lead screw using the 127/120 change gear combo.
I have become a dab hand at stopping the lathe with it coasting to a stop as it hits the end of the cut.

That's a very good method coasting down if you're good at it. With lathe that has good brake, it may work very well.

127/120 would give 3mm screw pitch, which happens to be what Leblond recommended, based on the following thread:

 
Back
Top