What to practice on lathe

I think it was Duncan Phyfe who, on the subject of good design, said something to effect of ".. It's not what you can put on, but what you can leave off..." Your call though.

I think you've done well for your first foray into lathe work! The finish on your bore looks pretty nice as does the outside of the neck. Truly flat bottoms on the bores are not the easiest to achieve and may very well be limited by your tool choice right now. Given any thought to if and how you might finish turn the outsides? A very slight, read five degrees maybe, angle to the top might look interesting as would some very slight chamfers.

Good job so far though, I'll bet you learned a bunch already in just this little thing!

-frank
 
Thanks, guys!!
Feels great to have something to show for my efforts.
The lid taught me a lot, like start with the hole not the top. I started to turn the lid top 1st. Luckily only made a few cuts and went to bed. The next day I realized boring a hole after cutting it off the round stock was probably a bad idea.

Definitely want to learn some threading, would love it to have a threaded opening. Next time!!

I was thinking of doing some sort of decorative angles or curves on it. Not super sure how or what tools yet? I still need a grinding wheel, using files at the moment to clean up edges on tools. I do have a 3/4 horse pump motor 3400rpm, just waiting to be used on a project. It was going to be a reloading case prep motor for trimming brass cases to reload 223.

Thanks again for the help to get me this far and the ideas going forward!!!
 
I use a Sinclair ultimate stainless case trimmer powered by a Ryobi cordless screwdriver and a Lyman case prep express to prepare case - 125 rpm .1 HP. I can't imagine a 3/4 HP 3400 rpm case prep machine. That sounds like a 350 blown Chevy small block lawnmower, too much for me. Just kidding. The pump motor might be used to make a single stone grinder?

It sounds as though you are learning very quickly. Keep on doing it!

Roy
 
I was looking at replicating or using the Giraud carbide tri way trimmer. http://giraudtool.com/giraud-tri-way-trimmer.html
Recommended rpm is 1000-3500 so a variable speed set up off a 3500rpm motor was recommended on a couple builds. They say around 3000rpm and they run fast and smooth.
I couldn't stand doing 223 cases by hand. I don't shoot them fast but I do enjoy shooting all day when I go target shooting.
I don't have a lot of power tools or tooling really, figured with a lathe I will be able to make some tools and other projects.
Looking forward to learning threading and lots more.

Thanx for the great reply. I had forgot about the Giraud trimmer. If you have a lot of brass that is an efficient way to go.

Roy
 
Make a spool.

Sometimes called 2 collar test.

This is a simple tool for adjusting tail stock.

First time while making you adjust tail stock then once made use with dial indicator and can be used for life on any lathe.

Locate some nice looking material such as stainless or other good looking round stock maybe 2 to 3 inches diameter and 4 or so inches long.

Face off both ends and center drill.

Take your time as it is a precision tool.

Now remove meat in the middle so it looks like a spool.

Remove maybe 1/3 total diameter leaving rings at each end maybe 1/4 or so length.

Next locate a chunk of 1/2 round and place in Chuck and make a center on it as it now will be dead nuts in Chuck.

Place part between centers and clamp tight.

Paint the part while spinning with a felt tip marker as it makes it easier to see when full cut is complete.

Take light cuts across total length until all ink gone.

Check diameter of both rings.

If not same adjust tail stock offset a bit less than 1/2 difference and repeat.

Again Paint and very light cuts.

When both are exactly same reverse in lathe and repeat as above but now very light and finish cut so surface is polish ready.

Should still be equal diameters.

Now to use for future tail stock alignment you repeat making the center in Chuck but instead of cutting you place a dial indicator in tool holder and adjust tail stock offset as needed.


Sent from my SAMSUNG-SM-G930A using Tapatalk
 
  • Like
Reactions: Z2V
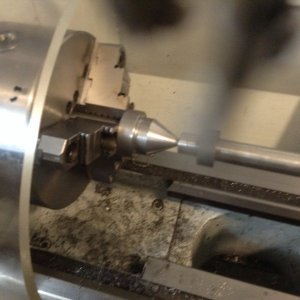
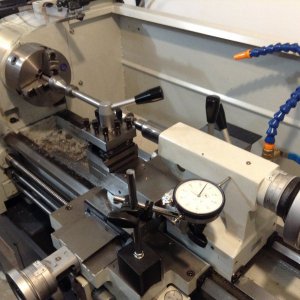
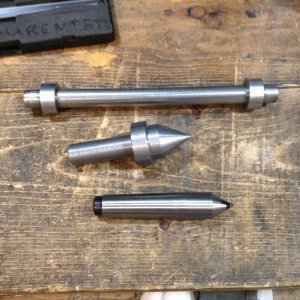
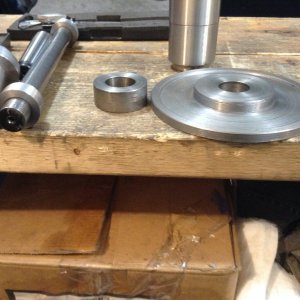
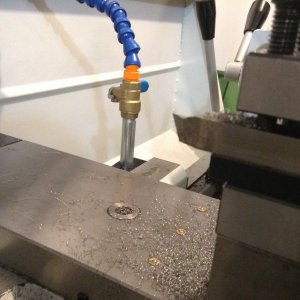
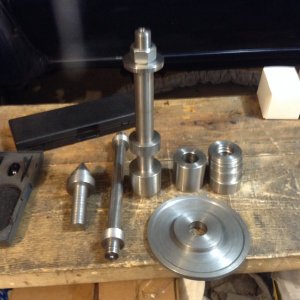
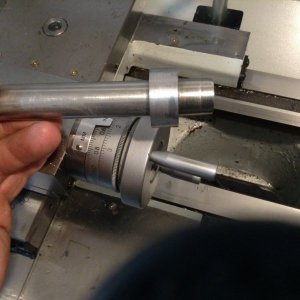
Funny just came back to this thread to add pics regarding a lathe test bar I mentioned earlier and the post above talks about it. Heres my version and a reason to have one.
I had a job to do and clean up some drums from a 1932 Ford pickup. Two were given to me with the hub still on and didn t want to mess with the hub as it would open up a can of worms and the customer said he would deal with it. Anyways I couldn t get it dialed in the four jaw with the cast hub and confident it was secure so I made up some bushing for the bearing races to run on a shaft. Intead of just making a close fit I decided to make a mandrel out of the shaft with a taper for future use and to help with drive also. The taper went from .9985 to 1.0015 give or take. Use the test bar to re align. You can use a dead centre in the spindle but it saves time to just take a cut in the 3 jaw at included 60 degrees each time you use it to be running true. You could expand on this and cut threads on each end to help press your collars on. Make sure you choose a thread to have clearance for your collars to pass the threads. Take a few thou off each end to line your collar up to make it easier to press it on. Sharp sharp tool as it will be friction drive and light cuts of two to four thou. A little oil on your dead centre in the tailstock. Take a cut and move over to the other collar take a cut and adjust until they have the same measurement. The stainless was given to me from a propshaft so a shop tool for the future with the spacers and such.

image.jpeg

image.jpeg

image.jpeg

image.jpeg

image.jpeg

image.jpeg

image.jpeg

image.jpeg
 
Last edited:
Funny just came back to this thread to add pics regarding a lathe test bar I mentioned earlier and the post above talks about it. Heres my version and a reason to have one.
I had a job to do and clean up some drums from a 1932 Ford pickup. Two were given to me with the hub still on and didn t want to mess with the hub as it would open up a can of worms and the customer said he would deal with it. Anyways I couldn t get it dialed in the four jaw with the cast hub and confident it was secure so I made up some bushing for the bearing races to run on a shaft. Intead of just making a close fit I decided to make a mandrel out of the shaft with a taper for future use and to help with drive also. The taper went from .9985 to 1.0015 give or take. Use the test bar to re align. You can use a dead centre in the spindle but it saves time to just take a cut in the 3 jaw at included 60 degrees each time you use it to be running true. You could expand on this and cut threads on each end to help press your collars on. Make sure you choose a thread to have clearance for your collars to pass the threads. Take a few thou off each end to line your collar up to make it easier to press it on. Sharp sharp tool as it will be friction drive and light cuts of two to four thou. A little oil on your dead centre in the tailstock. Take a cut and move over to the other collar take a cut and adjust until they have the same measurement. The stainless was given to me from a propshaft so a shop tool for the future with the spacers and such.

just when you think you understand something....
Ok, I thought the barbell test shape was done mounted in which with no tailstock support. Am I seeing a dead center in chuck and dead center in tailstock? What even drives material? I have to be misunderstanding something?
 
Sorry it s just a pc of stock in the chuck. Use the compound to set and cut the angle. It s a dead centre in the tailstock with no bearings to enter in the equation like a live centre. It just friction drive off the stock in the chuck. True it each time you use it Rather than taking the chuck off for a dead centre. Just saves time. Sharp tool. The one time to just do your grinding and don t put the radius on the leading edge.
 
Love all the lathe pics!!

I will try the cut test once I can level out my lathe a lil more. Right now I know its un even but have no way of adjusting it.
I am looking into 2 pcs of steel plate, one for each end of the lathe and then putting some leveling feet on the corners of the steel plate. Then I can make the adjustments I need to get better cuts.
I see a dial indicator in action is it mounted to the lathe? I like the idea of a couple read outs separate from the lathe knobs to read actual movement. Just haven't figured out a mounting system yet.
 
Back
Top