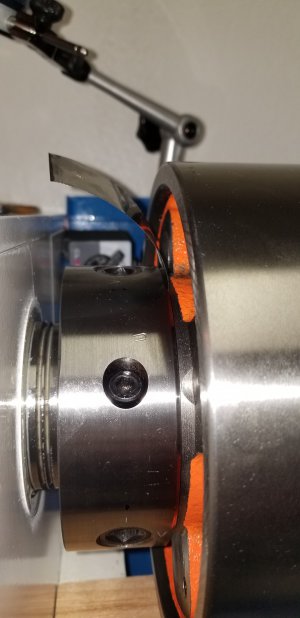
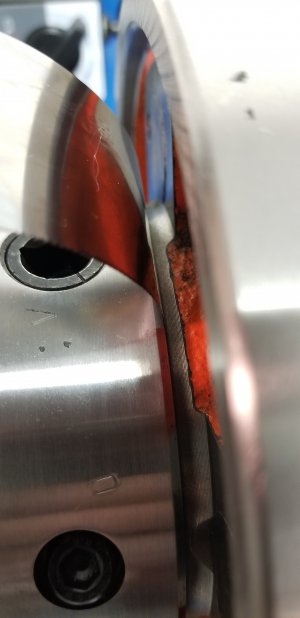
Why is it acceptable

5. Can you send or post a video? That might help. If the chuck has wobble, it seems like it is not pulling up on to the spindle all the way. I am not sure what was meant by the OD of the chuck has .0005 runout (Which is fine) but the back has .0045?

6. I do not know what you mean about the tool post in your first post, that makes it seem even more like its one of our machines since this order had a tool post on it.

5. I'll get video later this evening. I've attached picture to explain where my readings were coming from when I have it "tuned" in
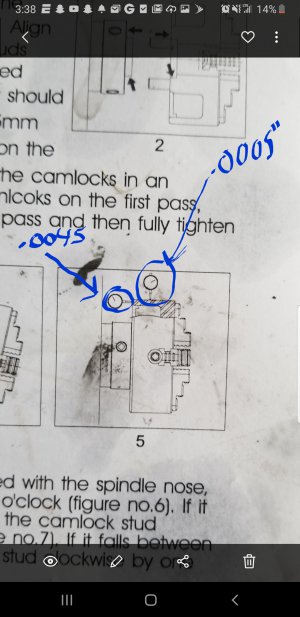
Screenshot_20200219-153931_Gallery.jpg
Per instructions here: unless I'm not understanding what this says.
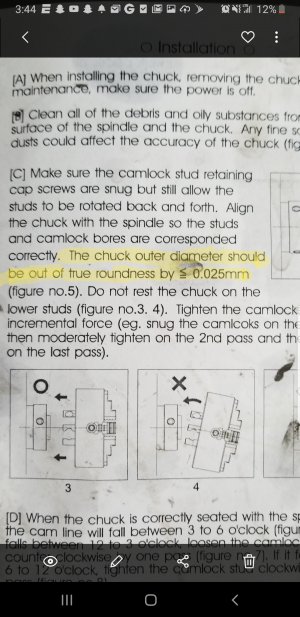
Screenshot_20200219-154447_Gallery.jpg
I bought the PM1228 back around Christmas. Not trying to hide anything I just didnt want to look like an idiot and bash an innocent company if in fact it was just me being a newb.

6. The qctp works great. I paid extra for the one that required no mods. Haven't had a single problem with that other than the parting tool holder slipping a bit when it's not tight enough but that doesn't bother me at this point cause I can crank on it a bit and get it to hold for at least one cutoff.
 
Ahhh OK Now I understand. I would also measure on the face of the chuck, I know the jaw slots are in the way though so not as easy. Normally if the chuck was wobbling, the OD would also be off with an indicator, the surfaces kind of go together, and if it was off at the back like it has a slight space between the spindle face and the chuck, it should have some runout going on the O.D. too. Check it out tonight when you have some time to make sure it is pulled all the way to the face of the spindle with zero gap and see what you find with that.

That part is Highlight means the OD runout should be less than .025 mm (about .001")

And I misunderstood about the tool post, sorry about that, thought there was a problem with it.
 
When I went back to put it in the position it was in giving different results every time no matter where I clock it. I could only get the back within .0055".the OD i could get down <.001 but the back is giving me high numbers and I can fit a piece of .001" shim in between the spindle and the chuck at certain spots where the studs are and on certain parts its can't fit through. 20200219_194326.jpg

20200219_194344.jpg
 
Take a very deep breath and start from scratch. Remove the studs from the chuck and offer up just the chuck after bluing the spindle and check the fit. If all good replace the studs and set as per the instructions. Double check every step.
Studs go in, get tightened with screw turned clockwise until indicator mark is between 3 & 6 o'clock when the are locked up. Seat slowly. DO NOT crank on a screw or it will cock the chuck. If not good decide on plan of action.
 
+1. Remove the studs and check if the chuck fits all the way onto the spindle taper. If it does then one or more studs are preventing the chuck from seating properly. You may need to swap stud positions until you find an arrangement that allows the chuck to snug up properly. This is not an uncommon problem and is due to manufacturing tolerances being what they are.
 
So trying all 3 studs in all 3 holes, and at all the different turn out positions per stud and all the different clocking positions per turnout option may finally result in a desired outcome?
 
Each individual stud is set at the correct height when the indicator mark on the screw is between the two 'V' marks on the spindle which are located at 3 o'clock and 6 o'clock when looking at the end of the screw. IF that condition is met when the stud is locked down then the stetting for that stud is correct. It just makes life simpler if the studs always go into the same hole. The screws turn clockwise to tighten and anti-clockwise to loosen.
IF the chuck sits correctly on the spindle then when the screws are turned the studs pull the chuck tight and all is well.
It looked like that chuck was loose in the video. The system is so simple that it is hard to visualise a problem occurring. The only thing I can imagine is not making sure all the screws are in the neutral position and not checking that the chuck will actually sit flat on the spindle OR one time only I saw someone turn the screws anti-clockwise to tighten the chuck but it was obvious when looking at the indicator marks.
 
The stud holes in the chuck and the threads on each stud differs. The datum line inscribed will put each stud at a different height; this might be a very small difference but it does make a difference. What I would do if this were me is to install the studs in the chuck and get the datum line at the surface of the chuck. I would label each hole and each stud and keep track of their positions. Then I would try to lock the chuck down to see if it worked. If not then I would leave #1 in place and rotate the other two and check for fit. If that failed, I would leave #2 in place and rotate #1 and #3, and so on.

Hopefully, one of these combinations will work. If not, call Matt and discuss a return. The important thing to realize is that it isn't a reflection on PM. These things are produced in a factory and it is the nature of the beast that things will vary. Just replace the chuck and move on.
 
Back
Top