2015 POTD Thread Archive

Here is an excerpt from Welder's Handbook that shows the reasoning behind the copper. Towards the bottom portion of the page on # 145.
https://books.google.com/books?id=G...why do they coat mig wire with copper&f=false

Mike.
Lol I speak nothing about the copper, only about the Silicon content in the rod, used as a deoxidizer, your right about the copper, but I'm right about the little cream colored mounds in the weld beads. They are the excess silicon. The guys who posted in that link for welding Web are pros. Them specifically. It's all good moving on.
 
Nope, not me. I really don't know how to process that to be honest with you.

Mike.


Dont worry, its a compliment! I think this guy could weld anything and from viewing your projects I would put you in that same category. :thumbzup3:
 
Mike - You are so right, there is always one that you don't get just right and you kick yourself for it. Others will look at it and say it's fine, but you can see it :)

Most of my welds have a smoother shape due to the gas i have. It doesn't get the penetration that i would like without turning up the current a bit more or slowing the wire feed rate. I can see that the ridges in the bead are from torch manipulation, mine are quite flat if i don't move the torch. I too find that you need to move the torch or else you don't "bite" in to the base metal.

A lot of the weld porn out there is done on some fancier welders than most of us own. Especially the ones that weld aluminium with the reverse polarity pulse to clean the metal.
 
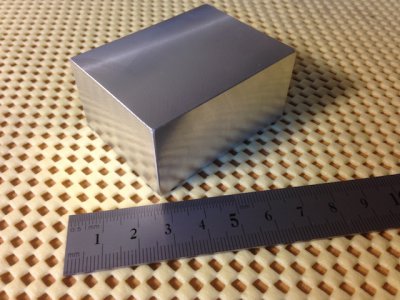
First order of business was cutting of a suitable length, about 30mm, of 60x60 aluminium bar, with the hacksaw. I guess in total that little task has taken an hour or so, over the course of a couple of days. I learnt something; I need a power saw!

Not that such a tool would have been useful this morning, as the local electricity supplier had selected my neighbours and I for some demand side management, colloquially known as "load shedding".

When the power resumed I was ready to square up the workpiece, though only once I'd worked out how to fit a 60mm piece into a 46mm vise; apparently it's done carefully, sideways and using a #3 centre drill to manage the hacksaw straight edge.

In went the fly cutter and chips went a'flying. I learnt somethings; I need a shop-vac; I need a plan to enclose the mill; fly cutting produces some seriously sharp swarf; swarf floats on tea.

Some hours later the result is quite pleasing.
IMG_4264.jpg

The design, a "ball screw nut carrier", calls for a piece 46x42x24, so there is some metal to remove. Maybe tomorrow

Oh, this is really the first time I've used a mill in probably 20 years. The tool of the day was my new toy, a Sherline 5410, and though the result is not exactly complex, I enjoyed making it, and learnt a few things along the way.

IMG_4264.jpg
 
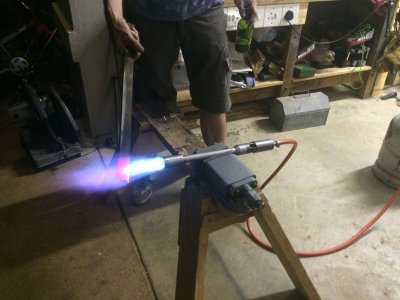
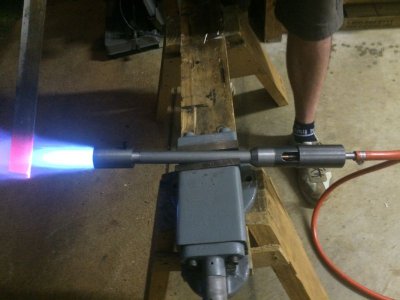
Building a small furnace, primarily with the intention of having a go at casting aluminum, has been on my todo list for a while but never made it to the top. A friend recent decided he needed one too (for forging knives) so with a companion to help I finally got the motivation and we are going to have a go at building a couple out of 14kg LPG cylinders -horizontal for him and vertical or me.
Today's effort was to turn up the components to build the burners from design plans he had found on the Internet. Took most of the day but we got one finished and tested.
IMG_4804s.jpg

IMG_4805s.jpg

This burner is supposed to be the bees knees according to his research of forums etc on the subject, and I have to say I was impressed with its performance (but then I only have my small brazing torch as a reference for comparison).

Edit:
Had some requests for the burner plans so here is the link to where we downloaded them. Not our design and all credit goes to Daniel Gentile.

https://dg.box.net/shared/static/s3pjhjalji.pdf

http://www.iforgeiron.com/topic/16803-need-better-burners-for-my-forge/?&p=170678&hl=need+better+burner&fromsearch=1#entry170678


IMG_4804s.jpg IMG_4805s.jpg
 
Last edited:
That burner looks pretty good in the pictures, Looks like it should heat things up nicely.
 
That burner looks pretty good in the pictures, Looks like it should heat things up nicely.

Well it made short work of an aluminium can - turned it into a pile of molten metal - without any furnace to actually contain the heat so I'm sure it will be more than enough for my intended purpose.

Was an interesting machining project for a beginner like me as well - all press fits and turning tapers.
 
Back
Top