2018 POTD Thread Archive

made an LED light for the girls' shower as there was only a light over the sink and it was pretty dim (some weird fashion in Texas of wanting every part of the house dark). Made it from a piece of 22x1.5x0.5" alu scrap, with a central channel and grooves either side for a piece of kitchen light diffuser to slide into. The square tubing JB welded to it offcenter holds the driver and twist nuts. 3 Cree 3000K LEDs (XTE? can't remember) running at 1W each, so about 3.5W total power draw. Wired into the back of the main light via a cable in the attic, not much fun doing that when it's 100F outside.

Daughter did some of the mill work, to give her a feel for it more than anything, but most of the drilling, tapping and soldering. Finished it up this afternoon and both the girls are very happy with it!

attachment.php

attachment.php
 
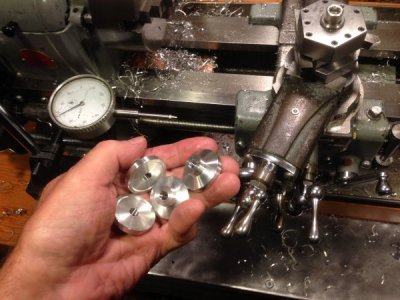
Spent the better part of the afternoon making these four little aluminum feet. They'll get a 5/16"-18 stud and jam nut to make them adjustable. Not terribly exciting I'm afraid, but sometimes that's a good thing.

image.jpeg

Thanks for looking!

-frank
 
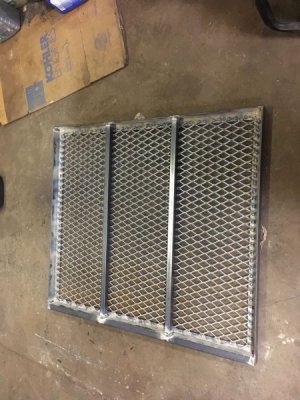
Started making ramps for my new 18' trailer. Since the trailer is higher than my current 12' trailer, the ramp needs to be longer so equipment doesn't get high-sided as it goes onto the trailer, so the ramp needs to be 6' long. I'm going to make them folding ramps, so they should be a little easier to raise/lower and so there's less wind resistance when on the move. Once it's complete and mounted, I'll see how easy it is to raise/lower, and may add springs to them to make it easier to lift them.

This is 1/4 section (2 ramps beside each other so it's full trailer width, each having 2 of these pieces):
IMG_1262.jpg
 
I made a replacement flag bracket for our front porch. The adjustable one was cast aluminum and broke during the recent wind storm that damaged our Bradford Pear trees so bad I cut them down. Video attached


Sent from my iPad using Tapatalk
 
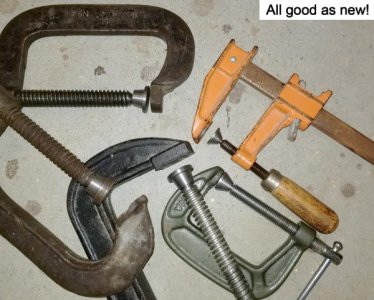
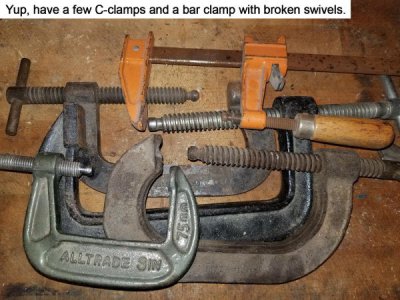
POTD was prep work for more shop organization. In a previous post I showed a 4’ x 4’ x 2’ deep cabinet with a couple of banks of drawers for organizing “stuff” that had accumulated on a shelving unit. Everything got pulled off the 8’ x 6’ tall x 2’ deep shelves and a pair of 4’ x 4’ cabinets were set in place. I had a pile of C-clamps setting on one of the shelves. Had ¾” pipe clamps leaning up against one end of the shelves, a pile of hand screws on the floor and bar clamps attached on the opposite end of the shelves. I’ll detail it in another POTD post, I repurposed a couple of the shelving supports to make a mobile clamp rack. While hanging clamps, I noticed the clamp swivel was off a number of C-clamps and a bar clamp. Spent a few hours making up new faces.

My clamps have a couple of methods of retaining the swivel ends. Some are peened over on the end to retain them to the clamp screw ball. I have some higher-end clamps that use a retaining clip to secure the swivel. Went the later design for these repairs.

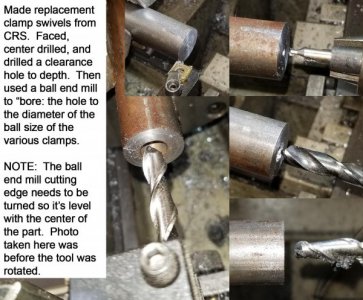
Started by chucking up some CRS which was faced, center drilled and drilled to depth. Then used the closed diameter ball-end mill to the clamp screw ball end to round the bottom of the hole and bore the diameter to size. NOTE: The cutting edge of the ball end mill needs to be on center to get a consistent diameter on the bored hole. Little bit of eyeballing the end mill to center as there’s a helix on the cutter.

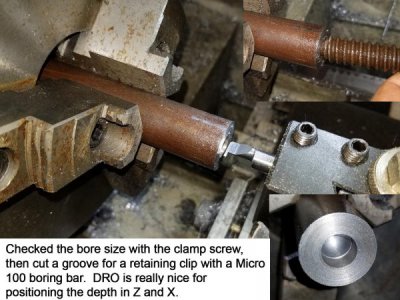
Test fit the clamp screw in the bored hole, then used a Micro 100 carbide boring/grooving bit to cut the clip groove. I arbitrarily picked 90% of the clamp screw ball diameter for the depth of cut axially, and cut the groove 75% of the clip diameter. I used a piece of extension spring for the retaining clip.

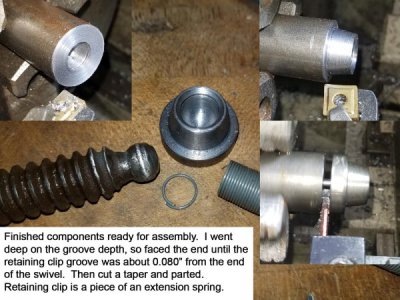
I had started with an arbitrary depth of cut of 1 ½ diameters of the clamp ball which left too much material on the end of the swivel. So, faced the swivel until the groove was about 0.080” from the end. Didn’t show it in the photos, but used a boring bar to cut a chamfer on the swivel just short of the retaining clip groove. Then cut a taper on the outside of the swivel up to the clamp face and parted.

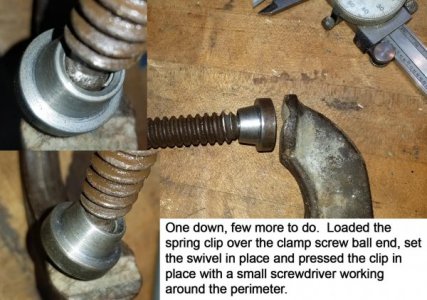
The retaining clips are a piece of extension spring. Slipped the loop over the clamp screw ball, set the new swivel in place and closed the clamp. Then pressed the clip in place with a small screwdriver and worked the clip into the groove around the perimeter. My arbitrary 90% groove depth worked fine, the swivels have about 0.060” off play.

Thanks for looking!

Bruce
20180818_110214.jpg
20180818_113159.jpg
20180818_113503.jpg
20180818_121011.jpg
20180818_121503.jpg
20180818_170333.jpg
 
I wasn't happy with the other knurler I made so I made another one. I copied it from Tom's Technique's site. It is massively rigid and make a really nice knurl. I'm sure the Accu-Trak wheels I bought aren't hurting.
YKKPGTjokAUzQ1TnEZ_qy30w1TYlqDo-L_QlzjvwGNzcCkgaN_ioq_a3w4P5FYedCPuIn2j2m-Cgu28GpHYcX6Lr5uxKecLYSEVgZ0MNyUII7SDp2oEmQa80ZTRyZARb8KC6VtpBTo_sFizhjW5pEzOcI4tHmwHpQNK0d6g5PD_cYsPaeCk2rv7x6c_vFA90IplMUyRFar9RJ8VS5xMgcw-Luvqu0R6iLeNAMYknQjqQuFKAy9PRYGExW_yaNRn4SGW55FpVJg8CQZ7fi1L4tQjrNCPkaSSg1K0Wh4x0_XSP_KOdMGeeBKqSkNENSABwB0gzPitUtmQFqrCx6pdHp-Q8iqOWy240kCTv3kFGSTRiLKDF8hdqmSdq15qoUFd_rdesiXxg75YYmGQHnwLLUZGR5r6ppuQZD50XS_3KJvoB8kXjJmLHWcFm4qYlWbsLav4TgfKHm5Sk_fl6_-t2iWuNvNkMErtol_VapICzgL90jqoMcv39hqP_BzwyOku1fw0lS3fSHegk8KSGDHb9UJ5oVfS0N0MG64_vrsyj4P0sPSSvrRdvCpI3qaBewXJe02fwf_f-hC1tZTCMXoXp-HGzKiIiu3Zrjs2dwOg=w2413-h1810-no
1TrDHt1wMmzlh0Dqhv11lWQYqYe3Bi3T2-o4vwXen23ogVyn-CXoca0vgq9DV7tb0x0EiWqm4V24y05IHeGIgxdixNVKyvLifZoYXHBmZ-6TleV4KdoH5PCl-JIzzEvuoWW-FTzefIizYGI5edQghZ4tUL-OkBlK_NyHAPw-kUcje4wAlPJPwmFt2RUFobZ0tjDGEgCGcYnhx8ftjG8o7NqO96B94aCiHlifTHYvWtFE_4J41tJqq8rT1CXuH8kzn5bpgcHQmalN99oWeRcw0RYm33zeOsVSkyYbLIyFtkBD9bTTAzlCAdJJncAAwW2LbVKGFSuBFgDa8pkv6s1yaw99SRw3zjDuj535QRnvqCcpBi9g3SLtsDA2kQpZzyb3XtwZhw0nqZ19qUzsH9Nhx6xqrefuVDtXbyrGatyKjLsARpY2qaogNbTDRD5w8euWS_Tpy7nPM2UU4dsAX5yq4KHjrXOzDCOJuBKTzD4Vb2Sx9c7SGHt5vQ-RYM0kCZ0jnUIFQElnp81Y9UJXvIHr1MWRQssyUNjijDjqMR2ti45thler8ek6iSKj-1UnYKmkiZgE9RmkdESRsaZMeVAL0v-nNIXyOQkrkqUKmKw=w1360-h1810-no
 
Last edited:
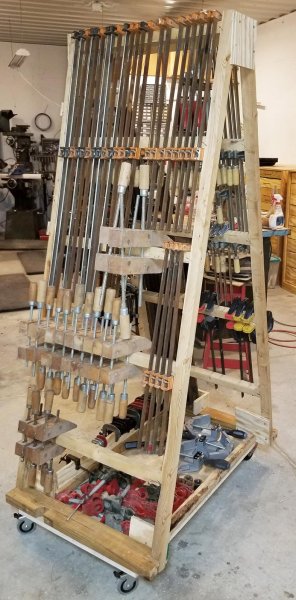
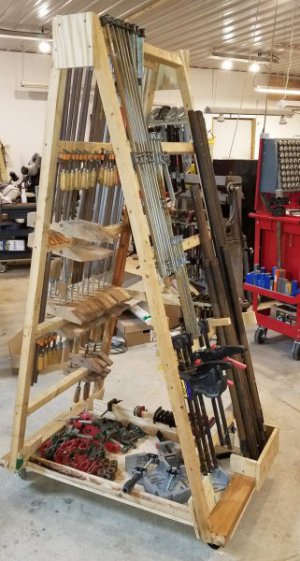
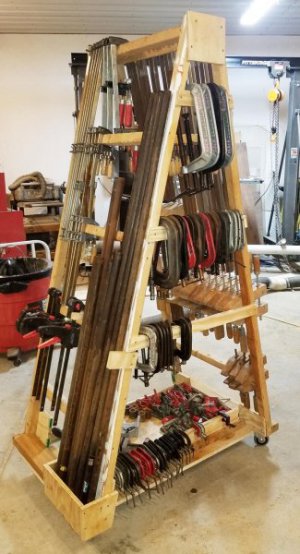
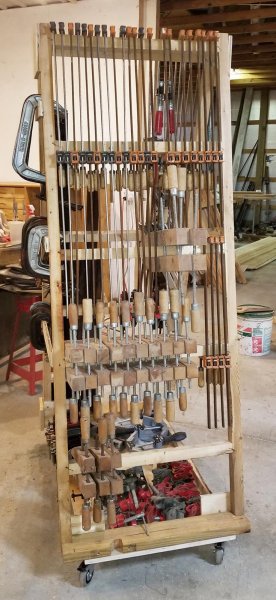
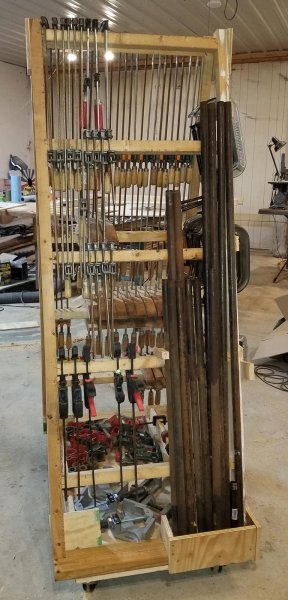
More or less finished another POTD. This one is a rack from most of my clamps: bar clamps, C-clamps, miter clamps, pipe clamps and hand screws. It was made from supplies on hand. I repurposed a couple of storage rack supports and screwed them to a base of 3/4" plywood. Somewhere around 400 lbs. casters underneath. It sure will be nice to roll the clamps to the job instead of piecemeal carrying them.

The base current has the miter clamps and pipe clamp pieces setting on top. Maybe another POTD to organize them a little better, but works for me for now. They don't bounce off the base when moving it around so will probably call it good. Thanks for looking.

Bruce

Shelf supports from an old shelving unit. I figured they be busted up for kindling, but worked out great for the clamp rack.
20180819_140326.jpg

20180819_134854.jpg
20180819_134908.jpg
20180819_134921.jpg
20180819_134937.jpg
20180819_134951.jpg
 
Last edited:
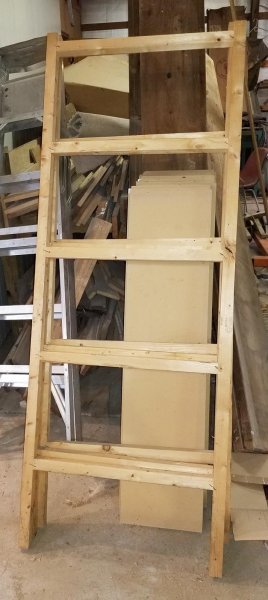
I did exactly (well almost exactly) that at work with some leftover angle. The pre-punched type that you use for adjustable warehouse shelving. I just made a one-sided ladder frame and leaned it against a wall and it still holds a whack of clamps, but your A-frame with wheels is really the way to go. Nicely done.

-frank
 
ddickey:

Nice job on the knurling tool. I built the same one from Tom's site. (Not as nice as yours.)

Could you post a link to the wheels you bought? If I remember, Tom's design calls for 1/4 X 1/4 X 5/8 wheels, which are somewhat hard to find. I bought wheels that size. But that was a long time ago, and I don't care for the pattern they make.

Thanks!
 
Back
Top