-
Welcome back Guest! Did you know you can mentor other members here at H-M? If not, please check out our Relaunch of Hobby Machinist Mentoring Program!
- Forums
- THE PROJECTS AREA
- PROJECT OF THE DAY --- WHAT DID YOU DO IN YOUR SHOP TODAY?
- Project of the Day Mega-Thread Archives
You are using an out of date browser. It may not display this or other websites correctly.
You should upgrade or use an alternative browser.
You should upgrade or use an alternative browser.
2020 POTD Thread Archive
- Thread starter eugene13
- Start date
- Joined
- Jan 11, 2018
- Messages
- 308
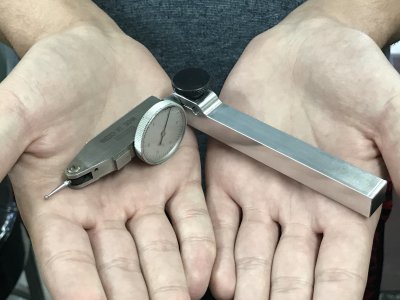
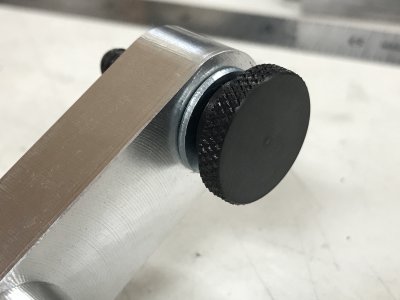
My son and I did a little machining project Sunday. We made a dial test indicator holder for my lathe. I had already it designed in Fusion360 so we started with the CAM files. Then he cut the stock to size. Next we loaded it into the mill and cut the first side. We flipped it over and cut the excess stock off the backside of the part. Then we drilled the top and cut the slot. We tapped the hole for the clamp with the tapping head on the drill press. We finished up by making the knurled steel knob on the lathe, pressed it onto a screw and then blued it. Hopefully some of it rubbed off on him. He seemed like he was interested.


- Joined
- Jan 11, 2018
- Messages
- 308
It doesn't get any better than that. Quality time with your son, I mean.
How old is the boy?
Nice looking DTI holder too!.
Yep, it was fun. He's 16 and thinks that he wants to be a mechanical engineer. I keep telling him that if he could walk into an interview with something that he designed and machined at home he'd have no problem getting a job.
- Joined
- Nov 24, 2014
- Messages
- 3,200
Yep, it was fun. He's 16 and thinks that he wants to be a mechanical engineer. I keep telling him that if he could walk into an interview with something that he designed and machined at home he'd have no problem getting a job.
ME . . . that's excellent.
Practical knowledge of what's required to produce common (and uncommon) features will put him miles ahead of other engineers involved in creating practical designs. From my career, I observed many incredibly expensive and/or unachievable requirements due to no practical knowledge.
- Joined
- Jan 28, 2011
- Messages
- 3,497
Any kind of hands on training is priceless based upon the garbage I have been seeing coming from these multi-billion dollar companies design bureau people. Many have no clue how things are made and what equipment is required to make it. Really, I think engineers should be required to watch every episode of "How it is Made" and "The Secret Life of Machines"!
Pierre
Pierre
- Joined
- Dec 6, 2015
- Messages
- 813
The press is a harbor freight 20 ton hydraulic. It sure have the arm a workout. The broach cutting length was quite a bit less than the gear length, so I had to use some extension bars to clear the gear. The broach itself is about 8" long.That is really nice. Hey, how long is your broach and what type of press did you use?
Robert
joe
- Joined
- Dec 6, 2015
- Messages
- 813
I finished up another project yesterday. I don't play hockey any more, so it was time to hang up my sticks (literally). I'd had this project on my to-do for some time, and yesterday was too perfect. I used a chunk of Delrin and machined a cross brace. The only critical dimensions were the groove widths to match the sticks (not all sticks are the same).


I did wrap the brace up in Navy blue (go Oilers!) hockey tape to cover the white. It can now be hung up, and if the neighbor kids ever want to break out into a street game again, I just unwrap the sticks, grab the inlines, and I'm in.


I did wrap the brace up in Navy blue (go Oilers!) hockey tape to cover the white. It can now be hung up, and if the neighbor kids ever want to break out into a street game again, I just unwrap the sticks, grab the inlines, and I'm in.
- Joined
- Dec 6, 2015
- Messages
- 813
Oh, and I finished the spindle on my Dunlap wood lathe from 1942. A long time ago, people started posting changing the thrust washers on Heavy 10's to bearings to take up slop. I measured up my old wood lathe and did the same with it. It's a 3/4-16 left handed thread on the outboard side of the casting, so it was easy to find a bearing.


Got it all adjusted, and I'm stoked! I need to add the motor mount and tensioning system to this one and it's ready to turn! (Lathe #5 - I think I have a problem).


Got it all adjusted, and I'm stoked! I need to add the motor mount and tensioning system to this one and it's ready to turn! (Lathe #5 - I think I have a problem).
- Joined
- Apr 22, 2016
- Messages
- 966
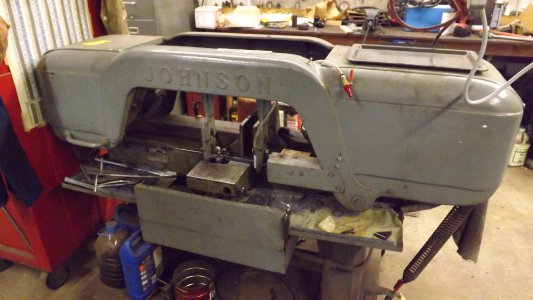
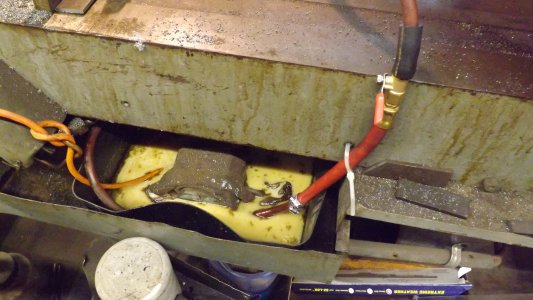
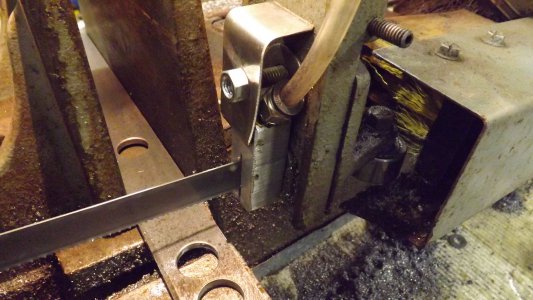
After reading posts this morning in the '5 x 6 band saw poll' I decided to do a little work on my Johnson. I have been waiting for a Chinese check valve to arrive for the coolant line. I remember posting a while ago on getting this cooling pump to work which I finally did and it works great except for the fact that the coolant drains back to the reservoir within seconds of shutting off the machine and takes 10 - 15 seconds to refill the line. So as I was fixing the chicken waterer this morning and took out one of the nipples, I thought 'wow, this would make a good check valve' (SS ball bearing in a plastic threaded housing). So the weight and trigger studs were removed and some odds and end hose adapted it the existing hose and now there is nearly instant flow from the nozzle.
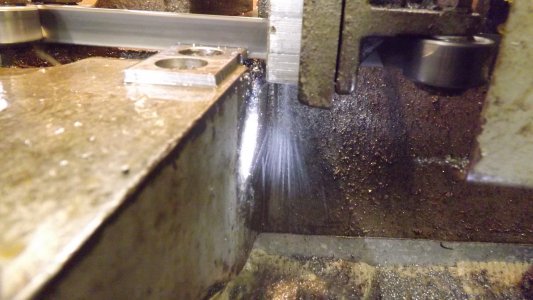
But back to the posts I read this morning, I decided to make a better chip remover/cleaner for the blade. Cut a piece of aluminum 3/4" sqaure by ~ 2-1/2" long which was drilled from the bottom with 3/16" meeting a 1/4" pipe plug thread on angled top to miss the blade adjustment bolt. Then a slot was cut to fit over blade for about 1" on the bottom. Push fittings and a valve with quick disconnect air fitting and it was time for a try. It doesn't take a lot of air and the air noise is barely heard above the motor and cutting noise. The final thing I will add is a solenoid valve (ordered) so it comes on with the saw and coolant and automatically off at end of cut. In the last pic you can see it in operation during a cut.
Thanks for looking
Aaron


