- Joined
- Oct 7, 2020
- Messages
- 2,117
Greg, That looks great! I love the window, very nice!

Outstanding!I'm back from a brief forum hiatus! My phone camera died which I relied on for shop photos. I have a new phone with new cameras, so back to posting.
Tom Lipton showed off a really cool little vise-mount bender in his video on making a canned tuna dewatering press:
If that video starts at the beginning, then skip to 32:10.
That bender looked perfect for my tiny, tiny shop, so I sent Tom an email back in April asking for the plans. I just finished it a couple of days ago, and I figured I'd share it here:
View attachment 383538
I won't embed the remaining photos out of consideration for those with slow internet connections. See the attachments for the rest of them.
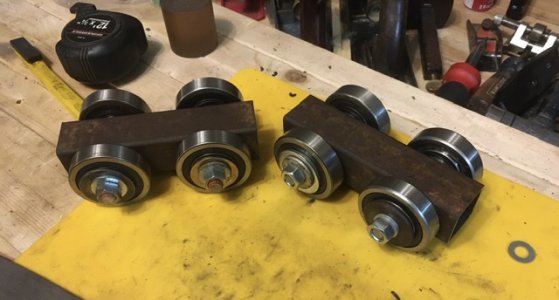
To use this, you just clamp it in your vise, set the fence in place, stick a 3/4" pipe on the rounded section of the swing arm, and yank on the pipe toflip over your crappy wooden benchbend your stock. The bends are pretty clean and I haven't given myself a hernia yet, so this bender has met all of my criteria for success. Plus, there are Features™. Want a wider bend radius? Change out the central 3/8" pin for something larger. I'm also envisioning bending dies I could plug into the 3/8" reamed holes to let me do all kinds of weird stuff and completely exceed the design limitations for this bender.
As an aside, it may seem like I'm getting excited over really simple things that any bender can do, and that's because I am. I've never owned, operated, or really even seen a proper bender before, because I've always been an asthmatic computer nerd that used to avoid any sort of manual labor at all costs. Thought I hated "workshop stuff," when what I really hated was woodworking with power tools. This tangent is getting too long, so I'm going to get back to the bender.
A not-so-quick note on materials and construction!
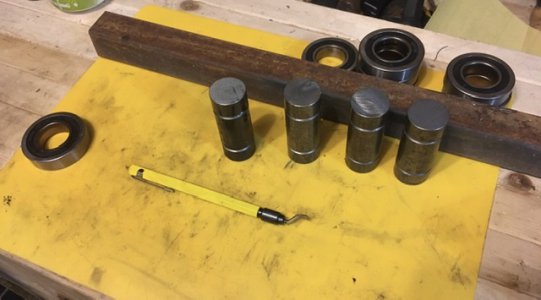
I used hot rolled 1018 angle iron for the table, and cold rolled 1018 for the fence. The "boss" that's welded to the table is also 1018, because I was worried about brazing or welding anything else.
The pivot arm is one solid piece of 4140PH, which is my favorite material to machine. It's also one of the main reasons I decided to work on this project, because there were some fun setups.
I used 932 bearing bronze for the big bushing. It's installed with a .0012 press fit with the pivot arm. I used a 1/2 ton arbor press with a 4 foot cheater bar, and I somehow didn't bend or break anything when doing that.
The 3/8" pin is O1 tool steel. I had planned on machining that oversized so I could harden it and then hard turn it down to final dimensions. I decided not to do that because A) I'm lazy, and B) I don't have CBN inserts and I don't feel like burning up $30 of carbide. I'm sure I'll manage to completely ruin that pin in time, and then I'll kick myself for not hardening it.
Two final notes on this and then I'll go away. I had initially planned on silver brazing the pivot boss to the table because I'm not really set up for welding. All of the reading I had done on silver brazing showed that the join could be just as strong or stronger than welding if you held proper clearances. Turns out, that's really hard to do! I was able to get a clearance of ~.002", but it wasn't super consistent. Another thing that's hard to do is to heat up a 7" piece of angle iron in the open air with MAPP gas. I didn't have enough fire bricks to provide proper insulation, so I spent an hour and a half outside during a cold snap, swearing at this piece of steel while waiting for my silver braze to wet out (which never happened).
In the end, I found a place that TIGged it up for $25 in about 3 minutes, which just shows me that I need to spend more money on tools.
Finally, a quick note on the plans. I don't have the rights to distribute the plans for this, but anyone interested should be able to email Tom and get them for free. I grabbed his email address from the bottom of his site, http://www.oxtoolco.com/
Outstanding!
I would love to have the plans.
Could you make them available to our group?
Is there a database in this forum for these files?
Thank you,
Jeff
 oxtool.blogspot.com
The heat in the 605 is not working, checked and it seems to have a clogged heater core, i'm afraid of unclogging it. I may just make it leak, and changing it is a dash out job.
Reverse flush it. You'll get all the sediment out and I doubt it'll leak. It'll only take you an hour or two and you'll get full heat again. Did it on one my cars years ago and it went from being barely able to keep us from freezing to sweating our backsides off in winter.
Got it."Nothing Too Strong Ever Broke"
Ongoing journal of a life spent designing and building special tools, instruments and mechanical devices for the scientific, medical, metalworking and product development industries. Idea's turned into reality by the mechanical pursuits of Tom Lipton (OX)
Scroll down to the bottom ...


")