- Joined
- May 13, 2019
- Messages
- 1,016
@devils4ever
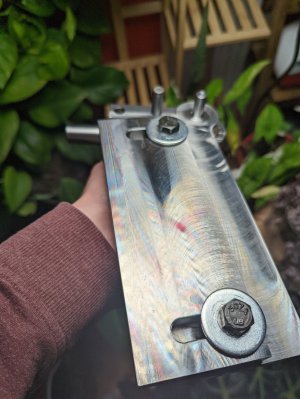
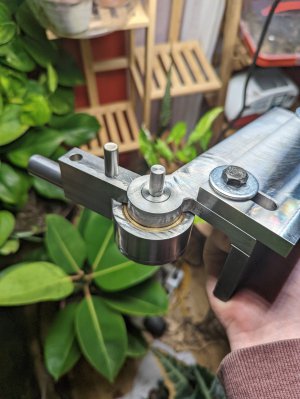
I don't think I've ever seen a tailstock tapper using slotted adapters to drive conventional tap wrenches.
I think those slotted adaptors are a very good idea.
Congratulations on your build.
Thanks.

@devils4ever
I don't think I've ever seen a tailstock tapper using slotted adapters to drive conventional tap wrenches.
I think those slotted adaptors are a very good idea.
Congratulations on your build.
")


The way your brother drives you should have gotten him training wheels!I've said it before, my brother's cars are competing for my attention. The original elephant has always had trouble taking off, the gearbox has been changed before my brother bought the car and the gearing is too high. When my brother was using it mostly on the highway this was great it keep the rpms down but in town it just burn the clutch. So to prevent this i got it smaller wheels, i bought 14" steel rims, had tires from the 206 and mound them and installed them. Buying and mounding with balancing the tires was less then 30$ so it is worth trying to prolong the life of the clutch. Now the tire diameter is much smaller and the car feels like you starting in first gear, before it took 3-4000 rpm to get going uphill now anything above idle is enough.


Ah, I did use commercial pins for the two 3/8" reamed holes. The pin in the middle actually goes into a 3/4" bored hole, so I had to make something myself. Do they make (for lack of a better term) stepped dowel pins? Like, something that'd be 3/4" on one side and 3/8" on the other? Because that would make my life a heck of a lot easier!@Badabinski
Nice job on the bender.
Instead of making your own 3/8" diameter pins, use alloy steel dowel pins. They are hardened and available at ant industrial distributer (or decent hardware store). Try it. You'll like it.
No "standard" stepped dowel pins that I know of. However, 3/4" OD leaves plenty of meat to press a 3/8" dowel pin in, if I understand problem correctly.Ah, I did use commercial pins for the two 3/8" reamed holes. The pin in the middle actually goes into a 3/4" bored hole, so I had to make something myself. Do they make (for lack of a better term) stepped dowel pins? Like, something that'd be 3/4" on one side and 3/8" on the other? Because that would make my life a heck of a lot easier!