-
Welcome back Guest! Did you know you can mentor other members here at H-M? If not, please check out our Relaunch of Hobby Machinist Mentoring Program!
You are using an out of date browser. It may not display this or other websites correctly.
You should upgrade or use an alternative browser.
You should upgrade or use an alternative browser.
A Vertical Slide For A 9x20 Lathe
- Thread starter savarin
- Start date
- Joined
- Feb 2, 2013
- Messages
- 3,627
G'Day,
excellent work Sav!!!
your attention to detail and skill has rendered a wonderful tool
i admire your tenacity and imagination
very well done
excellent work Sav!!!
your attention to detail and skill has rendered a wonderful tool
i admire your tenacity and imagination
very well done

- Joined
- Aug 22, 2012
- Messages
- 4,115
Thanks Mike, its finished, now I can finish the part I needed it for on the telescope.
I decided that a 4mm thread all the way through the gibb clamp was asking for trouble so I drilled all the way with the clearance drill for the thread then drilled a 4mm hole from the other side leaving only 6mm for the thread. The space being taken up with 4mm dia steel pins bearing onto the brass strip.
I then marked the brass strip and attempted to mill flat pockets for 4mm flat pins to sit in so the brass strip couldnt move in any direction. It worked, sort of, but the 4mm end mill did a horrible job and wobbled/flexed producing a larger hole than I anticipated. I went down this route as a test for when I try to improve the lathe cross slide as thats either too tight to move or too loose and lifts.
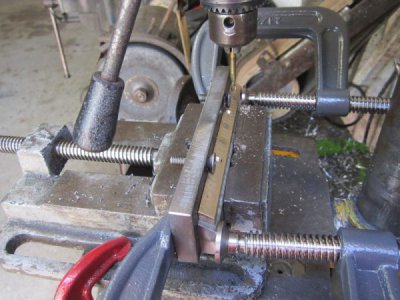
Here you can see how bad the pockets really are, but all the pins sit in them no problems.
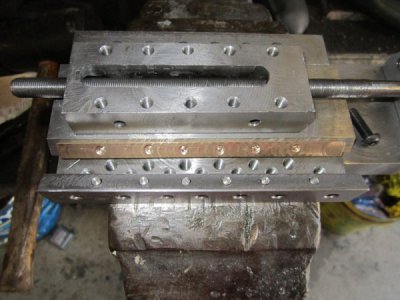
It all bolted up and adjusted to produce a very smooth action with no discernible play.
The lead screw has approx 1/125thmm of backlash in the thread that I didnt even notice untill all the gibb screws were tightened to a very stiff action.
Considering how bad that thread was cut thats not badd. I will make another when I get some good steel.
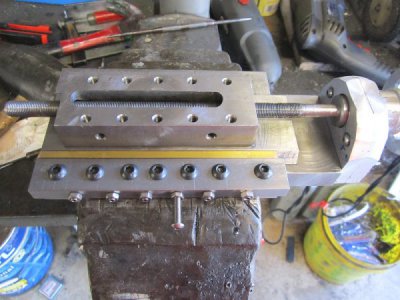
The pivot plate bolted on
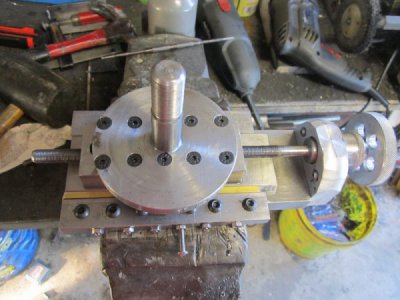
Its now ready to test hopefully this arvo.
I decided that a 4mm thread all the way through the gibb clamp was asking for trouble so I drilled all the way with the clearance drill for the thread then drilled a 4mm hole from the other side leaving only 6mm for the thread. The space being taken up with 4mm dia steel pins bearing onto the brass strip.
I then marked the brass strip and attempted to mill flat pockets for 4mm flat pins to sit in so the brass strip couldnt move in any direction. It worked, sort of, but the 4mm end mill did a horrible job and wobbled/flexed producing a larger hole than I anticipated. I went down this route as a test for when I try to improve the lathe cross slide as thats either too tight to move or too loose and lifts.

Here you can see how bad the pockets really are, but all the pins sit in them no problems.

It all bolted up and adjusted to produce a very smooth action with no discernible play.
The lead screw has approx 1/125thmm of backlash in the thread that I didnt even notice untill all the gibb screws were tightened to a very stiff action.
Considering how bad that thread was cut thats not badd. I will make another when I get some good steel.

The pivot plate bolted on

Its now ready to test hopefully this arvo.
- Joined
- Aug 22, 2012
- Messages
- 4,115
Mounted on the lathe and checking it out for squareness.
Pressed up against the face plate its three thou out at the base of the slide.
Can anyone do the trig to calculate how thick a shim I would need under the front of the angle plate to bring it into square?
My math is not up to this.
the mounting plate is 6" long
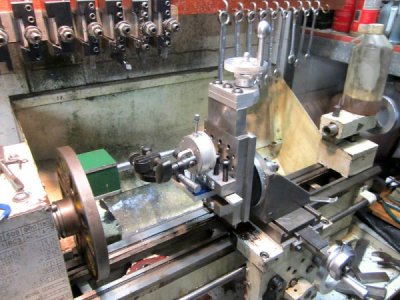
Here I'm adjusting the angle of the slide to ensure it traverses exactly horizontally so I can mark the "0" point for the degree wheel.
Thats all I had time for today, not even a trial cut.
Pressed up against the face plate its three thou out at the base of the slide.
Can anyone do the trig to calculate how thick a shim I would need under the front of the angle plate to bring it into square?
My math is not up to this.
the mounting plate is 6" long

Here I'm adjusting the angle of the slide to ensure it traverses exactly horizontally so I can mark the "0" point for the degree wheel.
Thats all I had time for today, not even a trial cut.
- Joined
- May 16, 2016
- Messages
- 1,695
Thanks Mike, its finished, now I can finish the part I needed it for on the telescope.
I decided that a 4mm thread all the way through the gibb clamp was asking for trouble so I drilled all the way with the clearance drill for the thread then drilled a 4mm hole from the other side leaving only 6mm for the thread. The space being taken up with 4mm dia steel pins bearing onto the brass strip.
I then marked the brass strip and attempted to mill flat pockets for 4mm flat pins to sit in so the brass strip couldnt move in any direction. It worked, sort of, but the 4mm end mill did a horrible job and wobbled/flexed producing a larger hole than I anticipated. I went down this route as a test for when I try to improve the lathe cross slide as thats either too tight to move or too loose and lifts.
View attachment 139640
Here you can see how bad the pockets really are, but all the pins sit in them no problems.
View attachment 139643
It all bolted up and adjusted to produce a very smooth action with no discernible play.
The lead screw has approx 1/125thmm of backlash in the thread that I didnt even notice untill all the gibb screws were tightened to a very stiff action.
Considering how bad that thread was cut thats not badd. I will make another when I get some good steel.
View attachment 139639
The pivot plate bolted on
View attachment 139641
Its now ready to test hopefully this arvo.
Quite an amazing build Savarin, but I'm a little intrigued by the measurement of 1/125th mm. I've not previously heard of that as a dimension, nor seen anything calibrated that way, I'm familiar with 128th inch but as all your other dimensions are in mm I'm not thinking it's a typo. However, well done.
- Joined
- Aug 22, 2012
- Messages
- 4,115
Quite an amazing build Savarin, but I'm a little intrigued by the measurement of 1/125th mm. I've not previously heard of that as a dimension, nor seen anything calibrated that way, I'm familiar with 128th inch but as all your other dimensions are in mm I'm not thinking it's a typo. However, well done.
Thanks Bob, that measurement was a best guess extrapolating from the scale at the handle.
Each division of the scale represents 0.1 mm of travel so as the screw moves approx 1 and a quarter divisions from one way to the other before it "bites" I took that as the best guess.
My brain worked it as one tenth of a mm plus a quarter of a tenth, weird I know but thats how it is.

One full revolution travels one mm.
Now you can see why I need someone else to work out the trig to get the tilt back for exact vertical else its back to t&e
- Joined
- Feb 17, 2013
- Messages
- 4,406
OK, let's be sure I understand things. You ran the carriage toward the head until the slide was against the face plate, and found that there was a .003" gap on the lower end ... ya?Mounted on the lathe and checking it out for squareness.
Pressed up against the face plate its three thou out at the base of the slide.
Can anyone do the trig to calculate how thick a shim I would need under the front of the angle plate to bring it into square?
My math is not up to this.
the mounting plate is 6" long
If so, you don't need trig, just proportions. You know that the slide and faceplate are out by .003" over the length of the slide. Let's call it L. The mounting plate is 6" long. The proportions will be .003"/L = SHIM/6", where SHIM is the thickness of the shim you'll need between the mounting plate and what it's mounted to. If the mounting plate is held against something that's less than 6" long, use that figure instead of the 6" in the above calculation.
Hope this makes sense.
<Quoting again>
Thanks Bob, that measurement was a best guess extrapolating from the scale at the handle.
Each division of the scale represents 0.1 mm of travel so as the screw moves approx 1 and a quarter divisions from one way to the other before it "bites" I took that as the best guess.
My brain worked it as one tenth of a mm plus a quarter of a tenth, weird I know but thats how it is.
One full revolution travels one mm. <end quote>
Your measurement would be 0.125mm (⅛ mm), not 1/125 mm.
By the way, this has been a fantastic build to watch, and kudos to you for your so far excellent results!
- Joined
- Aug 22, 2012
- Messages
- 4,115
Let's call it L. The mounting plate is 6" long. The proportions will be .003"/L = SHIM/6", where SHIM is the thickness of the shim you'll need between the mounting plate and what it's mounted to. If the mounting plate is held against something that's less than 6" long, use that figure instead of the 6" in the above calculation.
Hope this makes sense.
Err, if you mean 0.003/6 = 0.0005 and thats the thickness of the required shim then yes.
I think some experimenting is required to get a shim that thin.
Your measurement would be 0.125mm (⅛ mm), not 1/125 mm.
DOH!
 I cant believe I put that in print
By the way, this has been a fantastic build to watch, and kudos to you for your so far excellent results!
Thank you so very much John, that is much appreciated.
except for the shim to get the tilt corrected I got it squared up today and marked the zero degrees.
Cross drilled my long boring bar for a cutter midway ready to get back to the telescope build.
- Joined
- Feb 17, 2013
- Messages
- 4,406
I think you may have misunderstood what I was saying, or I misunderstood your terminology. So I did a couple of quick 3D renderings of what I think is going on with your slide. They're very "generic," as I don't know the exact construction details of your slide assembly. But I hope they're understandable.
Both diagrams show the faceplate (grey object on left) and the face of the slide (tan object next to it), with the 0.003" gap (exaggerated) at the bottom. The first diagram assumes that you'll want to put the shim between the base of your slide assembly and the plinth (most likely the cross slide of your lathe, shown as a pink object at the bottom). The second assumes that you want to put the shim between a vertical support of your slide (blue object) and some other slide part.
Both of the diagrams show the height of the slide face as having dimension "H". Both of them show the contact area to be shimmed as having dimension "L". On both diagrams, the location and thickness of the required shim is shown as "SHIM".
Here are the diagrams:
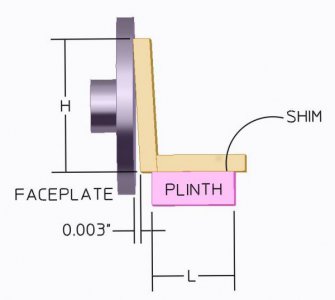
OOPS!!! SHIM is shown at the wrong end of the plinth! Should be at the end nearest the faceplate.
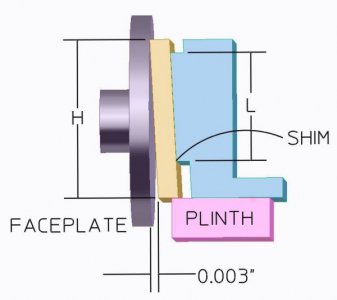
The thickness of the shim comes from proportions - 0.003"/H = SHIM/L
-or-
SHIM = 0.003" * H / L
Hope this is understandable! Do ask for clarification if it isn't.
Both diagrams show the faceplate (grey object on left) and the face of the slide (tan object next to it), with the 0.003" gap (exaggerated) at the bottom. The first diagram assumes that you'll want to put the shim between the base of your slide assembly and the plinth (most likely the cross slide of your lathe, shown as a pink object at the bottom). The second assumes that you want to put the shim between a vertical support of your slide (blue object) and some other slide part.
Both of the diagrams show the height of the slide face as having dimension "H". Both of them show the contact area to be shimmed as having dimension "L". On both diagrams, the location and thickness of the required shim is shown as "SHIM".
Here are the diagrams:

OOPS!!! SHIM is shown at the wrong end of the plinth! Should be at the end nearest the faceplate.

The thickness of the shim comes from proportions - 0.003"/H = SHIM/L
-or-
SHIM = 0.003" * H / L
Hope this is understandable! Do ask for clarification if it isn't.
Last edited:
- Joined
- May 16, 2016
- Messages
- 1,695
OK, let's be sure I understand things. You ran the carriage toward the head until the slide was against the face plate, and found that there was a .003" gap on the lower end ... ya?
If so, you don't need trig, just proportions. You know that the slide and faceplate are out by .003" over the length of the slide. Let's call it L. The mounting plate is 6" long. The proportions will be .003"/L = SHIM/6", where SHIM is the thickness of the shim you'll need between the mounting plate and what it's mounted to. If the mounting plate is held against something that's less than 6" long, use that figure instead of the 6" in the above calculation.
Hope this makes sense.
<Quoting again>
Thanks Bob, that measurement was a best guess extrapolating from the scale at the handle.
Each division of the scale represents 0.1 mm of travel so as the screw moves approx 1 and a quarter divisions from one way to the other before it "bites" I took that as the best guess.
My brain worked it as one tenth of a mm plus a quarter of a tenth, weird I know but thats how it is.
One full revolution travels one mm. <end quote>
Your measurement would be 0.125mm (⅛ mm), not 1/125 mm.
By the way, this has been a fantastic build to watch, and kudos to you for your so far excellent results!
That's more like it.
Err, if you mean 0.003/6 = 0.0005 and thats the thickness of the required shim then yes.
I think some experimenting is required to get a shim that thin.
Savarin, you might find a source of thin shims at the auto parts shop, or try some cheap feeler gauges just pull them apart to get .0005 put a .001 at one end and a.0015 at the other end, or other sizes to suit. A set of feelers probably cost less and is easier to find than a small sheet of shim.
DOH!I cant believe I put that in print
Thank you so very much John, that is much appreciated.
except for the shim to get the tilt corrected I got it squared up today and marked the zero degrees.
Cross drilled my long boring bar for a cutter midway ready to get back to the telescope build.

