
I concur. One should maintain the actual value in a register, of course, and round off when sending to the display. Indeed, I would propose the same method when using a 1um scale. I am pretty sure this is precisely what my commercially produced control panels do. Typically I just work in metric, but I have no hesitation to switch back and forth whenever it is convenient to the task.Looking at some numbers, I'll update my recommendation. If you mround() the value to .0002" for a 5um scale, I would prefer that much better than .0001". Every increment is exactly .0002", and error is still only half of the displayed value maximum.

-
Welcome back Guest! Did you know you can mentor other members here at H-M? If not, please check out our Relaunch of Hobby Machinist Mentoring Program!
You are using an out of date browser. It may not display this or other websites correctly.
You should upgrade or use an alternative browser.
You should upgrade or use an alternative browser.
An Electronic Lead Screw controller using a Teensy 4.1
- Thread starter WobblyHand
- Start date
I resemble that remark.More work... Seems to never end.
Absolutely. For that matter, rounding to the nearest 10 RPM should be fine.Put in a filter on the RPM so it wouldn't jump around as much. (A simple alpha filter, since it is cheap and easy to implement.) That helps. Will get rid of the decimal point, as there's really no value in knowing the RPM to a tenth.
It looks good to me.Changed a few colors to be a little better (at least to me). Increased the DRO font size and color to make it stand out more. Added the axis labels before each axis. I might brighten the background to highlight the DRO output. Touching the Left Hand button turns it orange, and makes the Right Hand button go grey. Still need to to a little more de-bouncing.
One thing you might consider: the shop environment.No matter how hard one tries, oil and grease happen. At the very least I would recommend a removable clear membrane for any touch-screen system. Push buttons are really not a bad idea. You, of course, should do what you think is best for you. I happen to like the push button system, but I would not hesitate to use one like yours.Been thinking about adding feed to stop and thread to stop. I can't add it to the main menu, simply because of the limited display size, but I can make a new page for this advanced feature. At least that way, there will be room for the required controls and settings. For a microsecond I thought about adding push buttons to the board, but decided a new page is better. Then I can have quite a few soft buttons on the page.
I have one suggestion: something thhat clearly indicates whether the units are metric or imperial. That is one thing I dislike on my DRO controls. I have to stop and think which system is on the display. A couple of times I have been mistaken. Fortunately, I have caught it in time.
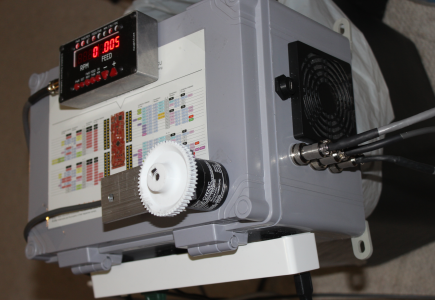
Oh, now that is really nice. I only have one MCU, so I will be forced to use a laptop (ugh) once the system is fully installed. I did add a USB feed-through on the front of the case so I won't have to unmount or even open the case for software updates.This is Unit #2 running. Unit #1 is attached to the lathe. I can debug display stuff upstairs on Unit #2 where it is a little more comfortable. I have remote access to Unit #1, so I can update it from upstairs.
Attachments
I can't add it to the main menu, simply because of the limited display size, but I can make a new page for this advanced feature.
I do think you will like having an additional page for more settings.
For bi-state buttons like LH/RH or start/stop, you could implement as a single button that toggles state. I like that better in my interface designs, and it takes less room.
I agree. A <Stop> button when the unit is already stopped is superfluous, as is an RH button when RH threading or turning is enabled. Just change the button color for clarity. This saves screen space and / or number of buttons. The one thing I might suggest (and am going to add to James' design) is to make a direction indicator of some sort blink when the lead screw is stopped to remind the user which way the carriage will be moving when the <Start> button is pressed. This could be done on the touch screen display, of course, but a pair of external LEDs might be a better choice. Blinking the indicator is, I think, a really good idea. This will catch the user's eye so mistakenly starting the lead screw in the wrong direction is less likely.
Last edited:
- Joined
- Dec 18, 2019
- Messages
- 6,464
Thanks for the recommendations. As for toggle buttons, dunno. I haven't quite got debouncing the touchscreen down pat yet. On the one hand you want a responsive screen, but if you do that the toggles drive you nuts. I don't want to wait seconds for things to change either. The advantage of the toggle is a cleaner screen. I'll try it and see how it looks and behaves.
Units are important! Currently changing units with the thread or feed selection. Might be useful to independently set the units on the two axes. I will put in the units explicitly. They were implied by the thread units, but I agree that they need to be "in your face".
As for a carriage direction indicator, that depends on the handedness of the thread and the spindle direction. So once the spindle direction is known from measuring the RPM, only then can one know the carriage direction. At that point one could see the direction by eye.
Adding a screen is pretty easy. I just have to add a state to the state machine and figure out how it is entered and exited. Then I design the ui, usually with a few pencilled cartoons initially, and implement the graphics. Finally, I add screen sensitive touch sensing (soft buttons) to create touch events. The events are parsed in the state machine to indicate what to do next. Doing this as a state machine has helped me out tremendously. Makes it easier to add functionality without being tied up in knots!
I now have spindle angle and stepper angle being computed on the fly. That only cost four lines of code. I will be using that info soon.
- Joined
- Dec 20, 2021
- Messages
- 889
I just had to build some debounce hardware for a special application. This hardware worked by grabbing the first change on the signal, and holding that value for a period of time, before allowing any subsequent change. Works really well. And it is immediately responsive.I’ve had hood success with the Teensy Bounce library, but that only works for pin inputs. I’m guessing a touchscreen generates different signals.
In the case of a soft button, you could apply the same thing:
Watch for a change. If you detect a change on the button, assume it was deliberate and run the code.
Simultaneously lock that button out from subsequent changes for some period of time (75ms, 100 ms, etc.).
If after the lock out period you detect another change, do the same (It will most likely be the release...).
By doing so, you get immediate responses from the screen, but prevent bounce after the fact.
- Joined
- Dec 18, 2019
- Messages
- 6,464
I need a way to do that essentially for all the buttons. There's a lot of them, so it has to be some sort of function that does this cleanly. The function has to return right away, so there cannot be any delays. It also has to preserve the internal state, (time of button press) like a class will.I just had to build some debounce hardware for a special application. This hardware worked by grabbing the first change on the signal, and holding that value for a period of time, before allowing any subsequent change. Works really well. And it is immediately responsive.
In the case of a soft button, you could apply the same thing:
Watch for a change. If you detect a change on the button, assume it was deliberate and run the code.
Simultaneously lock that button out from subsequent changes for some period of time (75ms, 100 ms, etc.).
If after the lock out period you detect another change, do the same (It will most likely be the release...).
By doing so, you get immediate responses from the screen, but prevent bounce after the fact.
This capability is not necessary for some menus, but is very important for others. If the button causes a change in state, then the context changes and that button is no longer available. However, there may be another button in the other menu, that shares the same physical location, (but has different meaning due to the context change) and we do not want to press that one, as soon as the context changes. Kind of ugly really, but I need to come up with something. Most of the time, things behave well, but I am not sure if that is because I have sort of trained myself to have a light touch. Other users could have an issue with it.
Well, define "without any delay". A delay of less than 40ms is not generally noticeable to a human being. At 3000 RPM, however, it is two full revolutions of a shaft. Digital processing can do wonders, but in this case there may need to be some level of both digital and analog debouncing, depending upon the exact situation and purpose of the button. Some functions can simply be triggered on the leading edge and ignore any subsequent input over a reasonable length of time.
- Joined
- Dec 18, 2019
- Messages
- 6,464
Kind of on the fence with implementing the de-bounce, mostly because I am not sure of the behavior I want really. Going to have to try a couple things to see which seems easier to live with.
But, on the road towards progress, I updated the rotary encoder count to 64 bits, so I can minimize any rollover occurrences. Had to modify a library to do that, at least until the author adds the feature. Changed the DRO outputs to a fixed pitch so the outputs sort of mimic a fixed display. Got to figure out how to right justify the output though. None of the libraries allow this in a simple fashion, that I know of. Fiddled with the display a bit to get rid of a couple of pixels that weren't being erased.
Finally managed to sync up all my code on various platforms to each other. Had varying versions on my laptop and two different RPI's. Yeah, that was a mess. Think I will create a local git repository to avoid this mess in the future. That way the remote RPIs push or pull the code from the repo as needed. Have to brush up on git again, every time I use it, I have to look things up... Need to make cheat sheets on each node, because I never can remember this kind of stuff.
Maybe I can put the repository on my last RPI4. I did set it up as a mini-server, booting from a SATA SSD, but my attempt at RAID failed using WD NVMe SSD's. The second disk died when added to the array. I got a replacement under warranty for the first NVMe SSD. First time I added the replacement to the array, it died as well. https://www.linuxfoundation.org/blog/blog/classic-sysadmin-how-to-run-your-own-git-server seems to be a decent write up on the process.