Colchester Chipmaster Restoration

This lathe will be coming home sooner than expected and rushed into immediate service since my brother missed not one, but two beautiful Colchesters at auction.
I guess in the end, we were not willing to kill for a new modern Colchester... maim someone sure, but not kill. :gangster:


I was impatient anyway and really wanted to test this baby out.
 
Since my KC15 collet chuck is missing the front cap, and since the one replacement part would cost £286 plus postage I've decided that I'll make a draw bar 5C collet.

This will preserve as much as my distance between centers as possible for smaller bar stock and should yield the best precision. I'll machine over size, heat treat and the grind the finished dimensions. I guess now you know why I was so thrilled to get 7 grinding fixtures recently. I'll have to make a tool post grinder too for some of the internal tapers.

The 5C collet adapter slips into the 4.5MT in the spindle, and also goes over the taper D1 taper to protect the nose from damage. Of course a draw bar (not shown) will pull the 5C collet adapter and collet both tight into the spindle bore. A threaded hole(s) in the adapter will allow cap screw to be tightened and push out the collet adapter if necessary.


spindle 5C adapter and collet.PNG
The inside of the collet adapter that goes over the spindle nose will have sufficient clearance so that the adapter does not bottom out on the nose, and can only seat in the 4.5MT of the spindle. I'll first finish grind the outside of the 4.5MT on the adapter on the surface grinder, then seat the adapter into the spindle and use an internal grinding wheel on the tool post to grind the final 5C dimensions on the inside of the adapter. The goal is near perfect concentricity so I can make sweet little engine parts.

spindle 5C adapter and collet2.PNG
 
Are your ways in good shape ? My Smart Brown has a 5c taper which is pretty neat so I made the missing parts for the drawbar to use it as you are doing. I found that the wear on my ways was fairly uniform over about 12" but the few inches nearest the spindle which is what are used with the collets had virtually no wear so any stock with stick out over an inch or two could vary in diameter 2-3 thou. I went to a 5c chuck to get back into the wear area and eliminated all but about .0007 or the variation. Evidently the collet chuck was little used, maybe due to the missing parts on the drawbar. The compound screw was much more worn than the cross slide screw which is rare too. Dave
 
Are your ways in good shape ? My Smart Brown has a 5c taper which is pretty neat so I made the missing parts for the drawbar to use it as you are doing. I found that the wear on my ways was fairly uniform over about 12" but the few inches nearest the spindle which is what are used with the collets had virtually no wear so any stock with stick out over an inch or two could vary in diameter 2-3 thou. I went to a 5c chuck to get back into the wear area and eliminated all but about .0007 or the variation. Evidently the collet chuck was little used, maybe due to the missing parts on the drawbar. The compound screw was much more worn than the cross slide screw which is rare too. Dave

I haven't checked the ways except for visually. They don't look worn but that doesn't mean anything.

This is going to be a precision piece. If the ways need work they will get work rather than me modifying how I make use of the lathe... at least in the long term. I'm looking at new bearings too and yes I know they're about $5000 for a set
 
you may get lucky. My experience is that spindle bearings, if still lubricated last better than the rest of the machine. Apron oilers tend to fail causing bed wear but hopefully the spindle bearings are still good. Dave
 
This will be my last post here about the chipmaster refurbishment. Try a google search to see if I decided to create my own site to blog about it or not, I have yet to decide.
 
Well until I create my own website and blog I'll add some more here to keep track of my progress and issues with refurbishing a lathe nearly as old as I am.

I've started to systematically tear down and cleaning some parts to catalogue what is missing and what parts are essential to replace with originals in order to meet my standards for a quality restoration.

Where original parts are no longer available I'll try to machine new parts to the original specifications, but may make minor changes to improve functionality and durability. For instance I'll be treating tool post and holders with black oxide finish. I'll be replacing the square head clamping screws in the tool holders with cap head screws to be able to use T-handle Allen Wrenches. I'll also be replacing many of the simple oil seals with modern garter spring oil seals.

So, the lathe has no oil in either the head stock or the gear box. The oil levels in the apron and the variator remain a mystery for now. I have ordered 5 liters of Morlina 10 for the variator and headstock. Once I have the oil I'll flush and refill the variator and headstock both to be able to test run the lathe, and to assess the state of the oil seals.

I haven't found a local supplier of ISO Tellus 68 oil for the gear box, or rather I haven't heard back from the company Shell referred me to, so I may just use an equivalent sold by Canadian Tire; Certified AW68 Anti-Wear Hydraulic Oil, it's about $100 for 18.9 liters.

I started the lathe tear down with the original Dickson tool post and tool post holders.

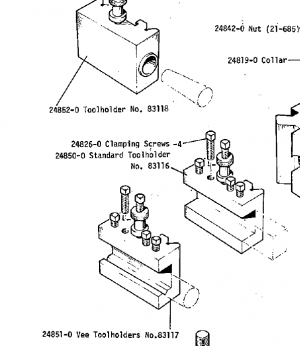
My lathe came with the optional "Colchester Type No. 259" quick change tool post, aka the Dickson Tool Post in the S1 size, along with four 24850-0 Standard Tool Holders No. 83116, one 24852-0 Morse Taper Tool Holder No. 83118, and supposedly one 24851-0 Vee Tool Holder No. 83117. I may just not have noted the Vee tool holder among all the others. I'll have to check again later.

1669146984072.png

I'm missing the following original parts rom the tool post itself:

Locating Pin 24821-0,
Collar 24819-0
Nut 24842-0, but have non-original nut

1669144998687.png

I may be missing one standard tool holder, and one vee tool holder, and I am definitely missing a couple of clamping screws. I checked the box of odds and sods but I didn't see anything there that obviously belonged to the tool post in there.

I ran into issues when my evaporust gel had the gel part solidify into a solid mass and render the gallon useless... that pisses me off and slows things down.

Next up will be the compound disassembly, cleaning and rust treatment.
 

Attachments

  • 1669145680664.png
    1669145680664.png
    26.7 KB · Views: 4
I forget, did we determine what threads the machine has? Dave
 
I forget, did we determine what threads the machine has? Dave
You mean what threading capabilities?

44 Imperial 2 to 120 TPI
14 metric 0.5 - 12mm

I haven't yet figured how to set up metric threading but then again, I am very happy to never thread metric

1669161505694.jpeg
 
Back
Top