

-
Welcome back Guest! Did you know you can mentor other members here at H-M? If not, please check out our Relaunch of Hobby Machinist Mentoring Program!
You are using an out of date browser. It may not display this or other websites correctly.
You should upgrade or use an alternative browser.
You should upgrade or use an alternative browser.
First facing cut - carbide insert - 5/8" brass round
- Thread starter ssdesigner
- Start date

- Joined
- Nov 23, 2020
- Messages
- 787
Sorry, I was looking at the tools incorrectly. 0 back rake on brass should be fine.
- Joined
- Feb 24, 2019
- Messages
- 924
This is the setup I just used for facing brass. It's my go-to for all soft metals and works pretty well.
Material is @2.75" round brass
HSS vee grind cutter with a slight rake.
Speed 430rpm.
Depth of cut was only .005
feed rate unknown faster on the front face, slower on the side. Nature of my machine without changing gears.
On the face I was getting nice curlies due to the angle of the cutter. On the side I was getting tiny chips.
Attachments
- Joined
- Mar 5, 2023
- Messages
- 65
A huge thanks to everyone posting here, I really could not have gone any further without your quick replies. Thank you.
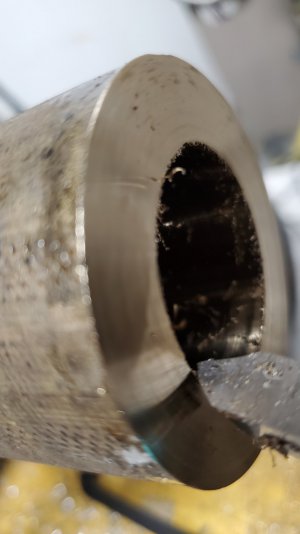
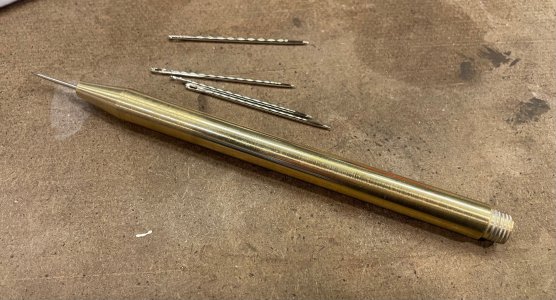
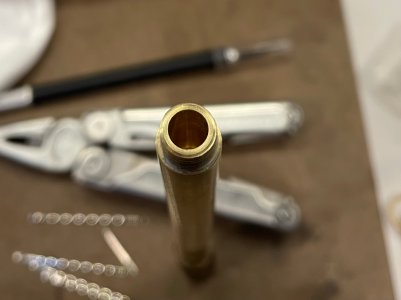
I was finally able to put a couple of hours in yesterday. Getting solid results now. Here is a progress pic of my scribe. Today it gets knurling, my #52 drill bit arrives in the mail so my heavy sewing needles will fit and I'll tackle the screw on cap. The 2nd pic is to show that there is a .250" diameter by 1.125" deep cavity in the top half of the scribe for storing 4 extra scribe tips.
I was finally able to put a couple of hours in yesterday. Getting solid results now. Here is a progress pic of my scribe. Today it gets knurling, my #52 drill bit arrives in the mail so my heavy sewing needles will fit and I'll tackle the screw on cap. The 2nd pic is to show that there is a .250" diameter by 1.125" deep cavity in the top half of the scribe for storing 4 extra scribe tips.
Attachments
- Joined
- Apr 23, 2018
- Messages
- 6,525
Now you're cooking with gas!
- Joined
- Mar 5, 2023
- Messages
- 65
What’s amazing is just how endless the need for a tool is, lol. Like everyone else I was warned about the cost of tooling, but my god. Every step forward is 2 back with one hole now needing a #52 drill bit and another a size Q drill bit.
- Joined
- Dec 24, 2020
- Messages
- 1,030
Glad to see it's working!
I didn't see this thread initially, and you moved away from carbide inserts so this is only directed at the initial problem and setup. I say that since it's a good bet at some point you will want/need to use carbide insert tools.
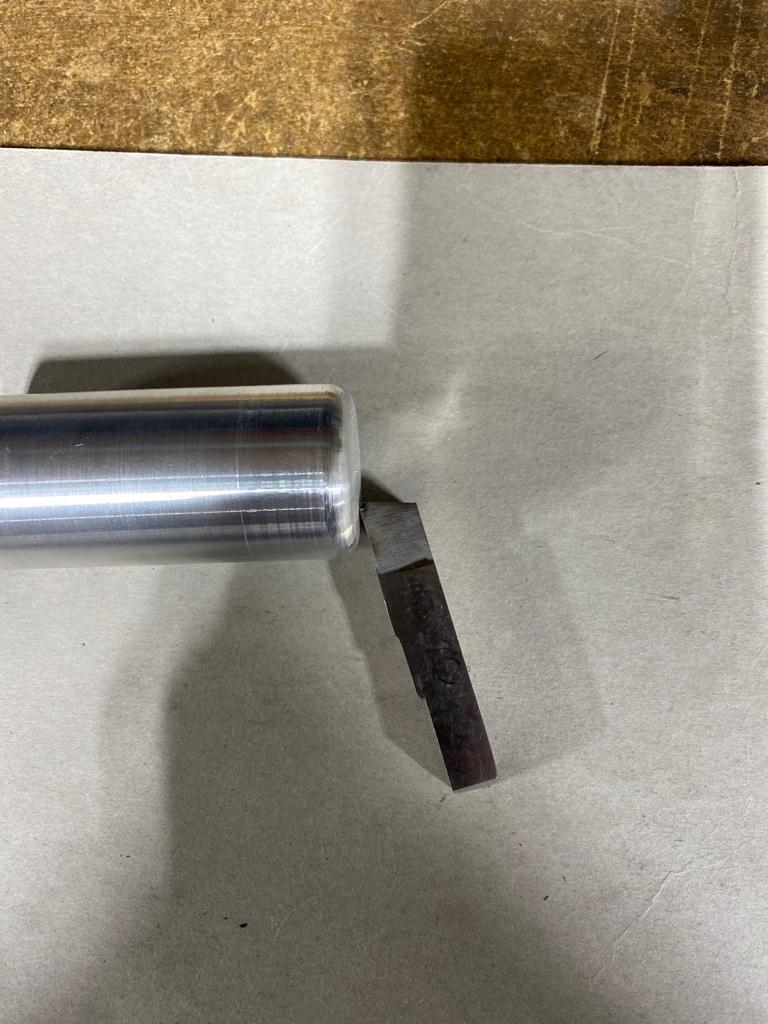
The carbide insert tool you were using is definitely a turning tool but it's not really meant for facing. It would have worked for turning but the orientation of your compound/tool post was wrong. That tool shape is for when you aren't going to be turning to a square shoulder and/or want to leave an angled shoulder. It can also be used to make chamfers as mentioned.
I said the compound/tool post was wrong, so we need to take a bit of a step back. One of the benefits of carbide insert tools is that they take some of the guesswork out of setup, but there's a gotcha in there you have to know from the start. Carbide tool holders in a QCTP assume that the tool post (really tool holder) is going to be square to the face of the chuck. They have the angles built in to the holder so all you have to do is square up the tool post to the face of the chuck and you're set other than making sure the insert tip is on center.
In addition to using carbide inserted tools, parting requires the tool to be absolutely square to the face of the chuck (or absolutely perpendicular to the work if you want to look at it that way) so it's a pretty important concept.
There are two easy methods that normally work on any lathe. One, is to slightly loosen the tool post so it can rotate and push the side against the chuck jaws (works best if the jaws are in good shape). To eliminate the jaws as a variable I like to use a 123 block on the face of the chuck and then move the carriage until the tool/tool post push on the 123 block...that will get the tool perfectly square, then tighten the nut on the tool post. I actually like to use the tool itself on the 123 block to eliminate variation in the tool holder and tool post. If the tool itself is square to the chuck, that's all that really matters.
I picked up a couple of scruffy 123 blocks super cheap at an estate sale a while back...cleaned them up and they're good enough for stuff like this:

The later posts with the HSS you had ground for you show how it's easy to get confused about which angle goes where when you're new to this. With HSS you often have to move the tool post around and combine that with grinding angles, relief angles, etc into the tool so there are a lot of variables involved. I won't argue that being able to grind HSS to a useable shape is a bad skill to have, but for a lot of things I like just being able to drop a tool in the holder and get to work without fiddling around with the tool post orientation, etc.
Here's a pic that shows how inserted tools (this is a CCMT insert holder) have the angles built in from the start using a piece of scrap for reference. This tool will face and turn to a square shoulder and all you have to do is get the tool square to the chuck and on center.

I didn't see this thread initially, and you moved away from carbide inserts so this is only directed at the initial problem and setup. I say that since it's a good bet at some point you will want/need to use carbide insert tools.
The carbide insert tool you were using is definitely a turning tool but it's not really meant for facing. It would have worked for turning but the orientation of your compound/tool post was wrong. That tool shape is for when you aren't going to be turning to a square shoulder and/or want to leave an angled shoulder. It can also be used to make chamfers as mentioned.
I said the compound/tool post was wrong, so we need to take a bit of a step back. One of the benefits of carbide insert tools is that they take some of the guesswork out of setup, but there's a gotcha in there you have to know from the start. Carbide tool holders in a QCTP assume that the tool post (really tool holder) is going to be square to the face of the chuck. They have the angles built in to the holder so all you have to do is square up the tool post to the face of the chuck and you're set other than making sure the insert tip is on center.
In addition to using carbide inserted tools, parting requires the tool to be absolutely square to the face of the chuck (or absolutely perpendicular to the work if you want to look at it that way) so it's a pretty important concept.
There are two easy methods that normally work on any lathe. One, is to slightly loosen the tool post so it can rotate and push the side against the chuck jaws (works best if the jaws are in good shape). To eliminate the jaws as a variable I like to use a 123 block on the face of the chuck and then move the carriage until the tool/tool post push on the 123 block...that will get the tool perfectly square, then tighten the nut on the tool post. I actually like to use the tool itself on the 123 block to eliminate variation in the tool holder and tool post. If the tool itself is square to the chuck, that's all that really matters.
I picked up a couple of scruffy 123 blocks super cheap at an estate sale a while back...cleaned them up and they're good enough for stuff like this:
The later posts with the HSS you had ground for you show how it's easy to get confused about which angle goes where when you're new to this. With HSS you often have to move the tool post around and combine that with grinding angles, relief angles, etc into the tool so there are a lot of variables involved. I won't argue that being able to grind HSS to a useable shape is a bad skill to have, but for a lot of things I like just being able to drop a tool in the holder and get to work without fiddling around with the tool post orientation, etc.
Here's a pic that shows how inserted tools (this is a CCMT insert holder) have the angles built in from the start using a piece of scrap for reference. This tool will face and turn to a square shoulder and all you have to do is get the tool square to the chuck and on center.
- Joined
- Mar 5, 2023
- Messages
- 65
It’s a deep rabbit hole for sure. It gets even worse when you get a milling machine and start tooling that up!

Oh, I’m there. I got the 3990 mill and opted to save a few bucks by getting it without DRO. That worked in my favor because last week LMS ran a sale on their DRO system and I grabbed it. And an android tablet. And a tablet mount. And tramming shims. With any luck I’ll actually get to use the mill next weekend.