

-
Welcome back Guest! Did you know you can mentor other members here at H-M? If not, please check out our Relaunch of Hobby Machinist Mentoring Program!
You are using an out of date browser. It may not display this or other websites correctly.
You should upgrade or use an alternative browser.
You should upgrade or use an alternative browser.
Group Project: Dividing Head - Organization and Design
- Thread starter Shotgun
- Start date
- Joined
- Aug 3, 2017
- Messages
- 2,437
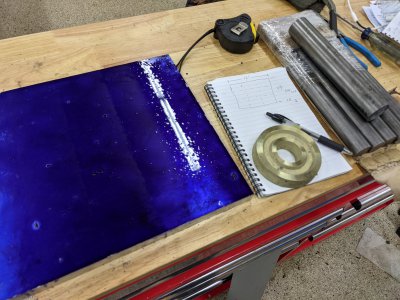
Ok, started getting my materials together! For the worm wheels, I have this hunk of aluminum that is .775 thick, 11.25x12". I should be able to get 9 wheels out of this. Additionally @rwm cast that gorgeous brass one that I will make as well!

Additionally (rhs of screen) I have 5 12"*1 1/16" 12L14 chunks for the worm gear shaft. Plus 1 more hunk of 1.5" in case it gets really bad!
Here the aluminum is blued up (and drying while I post this!) So I can mark it and chop it up somehow. Hopefully my woodworking bandsaw doesn't complain too much, I don't think I can afford a circular saw blade's kerf!
Attachments
- Joined
- Apr 29, 2019
- Messages
- 2,059
When you cut out the blanks from that chunk of AL, are you planning to cut squares or circles?
I was thinking to use a Ø3.75 hole saw to cut the blanks. You will have to measure the saw to be sure there will be enough material left on the OD of the puck, it will be close. This will also give a center hole to start from.
I was thinking to use a Ø3.75 hole saw to cut the blanks. You will have to measure the saw to be sure there will be enough material left on the OD of the puck, it will be close. This will also give a center hole to start from.
- Joined
- Aug 3, 2017
- Messages
- 2,437
Actually most of the way to cutting them to squaresWhen you cut out the blanks from that chunk of AL, are you planning to cut squares or circles?
I was thinking to use a Ø3.75 hole saw to cut the blanks. You will have to measure the saw to be sure there will be enough material left on the OD of the puck, it will be close. This will also give a center hole to start from.
") just finished cutting long way to get 3 strips, then put a couple of pieces through my bandsaw to cut them down the other way.
just finished cutting long way to get 3 strips, then put a couple of pieces through my bandsaw to cut them down the other way.Nearly done!
I didn't really want to buy the hole saw, plus always end up messing them up
though if I had a tough time fitting them all (and had to tessalate) I probably would have invested.- Joined
- Aug 3, 2017
- Messages
- 2,437
And chopped up I had plenty of room in 1 dimension, so I used the circular saw first. That long edge is about 4" on all(or a touch less).

Next I set them up in the horizontal bandsaw and let that go to work, which did a surprisingly good job! Those dimensions are all right about 3.7 or so, at least 1 is a touch smaller. I think it'll be alright, since I need to be at 3.600.
I found the centers using the diagonal method which I'll use to set these up in the 4 jaw. I figure I'll cut the centers, then make an arbor to hold them centered while I cut the outside to size. I haven't decided yet if I'm going to cut the center too small do my arbor can have a key to keep them from spinning (then come back to cut the center to full size!), else I was just thinking super glue.
Too bad this wasn't designed with a woodruff key, it would make my decision way easier
I had plenty of room in 1 dimension, so I used the circular saw first. That long edge is about 4" on all(or a touch less).Next I set them up in the horizontal bandsaw and let that go to work, which did a surprisingly good job! Those dimensions are all right about 3.7 or so, at least 1 is a touch smaller. I think it'll be alright, since I need to be at 3.600.
I found the centers using the diagonal method which I'll use to set these up in the 4 jaw. I figure I'll cut the centers, then make an arbor to hold them centered while I cut the outside to size. I haven't decided yet if I'm going to cut the center too small do my arbor can have a key to keep them from spinning (then come back to cut the center to full size!), else I was just thinking super glue.
Too bad this wasn't designed with a woodruff key, it would make my decision way easier
i have most of my material on hand need to order some aluminum and some softer brass and a new boring bar and i should be ready to start at it. After i finish and hone a few special made tools for the jobs. Honing some of the radius cutters isnt gonna be pretty lol
- Joined
- Aug 13, 2020
- Messages
- 1,342
I found the centers using the diagonal method which I'll use to set these up in the 4 jaw. I figure I'll cut the centers, then make an arbor to hold them centered while I cut the outside to size. I haven't decided yet if I'm going to cut the center too small do my arbor can have a key to keep them from spinning (then come back to cut the center to full size!), else I was just thinking super glue.
Too bad this wasn't designed with a woodruff key, it would make my decision way easier
You could start by drilling and tapping for the set screw and put a channel on your arbor.
![KIMG0731[1].JPG](https://www.hobby-machinist.com/data/attachments/324/324065-267871b903b36f1f08429d04e0cc4dda.jpg "KIMG0731[1].JPG")
- Joined
- Aug 3, 2017
- Messages
- 2,437
I thought about that, but I couldn't think of a way to ensure that the set-screw ended up between two teeth that way.You could start by drilling and tapping for the set screw and put a channel on your arbor.