

-
Welcome back Guest! Did you know you can mentor other members here at H-M? If not, please check out our Relaunch of Hobby Machinist Mentoring Program!
You are using an out of date browser. It may not display this or other websites correctly.
You should upgrade or use an alternative browser.
You should upgrade or use an alternative browser.
[Newbie] Jet 1236py reversing switch
- Thread starter walz10
- Start date

Nice switch! Could you please give a link? I've bought one or two previously, but this one looks like it has a handier "pattern." Thanks!

60 Amp Drum Switch Forward/Off/Reverse Motor Control Rain-Proof Reversing 60A D | eBay
Wash-down Safe and Rain Proof. 3 Positions: Forward, Stop, Reverse. Switch Action: Maintained (Stay Switched).
www.ebay.com
Sent from my iPad using Tapatalk
- Joined
- Feb 13, 2017
- Messages
- 2,138
A good simple switch. I bought several so I would have a common system on all machines. Haven't gotten around to replacing all of them yet though. It's "in the works"~~~ They're Chinese, but are rated at several times the load of a fractional horsepower motor. We shall see~~~
To answer your question:
There are two seperate but related portions. The first is as a line switch. Take the two wires from/to the power switch and locate them on the top contact. That's the easy one. I would suggest the line side, or power cord be to the left. Not an absolute, just the way I think.
The second portion is to find the two wires that are for the start winding of the motor. This is where your buddy may come in handy. Remove them from the "lugs" or "stabs" on the motor. Route them to the left side of the switch, the middle and bottom. From the right side, again middle and bottom, route two wires back to the motor, connecting them to the points from which you removed the wires earlier.
Make sure the green wires have not been disrupted. They are a safety ground and should never be disconnected on a functional machine. I, and any other decent electrician, will be obsessed with this wire. The wire need not be connected in the switch, it's all plastic, an insulator.
The motor is ready for a test run. Hook it up and try it. If the motor runs backwards, swap the leads on the middle and bottom right. Forward and backward are relative. I run my machines backward from the labels because of my positioning of the switches. Again, just the way I do things. Make it comfortable for you, instinctive motions.
There are several possibilities to make the connections, depending on how things are routed. The line cord can come into the switch first, which would require the neutral or white wire be passed on to the motor with no connection in the switch.
Most of my machines, and my preferred method, is to bring in the line cord to the motor and use a single 7 conductor rubber cable to the switch. It does take a lot of space at the motor, though.
.
@Bi11Hudson thank you very much. I may have more questions and I will wait for my buddy to give this a shot but in the mean time if you’d be willing I’d like to post a better picture of the wiring diagram and try to work from there.
Edit-@hman you’re welcome. Glad to help
Sent from my iPhone using Tapatalk
Edit-@hman you’re welcome. Glad to help
Sent from my iPhone using Tapatalk
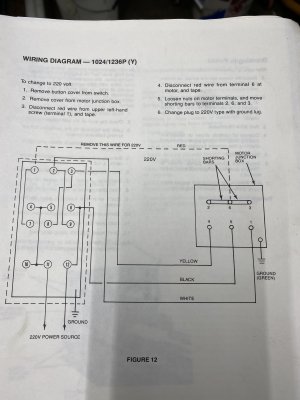
From this diagram it assuming that the wire colors are in the correct and original places for 220v operation. It appears that the constant is the yellow wire and will land on the top terminal of the switch and if I’m not mistaken will receive a hot wire from the other side of the switch? The other two wires from the motor will land on the two terminals below that. The remaining hot wire coming into the switch will land on either of the two terminals below that and be jumped to the remaining empty terminal? I’m just brain storming here and to be honest don’t really know what I’m doing. I’m an auto mechanic and think a have a fair understanding of DC electronics used on vehicles. The higher voltages here and all the horrible stories I’ve heard have me more than a little hesitant to dive in and just try something without someone saying, yeah you’re not gonna blow something up or fry yourself. Thank you everyone for the help. I’ll try to draw a diagram tomorrow and post it. It may make more sense than my long description of what I’m thinking.
Attachments
- Joined
- Apr 30, 2015
- Messages
- 11,299
Walz10: What we need to see is the 110 volt connection to compare with the diagram above. I want to verify how the motor shorting bars connect for the 110 case vs the 220 v case. We will probably need to run a couple extra wires from the motor to wherever you plan to mount the switch.
The only info that we can use so far is the switch internal diagram. That, plus the motor connections will be enough to wire it up to reverse
-Mark
The only info that we can use so far is the switch internal diagram. That, plus the motor connections will be enough to wire it up to reverse
-Mark
Last edited:
@markba633csi this has what your asking for. If you’d like to see the diagram in the manual I can take a picture tomorrow evening.
Attachments

- Joined
- Apr 30, 2015
- Messages
- 11,299
Yes the 110 volt diagram in the manual is what I need to see
I'm sketching up a drawing for you
I'm sketching up a drawing for you