[Newbie] Jet 1236py reversing switch

This is one possible way, once we identify the motor wires: I'm not positive about the wire colors, we should check with a multimeter
Jetschem3.jpeg
 
Last edited:
My hunch is the black and yellow are swapped- we shall see
The original factory switching swapped the run legs instead of the start legs possibly
I suspect for the 110 volt case the 1,3 and 2,4 are strapped, making red and black the start leg
 
So actually I think it's like this: (the existing pushbutton could be inserted in the incoming power leg(s) if desired)
As Bill H. mentioned above, motors like this need to come to nearly a full stop (so the centrifugal switch can re-close) before they can be reversed
Jetschem3b.jpeg
 
Last edited:
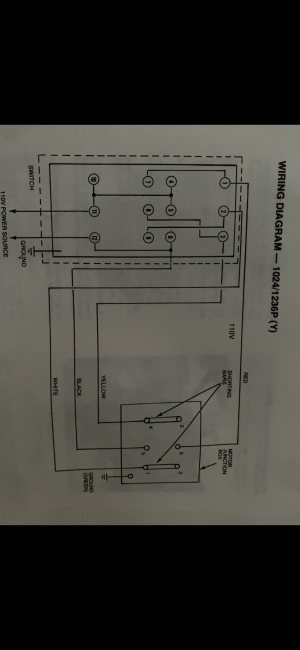
It occured to me after I had shut down last night that I had given instructions for wiring a 120 motor circuit, not a 240. This is a seriously misleading mistake as one side of the 240 volts will stay hot on the machine until it is unpluged. Always~~~ The simplist solution is to locate a seperate 2 pole switch that disconnects the line cord before the connections to the reversing switch. There are other methods to solve the problem, but they cannot be done through the reversing switch.

The style of your reversing switch will not disconnect both lines of a 240 volt single phase circuit, regardless of where it came from. It is set up for a 3 phase motor and is used on single phase where one side of the line is at ground potential. England, Europe, Japan, etc. can do this on 240 volts. In the US, the 240 volts is center tapped and grounded to get 120 volts, leaving two hot legs at 120 volts to ground.

.
 
Unfortunately with the style of drum switch the OP has this is the best we can do. Personally I don't consider it mandatory to break both power legs when "off"; as long as all exposed metal parts of the machine are properly grounded, it is safe- certainly no more dangerous than operating the lathe itself.
Of course the optimum would be a latching contactor system with an E-stop- and a foot brake too
-M
 
Last edited:
this is an apples to oranges comparison, but the logic is the very same.
in 110v machine circuits i work on, almost never is the neutral leg broken.
but all machines are grounded.
oversimplification: it is basically the same thing without the higher voltage
 
Ok so I’ve decided it’s probably best to start with the connections at the motor. That requires removing the motor though. It’s not really a big deal but I might not get to it for a few days. Does anyone see why I shouldn’t do this just to be sure of what’s going on in there. Plus it’ll give me a chance to clean up the motor and behind it.


Sent from my iPhone using Tapatalk
 
Here’s that 110v wiring diagram that was asked for
 

Attachments

  • IMG_3809.MOV
    1.2 MB
Walz: can you post that as a picture instead of a mov video? I can't seem to open it
You may not have to remove the motor, if you are currently running on 220 volts and have access to the three motor wires black, yellow, white you could simply connect to the drum switch (post #23) and you should be good to go.
You have the option of keeping the pushbutton switch or not, your choice. My feeling is it may be safer to keep it, considering if you need to shut the machine off quickly and hit the drum switch lever you may flip it over to reverse at which point the machine will keep running in the same direction. This is also why the latching contactor systems with E-stops are preferred to drum switches
M
 
I must have accidentally taken a video instead of a picture while in a rush to get out the door this morning
 

Attachments

  • 2ADA6884-EFFC-4D01-8547-0A47757A49B1.png
    2ADA6884-EFFC-4D01-8547-0A47757A49B1.png
    4.7 MB · Views: 20
Back
Top