Mike's CNC G0704 - Block 4 Upgrades

Those diagrams were very helpful.

I think your approach to bluing makes complete sense, but you could also do final checks by marking up with the mill head casting at various rotations. Ultimately, those are the surfaces that must mate well at all orientations, so marking against one another is the ultimate proof of bearing.

For example, one blue up at 0 degrees, one at 30, 60, 90. Just small motions to transfer the blue at each orientation. Basically mimicking the motion of the head in use on the mill: trammed, and tilted at various attitudes.
100% agree. The final print and finish scraping to bearing must be done with the mating member. Hope it is easy enough to accomplish that.
 
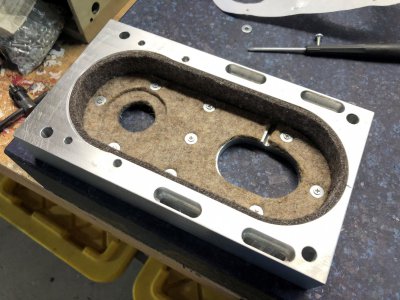
Felt is installed. Drilled and tapped the holes in the housing using a drill press and paper template. Needed to add some #6 washers to the 4-40 flat head screws as they pulled through the felt without retaining it much at all. The washers give plenty of bite, so the felt is going nowhere. It deformed a bit during assembly, but that shouldn't affect how it performs (the perfectionist in me was screaming though).

image116.jpg

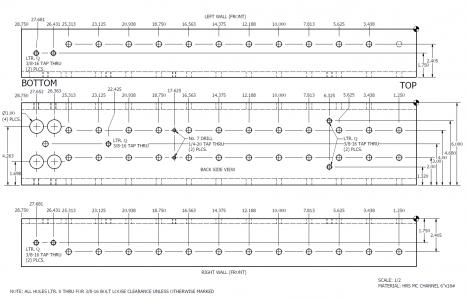
Put together a final drawing for the column reinforcement. All these holes need to be drilled in the steel channel, and mating tapped holes in the column. I have my work cut out for me. This is a "shop drawing" so I skipped all the formalities of border and title block. Don't hate.

1689885333165.png
 
I hesitate to write this since you're so far down the path, but why so many bolts?

If I understand the goal correctly, rigidity of the original column is more of a concern than damping. It would be to me, anyway.

Rigidity is mostly about dimensions, not mass (which would help with damping). A 2x10 wooden floor joist is ~125X more rigid on edge, because rigidity is proportional to the cube of the dimension resisting the load.

The plan as I understand it is to use wider channel to increase rigidity in X and Y (each side of the channel is like a plank on edge). But you're filling with epoxy anyway, which also mechanically attaches the channel to the original column, right?

All those bolts are serious opportunities to introduce stress into the column that could come back to haunt you. I'd REALLY SERIOUSLY consider just roughing three sides of the original column and the inside of the channel, then using just three bolts in a triangular pattern on the back face only of the original column. Then dam all but one dimension and fill with epoxy. (I'd want to allow the epoxy to freely expand in one dimension while curing, probably the top).

Three points define (and constrain) a plane, any more and you are over-constraining. With just three points, you cannot add any additional (global) stress. Any more, and you probably are.

Rather than a bunch of bolts, I'd just drill lots of shallow blind holes and/or grind channels with an angle grinder for the epoxy to flow into. I'd do it both to the inside of the channel and to the outside of the original casting. Wouldn't that make more sense?

If you really want that many metal fasteners for some reason I don't understand, I'd first assemble with just three of the bolts tightened down on the standoffs. All the remaining positions would then need to either have adjustable spacers that you'll just lightly snug up, or (better maybe) use unthreaded pins (drill rod) into holes with a tight but sliding fit. You'd drill and ream the holes after attaching the three bolts — the idea would be for each pin to resist forces in just one dimension.
 
Last edited:
I hesitate to write this since you're so far down the path, but why so many bolts?

If I understand the goal correctly, rigidity of the original column is more of a concern than damping. It would be to me, anyway.

Rigidity is mostly about dimensions, not mass (which would help with damping). A 2x10 wooden floor joist is ~125X more rigid on edge, because rigidity is proportional to the cube of the dimension resisting the load.

The plan as I understand it is to use wider channel to increase rigidity in X and Y (each side of the channel is like a plank on edge). But you're filling with epoxy anyway, which also mechanically attaches the channel to the original column, right?

All those bolts are serious opportunities to introduce stress into the column that could come back to haunt you. I'd REALLY SERIOUSLY consider just roughing three sides of the original column and the inside of the channel, then using just three bolts in a triangular pattern on the back face only of the original column. Then dam all but one dimension and fill with epoxy. (I'd want to allow the epoxy to freely expand in one dimension while curing, probably the top).

Three points define (and constrain) a plane, any more and you are over-constraining. With just three points, you cannot add any additional (global) stress. Any more, and you probably are.

Rather than a bunch of bolts, I'd just drill lots of shallow blind holes and/or grind channels with an angle grinder for the epoxy to flow into. I'd do it both to the inside of the channel and to the outside of the original casting. Wouldn't that make more sense?

If you really want that many metal fasteners for some reason I don't understand, I'd first assemble with just three of the bolts tightened down on the standoffs. All the remaining positions would then need to either have adjustable spacers that you'll just lightly snug up, or (better maybe) use unthreaded pins (drill rod) into holes with a tight but sliding fit. You'd drill and ream the holes after attaching the three bolts — the idea would be for each pin to resist forces in just one dimension.

Well I think we have a hung jury!

In all seriousness this is a good conversation and I’ve spent weeks pondering the options. I’ll try to summarize the goals and how I got to this decision (and hey, I might still be wrong).

Goal: To increase rigidity of the cutting tool due to column flexture and vibration. Scraping all parts for a better fit might be all the improvement I need but I figured I would experiment with this. Needs to be completed quickly and cheaply.

Option 1: Float the MC channel around the column and cure in-situ with epoxy granite. Provide some method of bonding epoxy granite to column and channel.

Pros:
  • Minimal bolting to the column limits stresses induced into the assembly
  • Minimal deformation of way surfaces limits scraping efforts
  • Potentially simpler to implement thanks to less machining
Cons:
  • Cost of epoxy granite is significant ($200+)
  • Epoxy granite recipes are highly debated and no obvious winner is available online.
  • Sourcing the proper aggregate for epoxy granite is difficult and most needs to be purchased in significant bulk adding to cost.
  • Structure depends on the ability for the epoxy to securely bond to painted cast iron and steel. Delamination would ruin the structure and many factors could cause this.
  • Epoxy shrinks ~2%. This could either cause delamination or stresses into the column.
  • Filling a 1/2” gap 30” deep with material the consistency of firm wet sand within a short 20 minute working time could be quite difficult.
  • My original plan involved screwing short flat head cap screws to the outside of the column and inside of the channel to provide something for the fill to bond to. This would require just as many drilled and tapped holes as option 2.
Option 2: Bolt MC channel to column on 3 sides with a significant number of bolts and precision machined spacers. Fill gap between column and channel with some material (epoxy granite, expanding grout, loose sand) for vibration damping.

Pros:
  • Straightforward assembly with a drill press and lathe to make spacers
  • Relatively low cost ~$75 in hardware
  • Guaranteed solid connection between channel and column which will not loosen over time
  • Entire assembly can be assembled and proved to be in good order before locking bolts and backfilling with curing material
  • Curing material fill is not structural and the risk of delamination is reduced.
Cons
  • Fair bit of machining needed for drilling the channel and fabricating spacers. Spacers need to be individually measured to ensure they are a snug fit
  • Significant risk of inducing stress into the column and deformation of the precision way surfaces. This is discussed more below.


So in my head, I originally started where @mattthemuppet2 was thinking with bolting the channel on all sides because I figured this would be the best way to utilize the strength of the MC channel. Then I got myself concerned (similar to you (@Rex Walters) about stresses in the column and causing me headache in scraping later. So then I went to the concept of bolting the channel to the back of the column and then curing epoxy granite or expanding grout between the two, but I had significant concerns about cost of epoxy granite (and complexity of the recipe) and the ability for the grout to adhere to the surfaces. If the surfaces didn't adhere, then the channel would not add any strength to the assembly and it would be a big waste. So after being questioned on the design, I flipped my opinion back to rigidly bolting the assembly and filling for vibration damping.

I am concerned about adding stress to the column with the bolted assembly, but I think it can be managed. First off, I think stress is OK in the column since it will be scraped flat after assembly. Cast iron shouldn't (???) creep over time as the creep threshold temperature is somewhere around 450*C. So as long as the applied stresses don't change (thread lock, fully cured infill, etc.) then the casting deformation should be constant over time. Additionally, I will be making each spacer to the exact size needed and alternatively torqueing all the bolts to equalize the stresses all over the column. Finally I can indicate the way surfaces as I am tightening everything to ensure the deformation stays within a thou or two so I don't need to scrape too deeply to bring the surface true. Only once I'm happy with the geometry, then I can apply Loctite red to each bolt and torque to spec, then do the curing fill. Once the surfaces are scraped true, then I would not expect movement over time of the assembly.

Also, I'm not aiming to come up with the perfect solution, it just needs to be better than the original column, not cost much, and not take too long to complete. I'm trying to make continuous progress on this project and don't want to stall on the column reinforcement.

Thoughts?
 
Last edited:
Well I think we have a hung jury!

In all seriousness this is a good conversation and I’ve spent weeks pondering the options. I’ll try to summarize the goals and how I got to this decision (and hey, I might still be wrong).

Goal: To increase rigidity of the cutting tool due to column flexture and vibration. Scraping all parts for a better fit might be all the improvement I need but I figured I would experiment with this. Needs to be completed quickly and cheaply.

Option 1: Float the MC channel around the column and cure in-situ with epoxy granite. Provide some method of bonding epoxy granite to column and channel.

Pros:
  • Minimal bolting to the column limits stresses induced into the assembly
  • Minimal deformation of way surfaces limits scraping efforts
  • Potentially simpler to implement thanks to less machining
Cons:
  • Cost of epoxy granite is significant ($200+)
  • Epoxy granite recipes are highly debated and no obvious winner is available online.
  • Sourcing the proper aggregate for epoxy granite is difficult and most needs to be purchased in significant bulk adding to cost.
  • Structure depends on the ability for the epoxy to securely bond to painted cast iron and steel. Delamination would ruin the structure and many factors could cause this.
  • Epoxy shrinks ~2%. This could either cause delamination or stresses into the column.
  • Filling a 1/2” gap 30” deep with material the consistency of firm wet sand within a short 20 minute working time could be quite difficult.
  • My original plan involved screwing short flat head cap screws to the outside of the column and inside of the channel to provide something for the fill to bond to. This would require just as many drilled and tapped holes as option 2.
Option 2: Bolt MC channel to column on 3 sides with a significant number of bolts and precision machined spacers. Fill gap between column and channel with some material (epoxy granite, expanding grout, loose sand) for vibration damping.

Pros:
  • Straightforward assembly with a drill press and lathe to make spacers
  • Relatively low cost ~$75 in hardware
  • Guaranteed solid connection between channel and column which will not loosen over time
  • Entire assembly can be assembled and proved to be in good order before locking bolts and backfilling with curing material
  • Curing material fill is not structural and the risk of delamination is reduced.
Cons
  • Fair bit of machining needed for drilling the channel and fabricating spacers. Spacers need to be individually measured to ensure they are a snug fit
  • Significant risk of inducing stress into the column and deformation of the precision way surfaces. This is discussed more below.


So in my head, I originally started where @mattthemuppet2 was thinking with bolting the channel on all sides because I figured this would be the best way to utilize the strength of the MC channel. Then I got myself concerned (similar to you (@Rex Walters) about stresses in the column and causing me headache in scraping later. So then I went to the concept of bolting the channel to the back of the column and then curing epoxy granite or expanding grout between the two, but I had significant concerns about cost of epoxy granite (and complexity of the recipe) and the ability for the grout to adhere to the surfaces. If the surfaces didn't adhere, then the channel would not add any strength to the assembly and it would be a big waste. So after being questioned on the design, I flipped my opinion back to rigidly bolting the assembly and filling for vibration damping.

I am concerned about adding stress to the column with the bolted assembly, but I think it can be managed. First off, I think stress is OK in the column since it will be scraped flat after assembly. Cast iron shouldn't (???) creep over time as the creep threshold temperature is somewhere around 450*C. So as long as the applied stresses don't change (thread lock, fully cured infill, etc.) then the casting deformation should be constant over time. Additionally, I will be making each spacer to the exact size needed and alternatively torqueing all the bolts to equalize the stresses all over the column. Finally I can indicate the way surfaces as I am tightening everything to ensure the deformation stays within a thou or two so I don't need to scrape too deeply to bring the surface true. Only once I'm happy with the geometry, then I can apply Loctite red to each bolt and torque to spec, then do the curing fill. Once the surfaces are scraped true, then I would not expect movement over time of the assembly.

Also, I'm not aiming to come up with the perfect solution, it just needs to be better than the original column, not cost much, and not take too long to complete. I'm trying to make continuous progress on this project and don't want to stall on the column reinforcement.

Thoughts?
I don’t know what epoxy granite is, but I thought the whole point of using a filler with epoxy was to minimize shrinkage.

I would go with what I described: using a slow cure epoxy with one dimension unconstrained during curing (an open top) per my reply. Exactly what epoxy is best will require research, but I’d be careful with threaded fasteners for the reasons given above.

Equalizing stresses with careful torquing of bolts and scraped machine ways don’t go together imo.


Also, fwiw, drilling and tapping all those holes won’t be quick. Seems to me that three bolts and epoxy would be the easier route.

I’m also loathe to make changes once I’ve made dimensioned drawings and am mentally invested in a plan, but it’s at least worth give it a few days of level-headed consideration before making the call.
 
Last edited:
I don’t know what epoxy granite is, but I thought the whole point of using a filler with epoxy was to minimize shrinkage.

I would go with what I described using a slow cure epoxy with one dimension unconstrained during curing (an open too) as described. Exactly what epoxy is best will require research, but I’d be careful with threaded fasteners for the reasons I described.
The concept of epoxy granite is to use a high fill of aggregate (80%+) to provide more strength than epoxy alone. The largest grain size is somewhere around 20% of the smallest feature size to be cast. From there smaller and smaller aggregate is added to fill the spaces between the larger grains. An optimal mix causes a nearly continuous path for stress from aggregate grain to aggregate grain throughout the entire material. The epoxy is really only there to bind all the aggregate together into a solid. The overall strength of the mix can be substantially higher than epoxy alone and is a high performance material. Some high end machine tool manufacturers actually use this material to produce machine frames (also called mineral casting). Precision surfaces, threaded inserts, and thermal management cooling channels can be cast in place.


The issue is that the recipe of aggregate sizes is critical and getting it wrong can cause the mixture to separate into layers and not work correctly. It's also very thick and difficult to form into narrow passages.

Its actually not all that different from the concept of concrete where the aggregate (gravel and sand) carries the load and the cement binds the grains.

I'm thinking I'm likely going to continue forward with the bolted connections, backfilling with expanding grout or possibly some form of epoxy granite. This might be a mistake but it still seems to be the best option in my mind. I'm going to take as much care as I can to limit the stresses in the column.
 
Your call, of course, but you might at least want to give it a day or two before you commit.

I don’t think the filler matters much for what you are trying to accomplish as long as it’s fairly stiff, tough and stable once cured.

At the very least, I suggest you only torque down three bolts in a triangle pattern first before determining the appropriate spacers elsewhere.


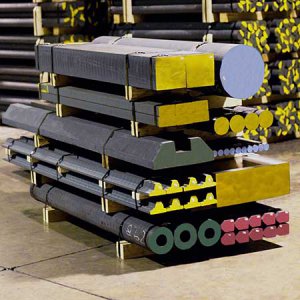
A REAL man would just replace the original column with a big hunk of durabar and mill the ways himself anyway. ;-)

1689958320592.jpeg
 
Last edited:
First off, I think stress is OK in the column since it will be scraped flat after assembly.
Just one more point: this statement seems a bit questionable at the least.

For example: It's quite difficult to stress relieve even solid pieces of cast iron because it's impossible for a casting to cool evenly (the core tends to cool last, of course, causing internal stresses when the core finally cools and contracts). It's quite common to chase your tail a bit when scraping one side of a part because of this: The bluing shows where to scrape, but then it moves a bit after scraping, so the next blue-up looks different.

I strongly suspect that such movement will be significantly worse if the casting is also under external stresses. Further, machining causes vibration no matter how much mass you add. Unless you loctite every screw (more time and effort) can you really count on the stresses remaining constant?

Remember that you are chasing tenths over significant distances when scraping — it doesn't take much for things to move. Even how you hold a part during blue-up makes a difference. Try bluing up your straightedge with a modest-sized chunk of scrap resting on one end so it isn't a uniform mass from end to end. You'll see how little it takes to change the blueing pattern. Similarly, if you've ever leveled your lathe with a 0.0005"/10-in precision level you'll know how a 1/32 turn on a screw can cause a huge change.

I'm still a bit skeptical of vibratory stress relief (or just ringing with a hammer). I think significant and complex heat treatment is the only reliable method to significantly stress relieve cast iron. That's usually not feasible for hobbyists due to the sizes of the parts, so often as not we leave our scraped parts in a state of equilibrium, with internal stresses still in place but not affecting things unless more metal is removed (or we buy castings that were stress relieved at the foundry for things like camelback straightedges).

I should have clarified a bit. I think no stress is best, however I am most worried about changing internal stresses after the column is scraped flat. I fully expect the stresses from bolting will make scraping more difficult since things will move ever so slight during material removal. As long as these surfaces don't creep over time, then I *think* I'm ok with the increased difficulty of scraping. Then again I might eat my words.

I do intend to Loctite RED every screw. somewhere between "I think I want this screw to stay put" Loctite Blue and "Burn it off" Loctite Green.

I'm hoping your last statement holds true for this assembly. The internal stresses are in equilibrium after being scraped and the column remains true.

I'll end with the statement that I absolutely think you are correct in every statement you've made about limiting internal stresses and deformation, but I'm worried the assembly won't realize the strength benefits of the MC channel addition without being securely fastened.
 
I'm worried the assembly won't realize the strength benefits of the MC channel addition without being securely fastened
I see, but I'm not sure I understand why.

Are you concerned the hardened epoxy (or whatever) filler will compress and not transfer the stress?

Choosing a good filler material will require some research, but I'd expect hardened epoxy resin to transfer the load pretty well.
 
Back
Top