- Joined
- Dec 20, 2012
- Messages
- 9,422
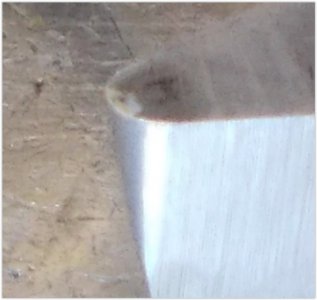
Okay, 15 degree side relief angles. I honestly do not see them in your pics but that is the nature of pics. The major problem is at the cutting point of contact at the nose anyway. This is a screen shot of the nose:

It may be the way the pic is displaying the angles but there appears to be very little, if any, relief under the cutting edge at the tip. This tool, as shown here, will rub with even small depths of cut. Coupled with the generous nose radius, this lack of relief will deflect excessively.
Again, the fix is simple - provide relief under the cutting edge at the tip. You can try hand-honing the relief under the tip but the way I would do this is to regrind the tool. I would simply grind the sides again but narrow the tip to a point. This will automatically create a relief angle underneath the tip. This relief angle will NOT be 15 degrees; it will be less but it will be adequate for this tool. Using your coarse diamond stone, hone a tiny flat across this tip at the nose; make it about 1/16" wide, no more. Make sure you follow the angle at the tip so the flat is even in width from the top of the tool to the bottom.
Now, hone the sides with your coarse and then fine and then extra-fine diamond stones to remove the grinding marks. Do this without touching the nose or flat you created. Focus on getting the sides of the tool dead flat and free of grinding marks. Now use your fine stone to gently round the tip and blend the sides of the flat at the nose into the sides. Keep the nose radius small; you gain absolutely nothing by going so big. You simply want to round the nose while keeping that relief angle under the top edge intact. Once the major shaping of the nose is done, use your extra-fine stone to smooth everything out. If you run your finger over the cutting edge you should feel a burr from all this work.
Once all this work on the sides and nose radius is done, hone the top of the tool with your stones from coarse to extra-fine. Your goal is to make this top surface dead flat and even all the way across. The burr your raised when doing the sides will be removed when you hone the top but you may raise a small burr on the sides and at the tip when doing the top. If so, this is good because you know your honing is effective. Use your extra-fine stone on the sides and nose to get rid of the burr; it should only take a very light stroke upwards to get rid of the burr.
At this point, the tool should be razor sharp. Look at the edges where the sides and end intersect with the top of the tool. There should be no light reflected off that edge or corner. Anywhere you see a reflection is a dull spot and you need to go back and fix that. Always hone to make the entire flat, flat.
Do not make the nose radius on a round nose tool too big. Big radii increase deflection and there is little value in this. I know the common wisdom is that big radii make for better finishes but if you think about it, the contact surface at the nose is very tiny with light cuts, maybe only a few thou across, so the size of the radius on light cuts doesn't matter much. What does matter is when you take heavy cut with a big nose radius; then you will see the deflection from that radius. Conversely, you will see far less deflection with a small nose radius. So, a small nose radius is more accurate and will finish just as well as a large nose radius.
If you like, test it yourself and see.


