My slow speed diamond disc lapping machine, the beginning

Sorry, didn’t mean to cause you grief. Looks like you’re good to go, maybe the volume wasn’t sufficient enough to be able move around. I just remember being totally baffled trying to figure out why my epoxy was climbing uphill! Glad it worked for you Jeff :encourage:
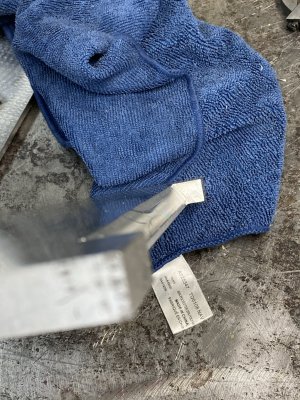
I cut the pockets over sized and left about .010" in depth for epoxy. Between the pocket pilot hole and the sides of the magnet, I hope to have enough holding power for the life of the tool.

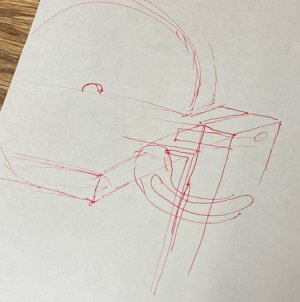
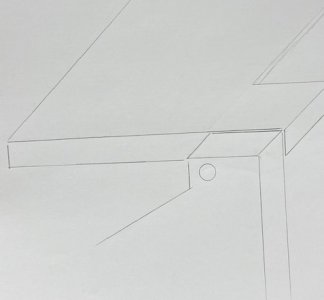
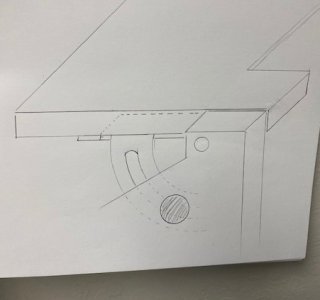
Thinking about the table size and the tilting method. I draw it in a doodle first then clean it up.
I call it my CAD program. You know, Conceptualize, Adjust and Dream it up.
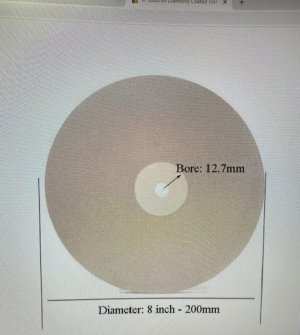
I know there's probably a dozen or more ways to do this. I'm concentrating on the pivot point. My gut tells me it should be just off the face of the disc. Of course the table will be able to slide in and out but I'm designing it with this idea in mind.
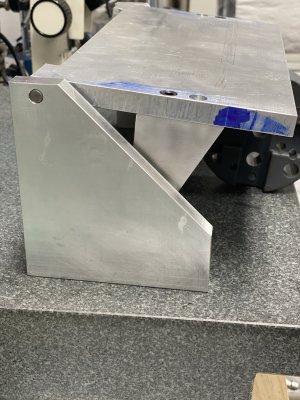
Aluminum and heavy sheet metal.
 

Attachments

  • lap 1.jpg
    lap 1.jpg
    66.2 KB · Views: 72
  • lap 3.jpg
    lap 3.jpg
    45.4 KB · Views: 61
  • lap 2.jpg
    lap 2.jpg
    50 KB · Views: 63
Last edited:
I decided to use a piece of .250" structural plate I had laying around for the platen.
I have most of this design in my head. I'll get something done over the weekend, I hope.
Rain on Sunday, that will help.
 
Nothing new about magnets my old leonard grinder uses magnets to hold the disk. got to be 70 years old.
 
Finished the hub and disc plate.
I was shooting for concentric = no wobble.
I think I achieved it. This was challenging for me. I learned a few things. The expanding arbors and turning between centers really has improved my game a bit. IMHO
 
Had to take a break. I got in that mood where I tried to get too much done.
A hobby machinist needs to be precise and take his/her time.
I made some mistakes this afternoon. I was surface grinding the platen and moved the wheel in the wrong direction. Ugh, I’ll fix it tomorrow.
The project will recover and the parts will be ok but it’s a good reminder.
I’m learning.
 
It looks real good Jeff, looking forward to the fineshed product.

Tim
 
Looking really good Jeff.
Nice work there.
 
Cut the bevel and clearance on the table.
I placed the pivot on center line as my little brain conjured.
I’m hoping this allows full motion while maintaining a close fit on the diamond disc. I am planning on having an adjustable frame.
 

Attachments

  • 3182705D-5EC7-47DC-BDCC-DE1CEC346F91.jpeg
    3182705D-5EC7-47DC-BDCC-DE1CEC346F91.jpeg
    862 KB · Views: 67
  • BC11B095-5A82-4B7B-BC3E-05F0441F60AB.jpeg
    BC11B095-5A82-4B7B-BC3E-05F0441F60AB.jpeg
    529 KB · Views: 65
  • C78D62DC-9AB9-4646-9464-1855E99A202B.jpeg
    C78D62DC-9AB9-4646-9464-1855E99A202B.jpeg
    1.2 MB · Views: 63
  • lapper 2.jpg
    lapper 2.jpg
    112.5 KB · Views: 50
  • lapper 3.jpg
    lapper 3.jpg
    91.4 KB · Views: 57
Sunday was a good day.
We had some rain!! We don't see that anymore. It's going to be another terrible fire year!
Made some good progress today. Haven't set the pins but it is looking good.
Plenty left to do. It feels good to get this far. The rest is fine tuning, allowing for an adjustable platen that locks up solid.
I need to pull out the 12" rotary table to cut the radius for adjustments.
The platen side supports will be mounted on a sliding frame for fine tuning.
 
A little progress this weekend.
Mom had a stroke. She is improving.

A friend suggested I add a sheet of stainless to the platen.
With the diamond abrasive it really chews up the aluminum.
 

Attachments

  • 6A62A774-1F36-4F29-98E2-A5425628E889.jpeg
    6A62A774-1F36-4F29-98E2-A5425628E889.jpeg
    950 KB · Views: 52
Last edited:
Back
Top