Pm727m and face milling

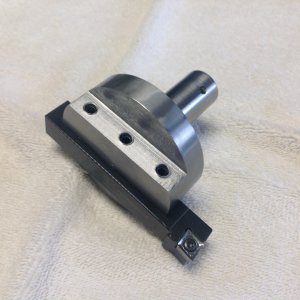
Guys, think about it. If you have to square a work piece, do you really want to gnaw away at it with an end mill like PacMan? Why do that when you can cut out to a 6" wide swath in one go and produce a much nicer surface finish that is as accurate as your tram? The Superfly will repay its cost in end mills, time and aggravation, trust me. On the other hand, if you often work with smaller work pieces or need to cut a ledge then the Sherline, being essentially a single insert face mill that costs all of $73.00, is a very good tool to own.

Personally, I think you should have both flycutters. Come on, you know you want them ... :clown:
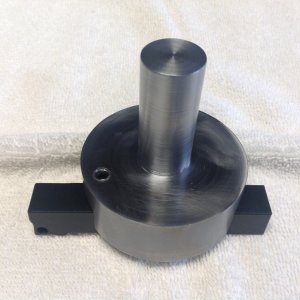
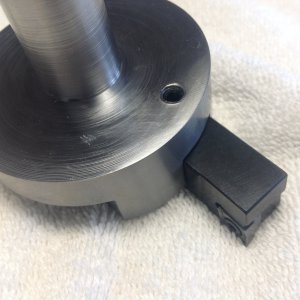
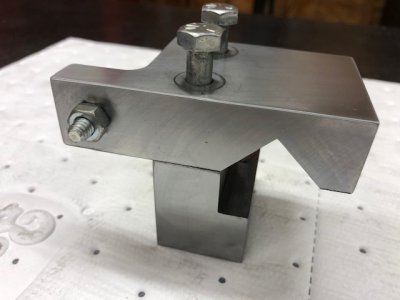
Got some bad news, Mike. I'm not going to be able to spend any money on a Superfly. At least not until my homemade fly cutter breaks. Here are some shots of one I made several months ago:

IMG_1467.JPGIMG_1469.JPGIMG_1471.JPG

It has a 3/4" shank and can cut up to about 6". I usually keep it set at about 4". The set screw on the top allows me to adjust the angle of the cutting tip. (That seemed like a nice feature to have, but I've never used it. I set it once and never changed it.) It cuts extremely well. I've been bailing wheat straw all day and am worn out, but tomorrow I'll go down to the shop and post a picture of a piece of cold-rolled I recently faced with it. It does a great job, so for at least the time being, I won't be in the market for a Superfly. Sorry.

Call me crazy, but something tells me you'll come up with something else I can't live without. Hurry up! The suspense is killing me.

Regards,
Terry
 
Another vote for the tormach superfly. I used mine on my pm932 in both aluminum and steel. Superb finish on anything inside with it. I have a larger mill I'm rebuilding right now and contemplated getting a big ole face mill and talked myself out of it until the superfly let's me down.
 
What about using these tools for the guys that dont have power feed, like me? Any suggestions?
 
Got some bad news, Mike. I'm not going to be able to spend any money on a Superfly. At least not until my homemade fly cutter breaks. Here are some shots of one I made several months ago:

View attachment 327580View attachment 327581View attachment 327582

It has a 3/4" shank and can cut up to about 6". I usually keep it set at about 4". The set screw on the top allows me to adjust the angle of the cutting tip. (That seemed like a nice feature to have, but I've never used it. I set it once and never changed it.) It cuts extremely well. I've been bailing wheat straw all day and am worn out, but tomorrow I'll go down to the shop and post a picture of a piece of cold-rolled I recently faced with it. It does a great job, so for at least the time being, I won't be in the market for a Superfly. Sorry.

Call me crazy, but something tells me you'll come up with something else I can't live without. Hurry up! The suspense is killing me.

Regards,
Terry

That looks like an SCLCL tool holder, Terry. If so, then the insert geometry should cut okay when the tool is horizontal. If you alter the angle of the tool then it will cut with the nose radius and that will adversely affect the finish unless you really slow down your feed. In contrast, the Superfly's insert has a broad contact area with a positive rake geometry that is presented at a fixed but presumably optimal tool angle. Not sure how it compares to an SCLCL tool, though.

As long as you have some kind of tool for surfacing accurately then that's what counts. As you say, I will get you some other way! ;)
 
  • Like
Reactions: tjb
What about using these tools for the guys that dont have power feed, like me? Any suggestions?

Feed manually. Inserts like to take a bite and be moved along and you'll have to sort out what that feed rate is by looking at the chip and the finish being produced. I feed manually on my Sherline and can produce a finish that is very, very nice.
 
That looks like an SCLCL tool holder, Terry. If so, then the insert geometry should cut okay when the tool is horizontal. If you alter the angle of the tool then it will cut with the nose radius and that will adversely affect the finish unless you really slow down your feed. In contrast, the Superfly's insert has a broad contact area with a positive rake geometry that is presented at a fixed but presumably optimal tool angle. Not sure how it compares to an SCLCL tool, though.

As long as you have some kind of tool for surfacing accurately then that's what counts. As you say, I will get you some other way! ;)
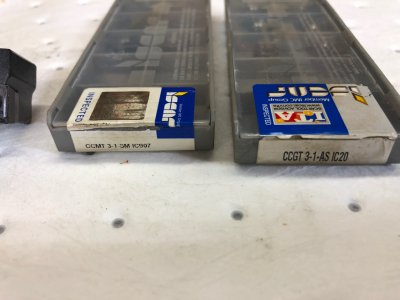
Okay, Mike. You've prompted a question or two that might be beneficial to myself and others who might need an education on the features and use of fly cutters. You are correct that it is an SCLCL tool holder with which I am using the following CCMT and CCGT inserts:
IMG_0782.jpg

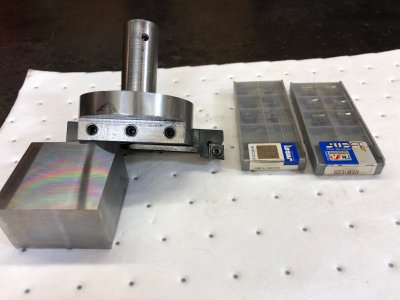
Here is a picture of the fly cutter, inserts and a piece of cold-rolled that I squared using the fly cutter:
IMG_0781.jpg

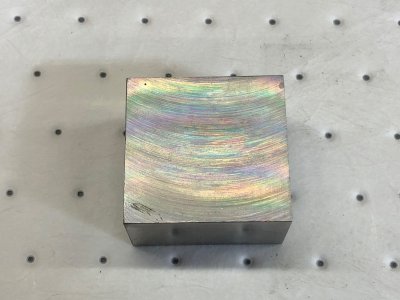
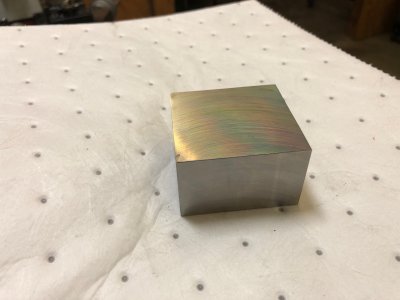
Here are close-ups of the squared metal:
IMG_0771.jpg IMG_0774.jpg

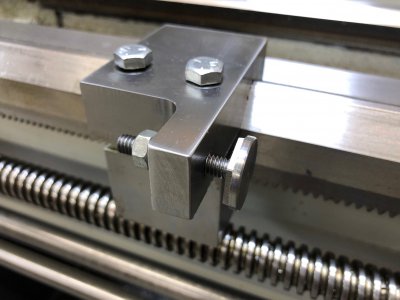
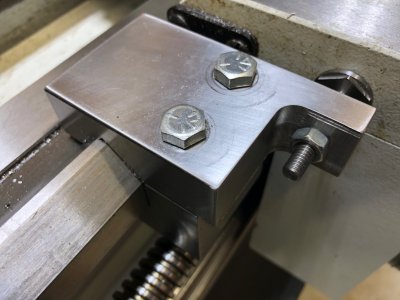
This block was an end piece that I played around with after making the following carriage stop:
IMG_0778.jpg IMG_0779.jpg
IMG_0739.jpg

All flat surfaces on the carriage stop were made using the same fly cutter.

Here's my question and the issue I have with using the fly cutter. You will notice the 'profile' swirls on the squared piece that follow the contour of the arc on the fly cutter. No surprise. (Those marks were also on the carriage stop pieces, but I sanded those down, except for the contact surfaces.) However, I have noticed that when I mill the piece from left to right, I get the exact pattern you see in the photos. But if I mill from right to left, the leading edge looks the same but mirror image, plus the trailing edge has a very slight 'shadow' effect. That is, the trailing edge IN THAT DIRECTION seems to be milling an additional microscopic amount on the piece - I'm guessing 1 or 2 tenths at the most. My knee jerk has been that my spindle is ever so slightly out of tram. I've even frightened myself into wondering if I'm putting too much torque on my spindle by using the fly cutter. I've accommodated that by only doing final cuts in the left to right direction. But your recommendation on the Tormach Superfly prompted me to do some investigating. I watched some youtube videos on the Superfly and was somewhat surprised to see the same 'shadow' result - even on Tormach's own video. None of the videos I saw commented on the observation, but it is very apparent when watching the videos. Is this normal? It makes sense to me that the wider the cutting area the more likely slight tramming would become apparent. Right/wrong?

Would you think I could get better results if I removed my set screw so the holder would be flat? I am milling something in the neighborhood of 4" at 800 - 1,000 RPM's at very slow feed rates. Based on observations on this thread it seems to me I should be stepping up the RPM's perhaps significantly. (Agree/disagree?) Any other advice or observations?

All you other experts, chime in if you like.

Regards,
Terry
 
I've also experienced the swirl or lack of a smooth mirror-like surface with fly cutters and have pondered why this is. In my mind, the answer is multifactorial, and since this is coming from MY mind it is naturally suspect. However, this is what I think.
  • Fly cutting is not a finishing process. The intent is to obtain a truly flat and accurate surface, which fly cutting does quite well. If you want a finely finished surface, buy a surface grinder or go at it by hand.
  • Tool geometry matters because like all machining processes, fly cutting produces cutting forces. Accordingly, we have to use the right insert in the right way. You are using a turning tool and twirling it around, which that insert was not designed to do. Does it work? Of course it does, but are the right edges or surfaces making contact so that the insert works as it should? This is why I suggested that angling your SCLCL tool might not be a good idea because you are then cutting with the nose radius and that greatly increases radial cutting forces and may produce unpredictable or suboptimal results. In contrast, the Superfly has a fixed geometry; you cannot alter the angle of the tool and the angle puts the insert at the desired geometry. The insert is commonly used in face mills so it is optimized to cut with the surface of the insert that makes contact with the work. The insert is a high positive rake insert that I think is intended to reduce tangential cutting forces, which is one reason why the Superfly works well on low HP mills. Bottom line on this is that the tool designers of the Superfly knew what they were doing. Even when taking deep cuts, the Superfly works. On light cuts, the user has to understand that there is a minimal effective cut and that is typically going to be the nose radius plus about a 0.005" or so. Too light a cut and the insert will deflect and you have chatter.
  • Tram is always an issue. I would guess that most mills are trammed well enough to function quite well but when fly cutting we are looking at the effect of minute amounts of tram being off. We're talking in the sub-thou range of off. So why does the pattern seem to change when we feed from different directions? I think this is the effect of climb vs conventional milling, and going in a climb direction will typically produce a better finish. I see this effect with my Superfly on my RF-31. I see less of an impact on my Sherline with the Sherline flycutter because that mill is trammed within an inch of its life but I still try to take finish cuts in a climb direction when finish matters.
  • Then there are centripetal forces and how they interact with cutting forces. This one is complicated and I still haven't figured out how to visualize how they interact. In my research, I haven't found anything to suggest anyone else knows, either. This is an important topic because it also applies to boring on the mill. I can bore and I can fly cut but do I honestly understand how the cutting forces are interacting? Nope, I don't. The reason this matters is because I think the finishes could be greatly improved with fly cutting if we could get a handle on this. Someday I hope to understand it, or at least hear it from someone who is a lot smarter than me.
A final note on why I think the Sherline fly cutter is an outstanding tool. As mentioned, it is essentially a singe insert tiny face mill. The insert is fixed and mounted in a solid chuck of steel. The insert is not hanging out there at the end of a flexing arm like the typical fly cutter is. Centripetal forces are there but they are minimal. Accordingly, you can take relatively huge cuts with this tool and it will cut well. Because the geometry is fixed and is so solidly supported, the finish is much better with this tool as opposed to more conventionally designed fly cutters. It will put a finish on aluminum that will frost your eyeballs, at least with the unaided eye. Under magnification, you will still see the radial marks of a typical insert but they are much finer than with most inserts. I may seem to make a big deal about this little Sherline tool but I have over 30 years of experience with it and have come to understand why and how it works. Sherline found a way to orient the insert so that it cuts well with one edge oriented vertically (so it can cut to a shoulder); it cuts with the side edge primarily and with light cuts, with the nose radius. However, since the nose radius is very nearly in line with the spindle and it has a mass of steel behind it, deflection is pretty well controlled and that allows a Sherline fly cutter to take lighter cuts and still be fairly accurate when doing so.

Sherline finally woke up and made this tool with a straight shank. This allows us to hold it in a collet instead of a MT1 adapter. This is such a good idea that I'm sure it will sell much better as more people discover this tool. I used mine in a adapter and it worked well but of course, it never dawned on me to just turn the stupid shank down so it didn't have a taper ... Duh! Still, turning it down would have resulted in a much reduced shank diameter so I just decided to buy one with a straight 1/2" shank and will now be happy.

Okay, I'm sure I'll have other thoughts but off the top of my head, this is what I think.
 
  • Like
Reactions: tjb
No, the tool does not position the insert with positive rake. It uses CPMW 32.51 inserts that are commonly available. These inserts are typically flat on top with no chipbreaker. Like all inserted carbide fly cutters, this one needs some speed to work well. In steel, it will probably need to run at the top speed your mill can run at and will take a 0.015" deep cut to begin with. The 32.51 insert has a 0.016" nose radius so this minimal depth of cut is equal to the nose radius; it will cut better with a 0.020" deep cut. In aluminum, 0.020" depth of cut would be the ideal minimum cut at max speed.

EDIT: I should add that a 0.016" nose radius is already a big nose radius so going bigger in an attempt to achieve a better finish will work but it will also contribute to higher radial cutting forces so deflection will increase. You may not see this deflection in chatter but you will see it in the finish. I would stay with a 32.51 insert if you go with this tool. Also, at minimum, you can take a 0.008" deep cut. Going less may or may not work well. I've gone down to 0.004" deep cuts and got away with it but inserts don't like it when you cut too shallow due to large increases in radial cutting forces. Stay at about 0.008 - 0.010" minimum for finishing cuts and you'll probably be okay.
 
Last edited:
I have one of the Grizzly G2861, while not a terrible face mill, it’s not a great one either. IMO the TPG inserts can work fine in a lathe, but marginal milling insert, they are weak, due to the 7 degree side angle, they chip very easily, are/can be reportedly rough on spindle bearings and finally surface finish can be quite poor. They are hardly text box on set up, very slight changes to speeds and feeds can change finish quality greatly. On mine the tool build quality is excellent, if it only worked as good as it looks.
 
Back
Top