

-
Welcome back Guest! Did you know you can mentor other members here at H-M? If not, please check out our Relaunch of Hobby Machinist Mentoring Program!
You are using an out of date browser. It may not display this or other websites correctly.
You should upgrade or use an alternative browser.
You should upgrade or use an alternative browser.
POTD- PROJECT OF THE DAY: What Did You Make In Your Shop Today?
- Thread starter wachuko
- Start date
- Joined
- Feb 25, 2021
- Messages
- 3,130
What, I have to actually do something with myHe could adopt my motto. "Doing less with more..." Lol
Made a drill adapter to adjust the mill knee. Went the easier route and used M3 SHCS on a 1.250” bolt circle. It’s a nice snug fit to the splines. Used the 2” boring head I made for the first time.


Made a couple of chip shields from scrap 1/4” acrylic and table covers from 1/8” fiberboard.


Made a couple of chip shields from scrap 1/4” acrylic and table covers from 1/8” fiberboard.
- Joined
- May 16, 2016
- Messages
- 194
Now that the lathe is up and running, I am starting on the Barker PM I picked up a while back:
(sellers photo)
The first thing to do on it is; clean off my workbench!
(sellers photo)
The first thing to do on it is; clean off my workbench!
- Joined
- Jun 7, 2019
- Messages
- 359
Finished up a back gage for an iron worker of my design. Fully adjustable without tools. One set screw and one roll pin are the only purchased parts all clamping is on brass so as not to mar the shafts 

- Joined
- Jun 7, 2019
- Messages
- 359
Made a couple of 3/8” to 3/4” tool holders for the Haas TL1 turret. I got tired so only ground 3 sides. I need to hold HSS tools for cutting Deckel S20-2 buttress threads on adapters for cat40 tool holders.


- Joined
- Apr 23, 2018
- Messages
- 6,533
I single pointed a chamber for a rifled barrel 20 ga. bolt action slug gun for a neighbor in exchange for a timely and professional furnace repair.

While I had the milling attachment installed on the South Bend lathe, I machined some T-nuts to fit the non-standard slots on my MasterCraft X-Y table.
I used a spring clamp to hold a parallel across the bottom opening of the sideways-mounted toolmaker’s vise so I could retain the parallels needed for the work. The toolmaker’s vise is still loaded into the “vise” built into the milling attachment.

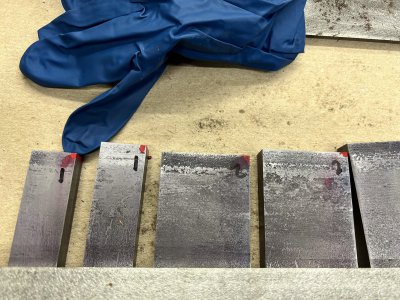
The MasterCraft table uses nominally 9/16”-slot t-nuts, but clamp kits for 9/16 slots are just too big. And the base of my drill press uses 1/2” slots. But the T part of even those smaller nuts is too thick for the half-depth slots, so I needed to machine off some thickness of the cheapie clamp set I bought. I just thinned four of the t-nuts.
I used my new-to-me Lassy drill-press vise to line the nuts up for chamfering with a countersink in the drill. What a nice vise this is.
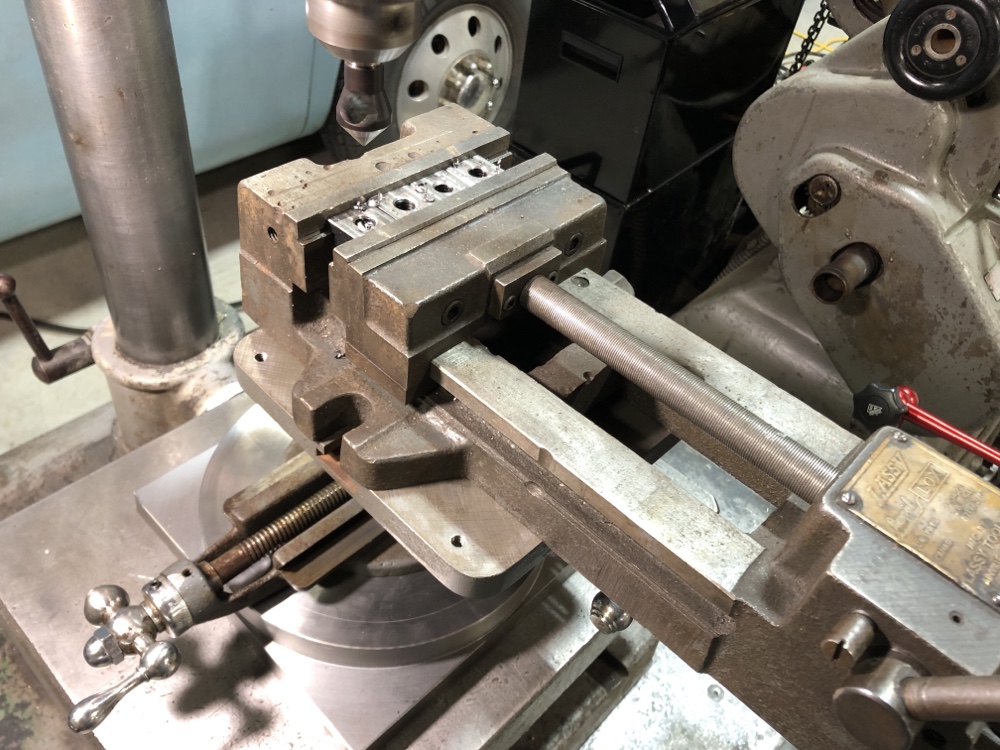
Then, I used two of them to clamp said vise to the X-Y table. Yes, this is Goliath standing on David’s shoulders, but the vise actually balances pretty well for small things.

You can see the holes I drilled in the corners of the mounting plate I made for the X-Y table, and I use those for mounting it on the movable table. But I doubt I’ll ever use it that way. Clamped to the bottom table of the bench-mount press with toe clamps, and with the vise on top of it, just about anything in the vise is reachable with a drill in the chuck. The quill on this old Delta press has a generous six inches of travel.
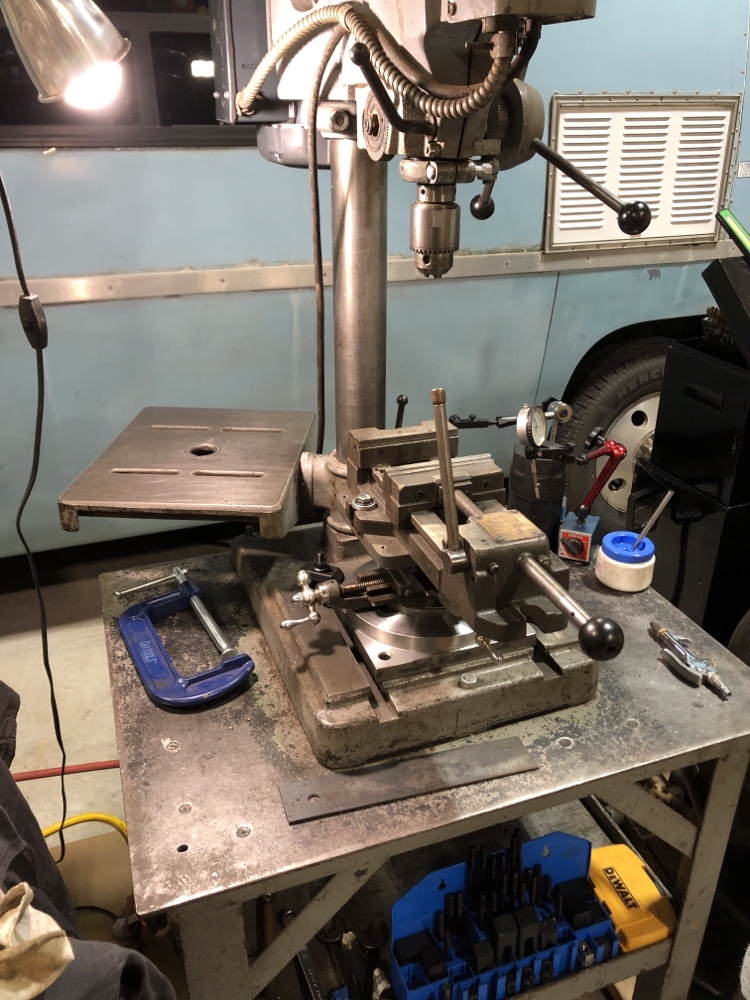
If I need to work close to the table, I can swing thd movable table up over this setup and get it right under the chuck. Eventually I’ll make or find a float-lock-style vise for the table.
Despite the weight of the Lassy vise, the holes being drilled are always right over the center of the assembly, so moving the X-Y table doesn’t result in sagging at the extremes under drill load. But for critical stuff (and this drill press has TIR well under a thou so critical stuff is possible) I can block it up with a machinist jack and a 2-4-6 block.
This is the perfect bolt pattern arrangement. Mount, say, a disk brake rotor on an arbor in the center of the table so that the center is right under the spindle, and then offset the X-Y table by the radius of the bolt circle. Then just spin the table—the top rotates and has a degree wheel. It’s more than accurate enough for bolt clearance holes. (One use case: The vintage GMC motorhome in the background uses rear disks intended for a Cadillac and comes with a 5-hole bolt circle—I need to redrill them for this application.)
(Making a brake-rotor arbor for mounting a brake rotor here or in the lathe is a future project.)
Rick “X-Y trammed and aligned within a couple thousandths” Denney
I used a spring clamp to hold a parallel across the bottom opening of the sideways-mounted toolmaker’s vise so I could retain the parallels needed for the work. The toolmaker’s vise is still loaded into the “vise” built into the milling attachment.
The MasterCraft table uses nominally 9/16”-slot t-nuts, but clamp kits for 9/16 slots are just too big. And the base of my drill press uses 1/2” slots. But the T part of even those smaller nuts is too thick for the half-depth slots, so I needed to machine off some thickness of the cheapie clamp set I bought. I just thinned four of the t-nuts.
I used my new-to-me Lassy drill-press vise to line the nuts up for chamfering with a countersink in the drill. What a nice vise this is.
Then, I used two of them to clamp said vise to the X-Y table. Yes, this is Goliath standing on David’s shoulders, but the vise actually balances pretty well for small things.
You can see the holes I drilled in the corners of the mounting plate I made for the X-Y table, and I use those for mounting it on the movable table. But I doubt I’ll ever use it that way. Clamped to the bottom table of the bench-mount press with toe clamps, and with the vise on top of it, just about anything in the vise is reachable with a drill in the chuck. The quill on this old Delta press has a generous six inches of travel.
If I need to work close to the table, I can swing thd movable table up over this setup and get it right under the chuck. Eventually I’ll make or find a float-lock-style vise for the table.
Despite the weight of the Lassy vise, the holes being drilled are always right over the center of the assembly, so moving the X-Y table doesn’t result in sagging at the extremes under drill load. But for critical stuff (and this drill press has TIR well under a thou so critical stuff is possible) I can block it up with a machinist jack and a 2-4-6 block.
This is the perfect bolt pattern arrangement. Mount, say, a disk brake rotor on an arbor in the center of the table so that the center is right under the spindle, and then offset the X-Y table by the radius of the bolt circle. Then just spin the table—the top rotates and has a degree wheel. It’s more than accurate enough for bolt clearance holes. (One use case: The vintage GMC motorhome in the background uses rear disks intended for a Cadillac and comes with a 5-hole bolt circle—I need to redrill them for this application.)
(Making a brake-rotor arbor for mounting a brake rotor here or in the lathe is a future project.)
Rick “X-Y trammed and aligned within a couple thousandths” Denney
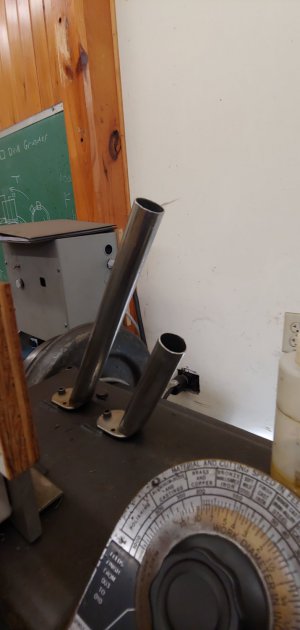
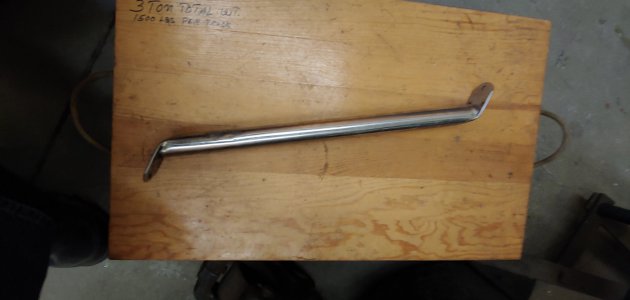
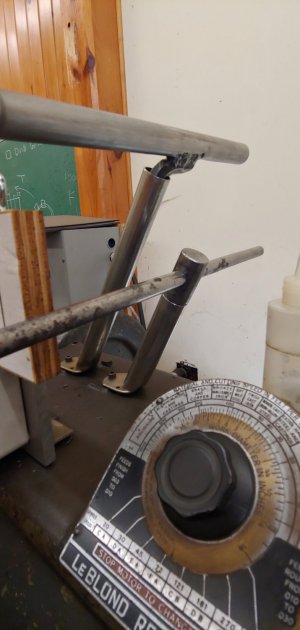
At the Tuckahoe machine shop we have a 19" Leblond lathe (with 4" risers) and we needed a more convenient place to put the chuck wrenches. I wasn't particularly busy a few weekends ago and I decided to come up with a solution. The prior weekend I was cleaning up the shop a bit and I ran across this stainless steel strut in our scrap pile. So I cut off about 2/3 of the strut, champfered the edges, and enlarged the mounting hole to fit a 1/4-20 cap screw. The lid on the top of the Leblond already had two bosses with 1/4-20 threaded holes in it. On the one closest to the headstock I mounted the pipe and it worked great for holding the chuck wrench we use the most. Then my buddy asked me if I could make another one for the other chuck wrench and I said sure. I got the shorter piece of the strut, moved the longer one to the hole farther away, and mounted the shorter one closest to the chuck. Now both of the wrenches are right there within reach. Couldn't have worked out better if I had planned it that way!
Attachments
T-nuts are not normally through threaded all the way as a safety. Prevents damaging the table by breaking out the top of the slot.I just thinned four of the t-nuts.
Be careful! or better modify those T-nuts.