Quarantine Projects!

As often happens I was doing a search though my big special materials drawers looking for something and found a piece that had been on my "where is it?" list. I found a vise from an abrasive saw in a yard sale several years ago with the idea of seeing if I could adapt it to my horizontal band saw as I like the quick release. It was $5, why not? The vise screw has been one of the least liked features of my vintage HF 4x6.

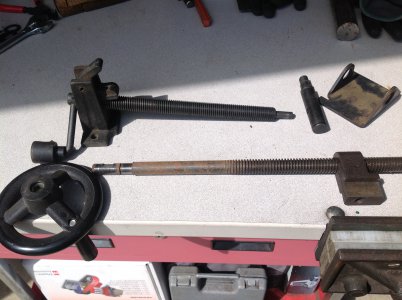
I pulled the vise screw out of the 4x6 and here they are with the "new" quick release screw on top. I came to the conclusion there would be a lot of machining and fabrication involved because they work radically different.

The old screw stays stationary and the vise nut moves along it by turning the wheel.

While the quick release screw moves in and out. Also as you can see its atleast 3-4" shorter.

I took a bunch of measurements and the way I have it figured I need an angle mount that would bolt to the end of the bandsaw deck for the quick realease to mount to. Then a piece of shaft to fit over the end of the screw a 1" over the threads with a setscrew to lock it to the nose that sticks out of the screw. Then a block that will replace the nut/ vise jaw mount. This will be bored 3/4" for the screw nose shaft to engage with a shoulder on the screw push side and a circlip on the other side. I'll also have to drill out the hole for the new screw as its .710 and the old hole is .500.

Of course I'll need the saw to cut up all the parts so I had to put it back together.
 

Attachments

  • image.jpeg
    image.jpeg
    1.8 MB · Views: 38
Looks like a worthwhile project @C-Bag.

The weldshop I used to work at had a similar saw where you had to turn the crank for about 5 minutes to recede the moveable jaw enough to set up a miter cut. And of course the threads were tight as heck the whole way!

I wonder if you could do some kind of half nut situation, like on a lathe carriage? Maybe you could make a half nut out of the cast part on your existing saw screw? Just thinking out loud, sounds like you have a plan!
 
First off, Happy Easter everyone!

Got my slot cut today! I used the old 4-1/2" angle grinder with cut off wheel. I cut freehand close to a scribe line and filed to fit.

As cut...

EM520723.JPG


I had to break out the auxiliary lighting!

EM520725.JPG


The filing process. This old file is pretty course and bites in nicely. It takes a pretty good amount of material off pretty quickly.

EM520727.JPG


This is the bolt that rides in the slot. It's a nice fit the whole way. A hair loose maybe in some spots, but still very close.

EM520729.JPG


With that I have all the parts! Here's the parts all mocked up.

EM520731.JPG


The three screws are supposed to be like leveling feet or something. The old instructions say they just rest on the cross slide I guess so you can keep the slotted bar level. Also I have to do something with that pin. I might cut it shorter and machine a head to press onto it. Or maybe just weld a nut on it.

EM520735.JPG


I've got some rust to clean up. Currently the block does not slide freely on the rusty bar.

EM520732.JPG


I'm gonna set the parts soaking in Evap-o-Rust after they're all disassembled. If you've never used Evap-o-Rust it's very handy!

I'm in the home stretch!
 
Nice work. Once you get confident with a 4" angle grinder it's amazing how much you can do with it. Just treat it with lots of respect because they can bite pretty good.

Cheers,

John
 
Looks like a worthwhile project @C-Bag.

The weldshop I used to work at had a similar saw where you had to turn the crank for about 5 minutes to recede the moveable jaw enough to set up a miter cut. And of course the threads were tight as heck the whole way!

I wonder if you could do some kind of half nut situation, like on a lathe carriage? Maybe you could make a half nut out of the cast part on your existing saw screw? Just thinking out loud, sounds like you have a plan!
It was the original mod because just like you mentioned that having to twirl away on that little handwheel is awkward and time consuming.

Believe me I pondered that exactly halfnut conundrum for quite a while brain cells pooping all the while. I was shocked to find the cast nut and screw threads of the 40yrld saw to be in perfect condition. I do take the time to periodically lube them but that still doesn't mean it's not going to be trash. I decided against the modding of the original nut because if my new quick release doesn't work all I'd have to do is make an adapter washer for where I'm going to have to drill out the hole in the saw body to reinstall the old setup. I'll post pics after I get the pieces machined.
 
Nice work. Once you get confident with a 4" angle grinder it's amazing how much you can do with it. Just treat it with lots of respect because they can bite pretty good.

Thanks! The grinder hasn't got me real bad yet. Got a few knicks from errant cutting wheels but nothing major. One time could've been major if I didn't have leather gloves on. Also after a few times getting my eyeball drilled I always wear face protection. I used to think my normal eyeglasses were enough but now I know better. Now I often wear a welding helmet with no dark lens, just a clear one. Full coverage!
 
Quarantine, yeah COVID-19 is really hitting hard here, monday-friday we are only allowed to leave our homes for 10 hours, Friday from 16 o'clock till monday 6 o'clock complete lockdown, but i'm working from home and i still find time to do staff around the house, yard, machine shop, garages, cars. A week ago we had snow so most of my cars are still on snow tires but they barely get driven in fat i've never felt so many flat spotted tires before, so first project i'm doing is to change to summer tires on all the vehicles, with the 607 out of the big garage. Is easier to do them in the big garage. Wale in there i did changed brake pads on the 605, they had some material still on them but they've started cracking from the heat, very unusual for what supposed to be high performance ceramic pads. luckily i have few pairs on my shelfs.
IMG_20200410_095814.jpg
 
I made some racks to hold long stock:
4c700f6de801adc307839df4d1084ad3.jpg
 
I recently did a total rebuild on my golf cart, can’t use it, may as well fix it up. When it came time to buff out the clear coat finish, I needed a buffer which I didn’t have. I picked up a buffing pad assembly on EBay for $10 but needed a way to mount it in a drill chuck, to use in my right angle drill. So I made a 1/2” hex to 5/8”-11 thread which I single pointed on the lathe. It worked out fine and saved me about a $100 besides.8AFBADA9-CF32-459A-BD7A-8155508617F4.jpegEE7CA3AB-EFC0-428F-85F0-58F37F120B87.jpeg45A4A738-F3C1-4B30-B314-5CD7AAD6B95B.jpeg5FA10F44-74DC-4245-B4C9-775A7D540E4B.jpeg1DF12E3F-40C6-4459-ADBD-10B70F83F329.jpegDE21AB3E-3FFA-45CF-9316-D4DA588EF977.jpeg
 
@GoceKU Gotta keep the cars in good shape! Even if you can't go out much right now.

@jwmelvin Racks like that seem like a simple thing but it's actually a HUGE upgrade for a shop! Frees up floor space, makes metal easier to find, keeps you safer from tripping hazards, looks legit. Many benefits!

@Billh51 That adapter is awesome! Very cool idea! And the cart is super fancy after that paint job!
 
Back
Top