Shop built CNC Mill Project

I've made a lot of progress on this build, and I've decided to do a build thread by continuing on here. I have learned a lot during the design and build phase and I thought some of this may be helpful to others.

I've actually had the mill mostly assembled and tested and have taken it apart to paint it. So, I thought I would document the reassembly process. I did take some pictures as I was designing and building various components so I'll try to include those as I go. I have made some changes along the way such as converting to a AC Servo for the spindle drive and I'll document my learnings in regard to things like that.

So, for a late introduction, here is what I'm doing.
  • I found a nice XY table on Craigslist which was the motivation for this build. It is a Fehlman table made in Switzerland, so it is very accurate and good basis to start with. I've converted it to ballscrews and extended the travel a bit too.
  • The base is 3" square tube with 1/4" wall. It is welded together with a 3/8" thick plate on top for the column to mount to. It is very sturdy.
  • The column is a 6" square tube with 3/8" wall, very heavy. I found this at my local steel supplier in the drop area. It looked like the perfect size and I used it as I found it without having to cut it. The angle at the top was already there. Its about 38" tall and allows for 16" of Z axis travel.
  • I'm using a Centroid Acorn controller and some open loop stepper drives and motors I have accumulated over the years. I may eventually upgrade to closed loop steppers if I have to.
  • The spindle came off of a Smithy Granite combo machine, which is now just a lathe. It uses R8 collets and uses angular contact bearings, which I have replaced.
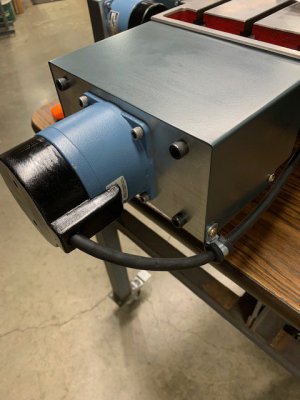
  • The spindle drive is an import AC Servo rated at 1.5KW and 3000 RPM. I've geared the spindle belt 1 to 1 so I can do rigid tapping.
I have modeled the entire machine in Fusion360, well at least to the point where I could create the necessary shop drawings to fabricate everything. All parts where machined on my Precision Matthews PM932 mill and the previously mentioned Smithy lathe.

Not sure how often I'll post as life does tend to prioritize things for you!

As they say "some assembly required"......

IMG_1237[1].JPG

IMG_1238[1].JPG
 
Last edited:
The painted parts are looking quit good. I am curious how all will fit together.
 
That is awesome. Looking forward to seeing it together and your documentation.
 
I'm finally starting the reassembly but thought I would start at the beginning with some basic information about the concept and the design process. Starting with the Fehlman XY table I started modeling the entire machine in Fusion 360. I'm by no means an expert with Fusion 360 but I was able to model it with enough detail to create the shop drawings needed to fabricate everything. Here is working shot of the basic design. I should also point out that since I'm retired and on a budget most of what I've purchased is hobby grade (i.e. import) with a few exceptions.


1688469434076.png

The table is 8" by 17" and after some modifications I was able to create 8" of travel in Y and 9" of travel in X. The Z Axis has about 16" of travel. The electrical cabinet will be mounted on the rear of the column. Although not shown here the touch screen monitor and keyboard will be mounted on an articulating arm mounted to the right side of the column.

The first thing I did was build the X & Y drive mechanisms. I'm using NEMA 34 steppers connected 1 to 1 to the ball screws. The ball screws for X & Y are 16mm in diameter with a 5mm pitch. The Centroid software takes care of the metric pitch conversion. I did replace the bearings in the ball screws mounts with angular contact bearings to minimize any lost motion there. I was able to reduce the lost motion to less than .0005". Because of the way the table was constructed I was limited in how I could mount the drive systems, but I'm happy with the final design. The stepper motors are rated 150 oz.in. holding torque. As I mentioned I may eventually upgrade to closed loop steppers.

Here are a few pictures of the Y Axis drive system, starting with some sample drawings from Fusion 360. The ball nut is mounted to the table with a 1/4" adapter plate. I'm using an HTD 5mm pitch timing belt. I'm using timing pulleys with a 1 to 1 ratio to match the direct drive of the X Axis.

1688474545946.png IMG_1283[1].JPG

IMG_1254[1].JPGIMG_9007[1].JPG

1688472185722.png 1688473157462.png

The X Axis is a direct drive from the motor to the ball screw.

IMG_1260[1].JPG IMG_1261[1].JPG

Well that's all for now, I'm going to enjoy the 4th of July with my family. Happy Independance Day to all.

Jim
 

Attachments

  • IMG_1282[1].JPG
    IMG_1282[1].JPG
    333.4 KB · Views: 5
  • IMG_1256[1].JPG
    IMG_1256[1].JPG
    251.7 KB · Views: 4
  • IMG_1257[1].JPG
    IMG_1257[1].JPG
    278.5 KB · Views: 3
After the X & Y drive systems were done, I fabricated the base and the column.

The various sections of the base were cut on my horizontal band saw and welded together. I then welded a 3/8" thick plate on top rear for the column to bolt to. I then used my PM932 mill to machine flats on the top front of the base to mount the X Y table and to drill/tap four 1/2-13 holes on the 3/8" plate as mounting holes for the column. It was challenging to do all the machining on small mill like the PM932 but I eventually got it done. There is no way I would have been able to do this without a DRO on the mill.

IMG_0953[1].JPG IMG_1225[1].JPG

The column was even more challenging. The first step was to mill the end square before I welded it to the base plate. There are numerous tapped holes on the front for the linear rails and slot for ball screw nut connection to the headstock. And, there are tapped holes on four sides. for various other things. I had to reposition the column several times on the mill to get all the machining done. I think it took a whole day to do the machining on the column.

IMG_0960[1].JPG

Here are a few pics of all the parts in the paint booth. I used some paint I had left over from a recent restoration I did on an old Sheldon Vernon Horizontal mill. Here is a link to thread I did on that restoration that talks a little more about the paint.

https://www.hobby-machinist.com/threads/sheldon-vernon-model-0-horizontal-mill-restoration.103319/

IMG_1232[1].JPG IMG_1231[1].JPG
 
The next task was the headstock. It is made from a 6" square tube with 1/4" wall thickness. A 1/4" steel plated was welded to the bottom to provide rigidity. There is almost 100 drilled holes with a majority of them tapped, which took another whole day to do. The holes are mixture of metric and imperial which keeps me busy finding the right hex wrenches. The linear bearings are mounted to the rear and are a bit challenging to install with the bolts on the inside. The outer most bolts were carefully positioned to avoid the inside radius of the tube. I then fabricated a two-piece adapter to connect the ball screw nut to the headstock.
IMG_0998.jpg IMG_1004.jpg

IMG_1005.jpg IMG_1266.jpg

The spindle is mounted to the front using a pair of cast aluminum spindle motor mounts which I bored to fit the spindle itself. I then milled the assembled unit to ensure the mounting surface was flat and parallel to the spindle. I then drilled the mounting holes in the flanges. The holes are slightly oversized to allow for tramming of the spindle.

IMG_8962.jpg IMG_8957.jpg

IMG_8966.jpg IMG_0966.jpg

The original idea was to mount a DC Motor inside the headstock and use a controller off of a treadmill to help keep the cost down. I've used these on several other machines in my shop with good results. However, the controller does not have very good speed regulation, so I decided to upgrade to an AC Servo drive as the spindle drive. More on that later. I bored a timing belt pulley to fit over the splined spindle and secured it with three set screws. I was able to get it to run very concentric to the spindle and I hope it stays that way. I used the same size pulley on the spindle motor for a 1 to 1 ratio. This will allow me to ultimately use the encoder on the spindle motor with the Centroid controller to do rigid tapping. The motor has a top speed of 3000 RPM which I think will work for most of my intended work. I do plan to design, build and install a power draw bar and use Tormac Tool System (TTS) tooling. That will likely be the first project on the mill. For now, I'll use standard R8 tooling.

IMG_1008.jpg IMG_1357.jpg

Thats all for now. Back to work on the re-assembly.

Jim
 
I like the solution for lubricating the spindle nut. I am going to try it for my CNC mill. Thanks....
 
Thanks Huub, I'm installing a complete one-shot oil system. I'll take some pics and post them a little later.
 
The first major step in the reassembly was to assemble the column. First, I chased all the tapped holes using a tap in a drill and chamfered each hole. I then began by installing the linear rails. I aligned the first rail to the side of the column with a dial indicator mounted on one of the sliders. I realize the side of the column is not a machined surface, but it is flat enough to align the rail to. I then aligned the second rail to the first making them parallel to each other. I was able to get them to within .0005" of each other.
IMG_1264.jpg IMG_1265.jpg

I then loosely installed the sliders on the headstock and slid it over the rails. I moved it back and forth the entire length of the column and tightened the mounting bolts from inside the headstock. It slides very freely on the rails. You'll see I also installed two LED lights on the bottom, you know us old guys need all the light we can get. The three holes in the center are for the bracket that attaches to the ball nut.

IMG_1275.jpg IMG_1276.jpg

I then assembled the Z Axis ballscrew, including the upper motor mount, ball nut, adapter bracket and lower bearing mount. I installed the entire assembly into the column. You can also see the beginnings of the one-shot oiling system. Each linear bearing gets oil as well as the Z Axis ballnut. It was a bit tricky routing the oil line through the slot in the column, that is what the small clamp is for on the bracket. I then stood the column up and bolted it to the base, not an easy task working by yourself.

IMG_1267.jpg IMG_1280.jpg

I've actually made a lot of progress this week, it's been too hot to do anything outside. I took a lot of pictures and I'll try to post something each day now.

Jim
 
Well, it is starting to look like a mill finally. This part of the reassembly is going pretty quick since there is no fabrication involved. I got most of the oiling system installed and some of the wiring. For the oiling system I used a hand oil pump off Amazon and two manifolds I found on Ebay. Each manifold has 5 output ports, each of which is adjustable for the flow rate.

IMG_1395.jpg IMG_1399.jpg

The manifold that is mounted on the side of the headstock is plumbed to the four linear slides and the Z Axis ball nut. Tube from the pump is temporary as I still need to run an air line and coolant line to the mist cooler.

IMG_1393.jpg IMG_1278.jpg

The manifold that is mounted on the base of the column feeds the X & Y ways and the Y axis ball nut which is stationary of the front of the table. The four oil lines going around the rear of the column go into the drag chain on the other side of the machine. By using translucent oil lines I could see the oil as I primed the system with a few hand pumps. I set the metering valves to one turn out, which I think is too much. I many back those down as a lot oil dripped off over night.

IMG_1394.jpg IMG_1400[1].JPG

I also got all the covers installed as well as the Home Limit Switches for all 3 axis. I 3D printed the end bells for the stepper motors and the small covers for the limit switch terminals. Having a 3D printer is very usefull for things like this. The electrical connector is inside the end bell.

IMG_1363.jpg IMG_1390.jpg

IMG_1391.jpg IMG_1392.jpg

Here are the X, Y and Z home/limit switches. I have software travel limits set in Centroid so actual limit switches are not needed, although you must set the machine to home each time you power up.


IMG_1398.jpg IMG_1396.jpg IMG_1397.jpg

Well, that's all for now, time to go out and mow the lawn before it gets too hot. Next, I'll be working on the final wiring for the control panel, get the axis moving, and do a mechanical alignment.
Jim
 

Attachments

  • IMG_1390.jpg
    IMG_1390.jpg
    57.3 KB · Views: 5
Last edited:
Back
Top