Wow. That ended up being a longer break than I anticipated. I took a few days away from the shop to give my back a rest, and then ended up getting a little busy with work and travel. Anyway, I got a little more time in today.
I did spend an hour or two on 5/2 getting a couple more roughing passes, but managed to mess up the exposure of my photos/video (apologies for the poor quality).
I was still roughing, because I still had some 1" square areas with no bearing at all:

It's easy to get into a mode where you keep seeing spots you "missed." So you go back and touch up an area, and before you know it, you've over scraped an area, with scrape marks too close together and overlapping.
One simple trick to keep yourself from doing this is to mark out areas on the part, and scrape within each area completely before moving on to the next area. You're less tempted to back up and hit spots you missed:

Anyway, here's how it ended up after about 90 minutes of scraping on 5/2 (maybe three or four blue ups?):

(I tried to play with the levels a it to make the markup easier to see, but clearly I'm going to need to drag out my filters to photograph this better.)
It's probably hard to tell due to the crappy photo, but there is a pretty big area along the bottom that no longer appears to be marking up. It seemed like the last blue up was worse than the previous.
When this happens, it's smart to take a break. A couple weeks break might be excessive, but it's probably good to at least break for lunch or a cup of coffee.
The other thing to keep in mind is that if an area was printing just a pass or two ago and isn't currently, then you
can't be more than a few tenths away. This is where calm consistency is the most important thing. Whatever you do don't start trying to scrape lighter or harder in certain areas. Keep your scrape depth the same no matter what.
Anyway, I gave it another pass this morning and ended up with this:

Yeah, I can't see the pattern, either (crappy photography notwithstanding, it was hard to see even standing there).
I'd cleaned the plate thoroughly this morning before starting, but I'd put too light a coat of ink for the stage I'm at. Adding a little more ink gave me a
much more satisfying mark up (no scraping was done between these two photos, I just added more ink to the granite and rubbed the part up again):

Since it's finally marking up pretty well over the entire surface, I'm finally to the finishing stage and ready to go after individual points. It's much, much more time consuming scraping individual points, so resist the temptation to start doing so before you get it marking up to this point.
In addition to adding more/wetter ink to the granite plate, I also moved the part onto a dry part of the granite after marking it up and rubbed it around dry. This causes the very highest points to reveal themselves. Notice in the upper center of the photo how some of the spots are dark circles around a silvery center spot? Those silver spot are the highest peaks.
So I took a pass just "dive bombing" those individual shiny spots, ignoring the smaller black marks without a shiny spot in the center. It may seem surprising and counter-intuitive to skip any points that are clearly touching the granite (showing blue/black) but keep in mind we are dealing with tiny deviations in height (around 50 millionths to a couple ten thousandths of an inch). If any of those tiny points you leave are higher than anywhere else after this scraping pass, moderate stoning will bring them back to the same level as the other points. The pressure per square inch from the stone on those tiny points is enormous — the stone will shear them right off.
After another pass or two I was averaging around 15 to 20 PPI (with the lightest areas only seeing 5~8 PPI):

One more pass brought me to about 27 PPI:

It takes a long time to complete a scraping pass when you've shortened up your stroke and are going after individual points. It probably took me a solid 30 minutes to just to scrape this last pass (not counting time for stoning/highlighting/blueing). My all-steel scraper is so dang heavy I can't manage more than a few minutes at a time, so the 30 minutes was broken up into 5 or 6 short stints.
A word about counting points:
It's not rocket science, but you only count individual points within a 1"x1" square. If you see any blue at all within the boundary of the square, count it as a point. If you see a bunch of connected shapes, you count it as one point, but if you see individual silver points in an "island" of bluing, it's fair to count the individual shiny spots. Take a reading in several random locations (trying to get at least one of the densest and one of the lightest areas). Average the results. It helps to tic off each point as you count it with a sharpie.
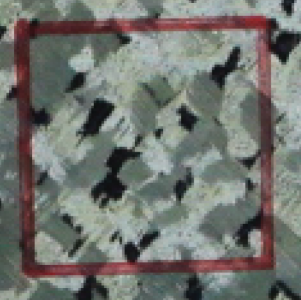
For example:

I counted this as 33 PPI above (I was probably optimistic counting a few of the points). A 1" by 1" square is actually outside the the red sharpie mark (the point angled in a bit as I scribed the square). I doubt that I'd come up with the same count twice, but this is probably similar to what I counted (my eyes are terrible, FWIW):

I really want to get back to working on my lathe, which requires first scraping in a lighter 36" straightedge than the one I have, but I foolishly appear to have promised to scrape this surface plate in to 40 PPI.
Seriously, this plate is already scraped in well enough for almost anything I'm likely to do. Because it's intended to be a reference gage for other things, though, it is worth the time to go the extra mile and get it to ~40 PPI throughout.
I will dig out a polarizing filter for my camera before my next few passes, though, and see if I can get better quality photos. I'll try to document the final finishing passes as well as I can.


")