-
Welcome back Guest! Did you know you can mentor other members here at H-M? If not, please check out our Relaunch of Hobby Machinist Mentoring Program!
You are using an out of date browser. It may not display this or other websites correctly.
You should upgrade or use an alternative browser.
You should upgrade or use an alternative browser.
Webb/Takisawa TSL-800D, curious if there are other owners here
- Thread starter Crank
- Start date
- Joined
- Jul 29, 2014
- Messages
- 2,743
I recently purchased a TSL-800D from the original owner. It came with a (slightly more than) complete set of change gears. The owner, a machine shop owner/operator, did not really do the best job of preventive maintenance...the apron oiler was inoperative, the tailstock was stuck in a slightly off position, and there is a slight headstock misalignment. The power longitudinal feed shutoff was frozen solid, had been for years it looked like. Fortunately, all that was fixable with no new parts. It's an impressive lathe, smooth to operate and makes parting off actually fun, compared to my old lathe.
It's built like a little brick house. Brake works instantly, tailstock and compound have a good amount of travel, so I'm happy. Surprisingly, another local in my small town also has the same lathe, that he bought new, and he loaned me a 4 jaw chuck. (What are the odds?)
It's built like a little brick house. Brake works instantly, tailstock and compound have a good amount of travel, so I'm happy. Surprisingly, another local in my small town also has the same lathe, that he bought new, and he loaned me a 4 jaw chuck. (What are the odds?)
- Joined
- Jul 29, 2014
- Messages
- 2,743
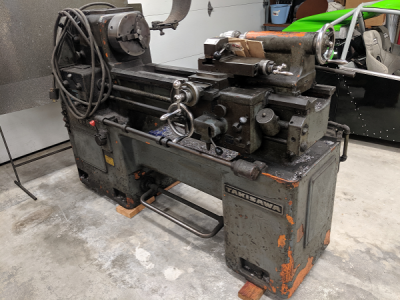
Here's a shot of the Takisawa. I added a D80 Dro from Dropros using the mini magnetic scales. That really seems to be a good solution for this lathe, as you see I added the X axis on the cross slide behind the carriage and it only takes up a quarter inch or so of tailstock movement...and is protected from impact by the way the scale sits on the cross slide.
Pay no attention to the chipped paint on the apron...I did that working on it. It's kind of a porch paint job the previous owner put on, and I have some touch up porch paint coming.

Pay no attention to the chipped paint on the apron...I did that working on it. It's kind of a porch paint job the previous owner put on, and I have some touch up porch paint coming.

- Joined
- Aug 16, 2017
- Messages
- 150
Fear not, filth and grime can act as a protectant. The K&T mill I just got has cleaned up wonderfully. These are great machines, albeit odd with the manual drip system for the QCGB and the additional change gears. Shy of taking out my spindle, I have been into every part of mine, so just ask if you need a hand with anything.
Mark
Mark
- Joined
- Jul 29, 2014
- Messages
- 2,743
Crank, how did you get into the apron? I tried to do that without removing the carriage from the ways, but chickened out after not being able to get the front of the apron loose from the back part. It seemed like I got everything out of the way, and partially separated the front from the back, but...the risk of ignorance appeared high.
I would appreciate any tips...
I would appreciate any tips...
- Joined
- Aug 16, 2017
- Messages
- 150
Winegrower,
Unfortunately, the apron is not a quick removal, expect to spend a solid hour removing interferences. You have to disconnect and remove the drive rods after removing the support/bearing block to the right and then the apron can be pulled/dropped away from the carriage. Walking the threaded rod out from the half nuts is a a bit of a wiggle and lift endeavor, but not rocket science. Get help and have wood blocks handy to avoid an unexpected drop. Once down, I was able to inspect everything inside and that thankfully was clean as a whistle and concentrated on all the swarf and muck where the half nuts were and general cleaning of the dark recesses on the backside. I saw no reason to mess with bearing replacements in the apron. IIRC, there were more of those copper tubes for lubrication inside, so be cautious to avoid damage, or knock them out of alignment as you drop the apron. Sorry, it's been a while and I'm a bit fuzzy on whether they were there or not. I'd have to review the parts breakdown to refresh my memory. I hope that helps.
Mark
- Joined
- Aug 16, 2017
- Messages
- 150
Just reread your post and I think you're describing an attempt to pull the front cover only. I never separated the apron that way, as I was doing a complete removal for cleaning and surface prep. I would be concerned that pulling the front cover while upright could unleash many little items in an unexpected manner. If you still want to remove it, drop the apron as i described and work on it while it is laying on its back. Many of those shafts may not want to align easily otherwise.
Mark
Mark


