-
Welcome back Guest! Did you know you can mentor other members here at H-M? If not, please check out our Relaunch of Hobby Machinist Mentoring Program!
You are using an out of date browser. It may not display this or other websites correctly.
You should upgrade or use an alternative browser.
You should upgrade or use an alternative browser.
What Did You Buy Today?
- Thread starter darkzero
- Start date
- Joined
- Nov 23, 2014
- Messages
- 2,612
OOPS, POSTED in the wrong thread. . . Too much pre-Super Bowl festivities!
POTD was an overkill project repairing our bird feeder. My wife found one years ago that holds 20 lbs. of seed, lets us get away with filling once every week or two. The feeder had an aluminum tube at the base to elevate it. I never showed the project, but I’d made an aluminum bushing that lagged into the 4 x 4 pole. To fill the feeder, I just lifted the pole and feeder out of the bushing. That let us fill the feeder with it on the ground, instead of dragging a ladder out to fill it.
Well, I filled the feeder, set it in place and walked away. Then heard the “crash”. The aluminum tube had fatigued over time and snapped off. The clear plastic tubes of the feeder didn’t survive the 12’ fall off our retaining wall. In fact, none of the plastic parts survived.
Pieces/parts leftover after the fall.
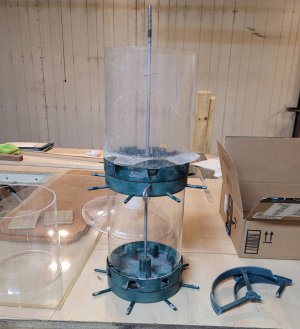
My wife found some suitable acrylic tubing on Amazon to replace the two plastic tubes. POTD was making the broken pieces to make the birds happy again.
The plastic tubes had a skirt near the bottom to help keep rain out of the feed. The plan was to cut some rings from some ¼” Lexan on hand, slip them over the tubes and caulk them in place. I didn’t show it, but ran some 8-32 screws near the bottom edge of the tubes for the Lexan to rest on. I have a couple of CNC mills, but had jobs on both. I used the DoAll bandsaw to cut rings. My saw has a blade welder, no problem cutting out the inside of a ring. I didn’t show it, but used a drum sander to tweak the ID for a tight slip over the plastic tubes.
Cut circles to the original OD of the feeder tube skirts
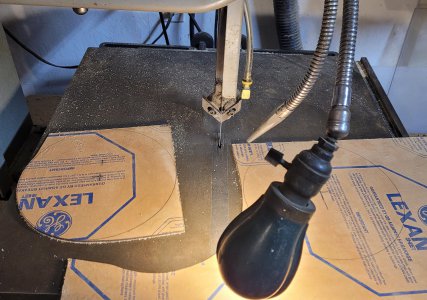
Set the new tube on the Lexan and traced the ID/OD. Drilled a few holes and slipped the blade stock through before welding
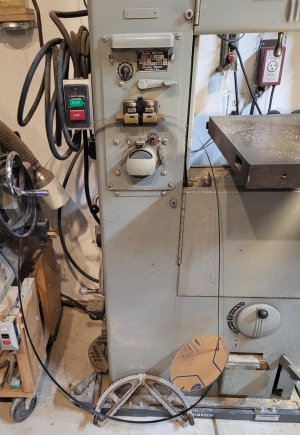
Cut the ring, removed the blade from the saw, cut it 1/8" either side of the previous weld and repeat
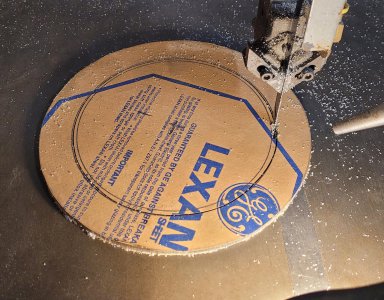
Drum sanded the ID for a tight slip fit
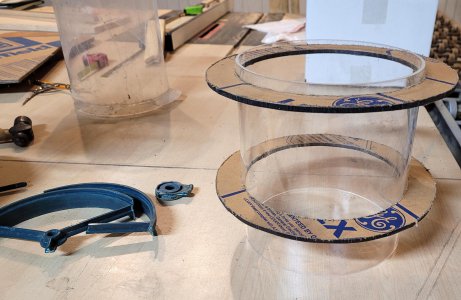
Chucked up the two center disks on a 5/16" bolt and turned the OD for a loose fit to the new tube(s)
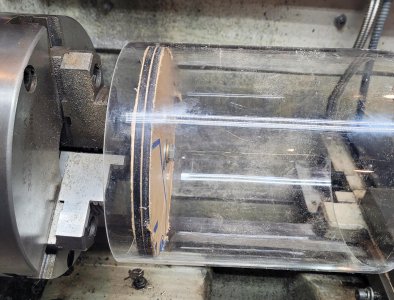
The top of the feeder was plastic and was smashed. New top would be a squirrel guard. The feeder originally had a plastic “spoked wheel” under the cap; refilling was dumping seed through the openings between a couple of spokes after removing the top. My original plan was to eliminate that spoked wheel part which set over the center steel rod and captured the top edge of the clear tube. I’d attach a disk of Lexan (leftover from the ring cut) to the inside of the squirrel guard, that piece would fit into the clear plastic tube and center the top on the tube. I made a bushing/plug for the squirrel guard that slipped over the center steel rod (didn’t photo any of that). Filling would take removing the top nut, lifting the top, and dump in seed. I got it all together and realized that the top spoked wheel piece was dual-purpose. It not only centered the top clear tube on the center rod, but also acted as a big washer that held the whole feeder together. So, plan B. . .
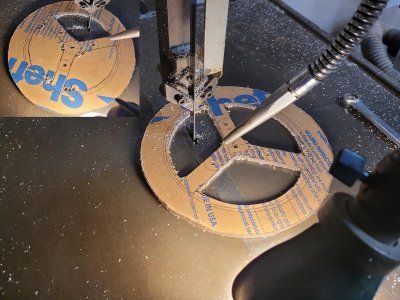
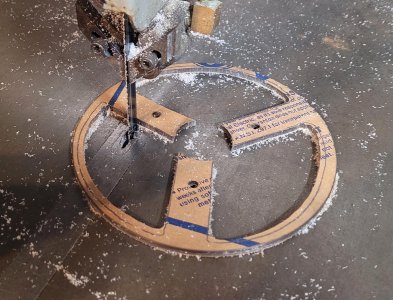
I made the top spoked wheel part from a couple of ¼” pieces of Lexan. One pieces would set on top of the clear tube (washer), other would fit into the tube (centering bushing). Back to the DoAll and multiple cuts, break the blade, slip through a hole in the plastic, weld the blade, and repeat. The two pieces were bolted together; upper one sets on top of the upper feeder tube, lower one fits inside and centers that tube. A 5/16”-18 nut secures the stack of parts.
This piece slips over the center 5/16" steel rod and sets on top of the top tube. A nut is run down to mash the stack of parts together.
This piece was one of the inside pieces turned on the lathe. This bolts to the "spoked wheel" above and sets inside the upper feeder tube to hold it centered.
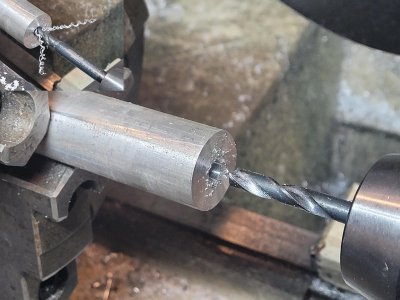
Instead of aluminum tubing, I used a piece of 1” solid aluminum rod stock. The center rod of the feeder is threaded 5/16”-18 on the ends (not metric, not that it matters). I drilled and tapped a 5/16”-18 in one end of the rod so it could thread to the bottom of the feeder. I’m sure the 1 ½” slip fit into the bottom detail would be fine, but I went with the belt and suspenders.
Drill/tap a 5/16"-18 in the new 1" solid support rod
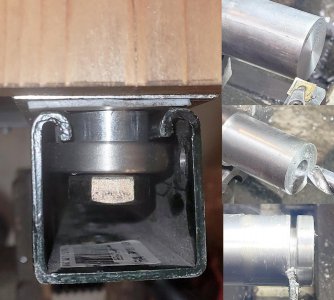
Plan for raising/lowering the feeder was through a sliding pole. Plan was to lag a length of Unistrut to the existing 4 x 4 feeder pole and have the feeder slide up/down on the Unistrut. I didn’t photo a number of these steps; made some T-nuts of sorts from 303 stainless and 6061 aluminum bushings. Used a plate of ¼” aluminum for a base that runs against the Unistrut, ran ½” bolts through and nutted in place. There’s a piece of 1/8” Teflon between the Unistrut and aluminum base.
T-nut/spacers made from 303 stainless and 6061. I made three of these; slides up and down pretty smoothly
The base that the feeder attaches to is a Cedar board. That attaches to the sliding base with a piece of aluminum angle. There are a couple of aluminum braces that run to the bottom of the sliding base for added support.
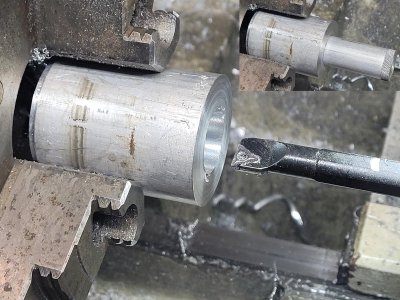
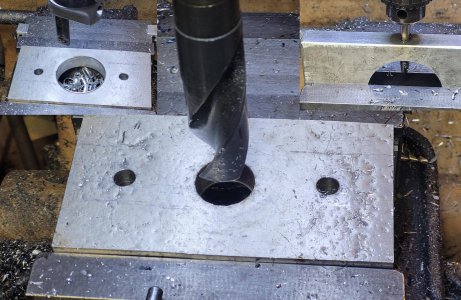
The 1” aluminum rod in the feeder sets in a bolted together aluminum base. I made this from a piece of ½” thick plate and a 2” round. I didn’t show it, but drilled and tapped a ¼”-20 hole in the 2” aluminum and ran in a leftover knob from “something” to lock the 1” aluminum in place.
Drilled and bored a 2" aluminum round for the 1" bottom rod
Drilled and bored a clearance hole in a 1/2" aluminum base that the 2" support bolts to
Feeder down low for filling and up high
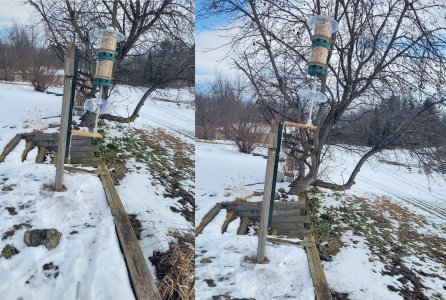
Works pretty well though the project isn’t completely done. I call it the “Leaning Tower of Bird Seed” as the 4 x 4 pole in our front yard is WAY crooked. I’ll reset the pole in the spring when the ground isn’t frozen. Also, the jury is still out on the size of the Cedar base as it makes a nice base for racoons. The 1” aluminum rod is 2 ½’ long, so think I’m okay, but may end up having to guard the top of the Cedar also.
Thanks for looking, Bruce
POTD was an overkill project repairing our bird feeder. My wife found one years ago that holds 20 lbs. of seed, lets us get away with filling once every week or two. The feeder had an aluminum tube at the base to elevate it. I never showed the project, but I’d made an aluminum bushing that lagged into the 4 x 4 pole. To fill the feeder, I just lifted the pole and feeder out of the bushing. That let us fill the feeder with it on the ground, instead of dragging a ladder out to fill it.
Well, I filled the feeder, set it in place and walked away. Then heard the “crash”. The aluminum tube had fatigued over time and snapped off. The clear plastic tubes of the feeder didn’t survive the 12’ fall off our retaining wall. In fact, none of the plastic parts survived.
Pieces/parts leftover after the fall.

My wife found some suitable acrylic tubing on Amazon to replace the two plastic tubes. POTD was making the broken pieces to make the birds happy again.
The plastic tubes had a skirt near the bottom to help keep rain out of the feed. The plan was to cut some rings from some ¼” Lexan on hand, slip them over the tubes and caulk them in place. I didn’t show it, but ran some 8-32 screws near the bottom edge of the tubes for the Lexan to rest on. I have a couple of CNC mills, but had jobs on both. I used the DoAll bandsaw to cut rings. My saw has a blade welder, no problem cutting out the inside of a ring. I didn’t show it, but used a drum sander to tweak the ID for a tight slip over the plastic tubes.
Cut circles to the original OD of the feeder tube skirts

Set the new tube on the Lexan and traced the ID/OD. Drilled a few holes and slipped the blade stock through before welding

Cut the ring, removed the blade from the saw, cut it 1/8" either side of the previous weld and repeat

Drum sanded the ID for a tight slip fit

Chucked up the two center disks on a 5/16" bolt and turned the OD for a loose fit to the new tube(s)

The top of the feeder was plastic and was smashed. New top would be a squirrel guard. The feeder originally had a plastic “spoked wheel” under the cap; refilling was dumping seed through the openings between a couple of spokes after removing the top. My original plan was to eliminate that spoked wheel part which set over the center steel rod and captured the top edge of the clear tube. I’d attach a disk of Lexan (leftover from the ring cut) to the inside of the squirrel guard, that piece would fit into the clear plastic tube and center the top on the tube. I made a bushing/plug for the squirrel guard that slipped over the center steel rod (didn’t photo any of that). Filling would take removing the top nut, lifting the top, and dump in seed. I got it all together and realized that the top spoked wheel piece was dual-purpose. It not only centered the top clear tube on the center rod, but also acted as a big washer that held the whole feeder together. So, plan B. . .
I made the top spoked wheel part from a couple of ¼” pieces of Lexan. One pieces would set on top of the clear tube (washer), other would fit into the tube (centering bushing). Back to the DoAll and multiple cuts, break the blade, slip through a hole in the plastic, weld the blade, and repeat. The two pieces were bolted together; upper one sets on top of the upper feeder tube, lower one fits inside and centers that tube. A 5/16”-18 nut secures the stack of parts.
This piece slips over the center 5/16" steel rod and sets on top of the top tube. A nut is run down to mash the stack of parts together.

This piece was one of the inside pieces turned on the lathe. This bolts to the "spoked wheel" above and sets inside the upper feeder tube to hold it centered.

Instead of aluminum tubing, I used a piece of 1” solid aluminum rod stock. The center rod of the feeder is threaded 5/16”-18 on the ends (not metric, not that it matters). I drilled and tapped a 5/16”-18 in one end of the rod so it could thread to the bottom of the feeder. I’m sure the 1 ½” slip fit into the bottom detail would be fine, but I went with the belt and suspenders.
Drill/tap a 5/16"-18 in the new 1" solid support rod

Plan for raising/lowering the feeder was through a sliding pole. Plan was to lag a length of Unistrut to the existing 4 x 4 feeder pole and have the feeder slide up/down on the Unistrut. I didn’t photo a number of these steps; made some T-nuts of sorts from 303 stainless and 6061 aluminum bushings. Used a plate of ¼” aluminum for a base that runs against the Unistrut, ran ½” bolts through and nutted in place. There’s a piece of 1/8” Teflon between the Unistrut and aluminum base.
T-nut/spacers made from 303 stainless and 6061. I made three of these; slides up and down pretty smoothly

The base that the feeder attaches to is a Cedar board. That attaches to the sliding base with a piece of aluminum angle. There are a couple of aluminum braces that run to the bottom of the sliding base for added support.
The 1” aluminum rod in the feeder sets in a bolted together aluminum base. I made this from a piece of ½” thick plate and a 2” round. I didn’t show it, but drilled and tapped a ¼”-20 hole in the 2” aluminum and ran in a leftover knob from “something” to lock the 1” aluminum in place.
Drilled and bored a 2" aluminum round for the 1" bottom rod

Drilled and bored a clearance hole in a 1/2" aluminum base that the 2" support bolts to

Feeder down low for filling and up high

Works pretty well though the project isn’t completely done. I call it the “Leaning Tower of Bird Seed” as the 4 x 4 pole in our front yard is WAY crooked. I’ll reset the pole in the spring when the ground isn’t frozen. Also, the jury is still out on the size of the Cedar base as it makes a nice base for racoons. The 1” aluminum rod is 2 ½’ long, so think I’m okay, but may end up having to guard the top of the Cedar also.
Thanks for looking, Bruce
Last edited:
- Joined
- Sep 22, 2019
- Messages
- 946
Any interest in AC Garden tractors by chance?It’s a 1969 Allis Chalmers I-600. I’m a collector of Allis Chalmers tractors.
It handled the mill with ease.
- Joined
- Aug 13, 2020
- Messages
- 1,342
I doubt you'll regret it. It'll work great till it doesn't after a few years. They're light and versatile. You'll have gotten your money's worth before it dies ('cause it is so cheap), and can just get an upgraded version.
- Joined
- Apr 9, 2016
- Messages
- 120
Always wanted one or 2Any interest in AC Garden tractors by chance?
- Joined
- Jan 4, 2021
- Messages
- 1,968
4@ 14’ x 4” x 6” = a lot of work, don’t know how you got them loaded in just 5 minutes!4 14' long , 6" x 4" solid oak beams for 5 minutes work and no $$$ .I have plans for them in the works .
- Joined
- Sep 8, 2019
- Messages
- 4,392
We did our taxes, which is always nasty because my wife is self-employed. Got a refund, & bought an 80mm face mill & 10 inserts for it.
The Glacern R8-FM45-300 is an R8 integral shank face mill, 80mm cutting diameter. It has 6 inserts which might be outside the envelope what my 3HP mill can power.
 www.glacern.com
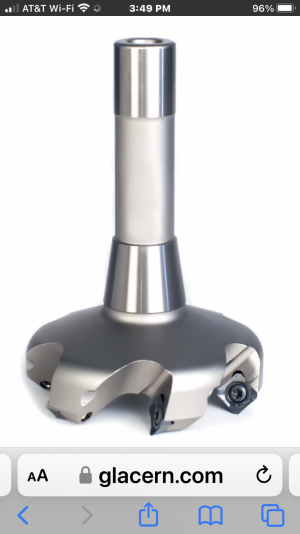
I have one of these in 50mm; it has 4 inserts. **It sees so much use**, but 50mm is only 1.97”, so I need to do 4 passes to machine the 6” plate that I am working on now. The 80mm will get it done in only 2 passes, as 80mm is 3.15”.
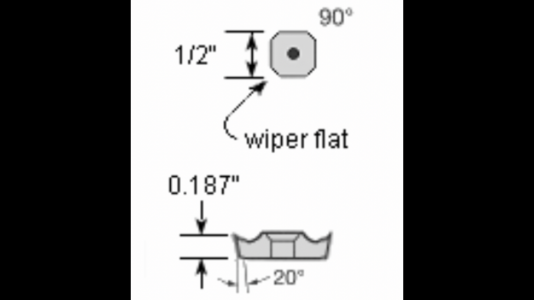
I use these inserts:
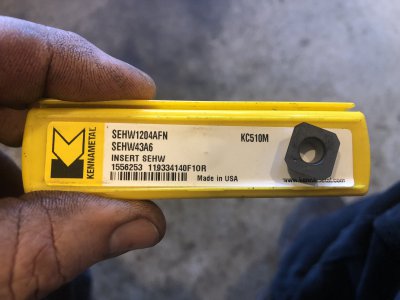
Glacern sells them for $24.00 each, but Carbide Depot has the exact same inserts for $19.15 each:
I have found these inserts to be nearly indestructible, at least on E7018 material.
The Glacern R8-FM45-300 is an R8 integral shank face mill, 80mm cutting diameter. It has 6 inserts which might be outside the envelope what my 3HP mill can power.
Glacern Machine Tools - FM45 Facemills
Glacern Machine Tools manufacturers CNC Machine Vises, Precision Tool Holders, and Indexable Milling Cutters for vertical and horizontal cnc milling machines.

I have one of these in 50mm; it has 4 inserts. **It sees so much use**, but 50mm is only 1.97”, so I need to do 4 passes to machine the 6” plate that I am working on now. The 80mm will get it done in only 2 passes, as 80mm is 3.15”.
I use these inserts:

Glacern sells them for $24.00 each, but Carbide Depot has the exact same inserts for $19.15 each:

I have found these inserts to be nearly indestructible, at least on E7018 material.
Last edited:
- Joined
- Aug 13, 2020
- Messages
- 1,342
We did our taxes, which is always nasty because my wife is self-employed. Got a refund, & bought an 80mm face mill & 10 inserts for it.
The Glacern R8-FM45-300 is an R8 integral shank face mill, 80mm cutting diameter. It has 6 inserts which might be outside the envelope what my 3HP mill can power.
On the advice of another poster here, I took two of the four inserts out of my facemill on my 1.5Hp mill. I went from repeatedly stalling the machine to the best face cuts I've ever done. With that wide of a face cut, it would always be engaged if you had 3 bits, wouldn't it?
- Joined
- Sep 8, 2019
- Messages
- 4,392
On the advice of another poster here, I took two of the four inserts out of my facemill on my 1.5Hp mill. I went from repeatedly stalling the machine to the best face cuts I've ever done. With that wide of a face cut, it would always be engaged if you had 3 bits, wouldn't it?
This is great advice! Removing 3 inserts will probably make the difference between stalling the mill and finishing the work.
Having said that, if I do experience stalling I am going to try reducing the DOC first. The max DOC that I do now (with 4 inserts on a 2” face mill) is only .035”.


