-
Welcome back Guest! Did you know you can mentor other members here at H-M? If not, please check out our Relaunch of Hobby Machinist Mentoring Program!
- Forums
- THE PROJECTS AREA
- PROJECT OF THE DAY --- WHAT DID YOU DO IN YOUR SHOP TODAY?
- Project of the Day Mega-Thread Archives
You are using an out of date browser. It may not display this or other websites correctly.
You should upgrade or use an alternative browser.
You should upgrade or use an alternative browser.
2015 POTD Thread Archive
- Thread starter jumps4
- Start date
They were made by Sandvik. I don't know the model number,( it is probably printed on them). but I have seen them on ebay also. I don't know where he got them but he gave me a bunch of tooling like drills and reamers and these to do a little machining job for him. They mount in different types of holders made by the manufacturer, but I thought they would work great for the tool holder I made ( and they did).
These type of tool holders are actually called boring cartridges. There are many styles, but if you search ebay, you can find the style you are looking for. MSC carries them new, but they are in the $100+ range a piece. They are used in custom built boring heads that machine multiple diameters at the same time.
- Joined
- Feb 8, 2014
- Messages
- 106
So wouldn't you know, I get to the 4th hole in the first row and my center drill breaks the tip off in the mini pallet....#%&$
That hurts! Time for a small carbide end mill. I also started with a center drill but stopped after half a dozen. I had no trouble using a new cobalt drill at high rpm and pecking lightly to start the holes.
- Joined
- Jul 9, 2014
- Messages
- 613
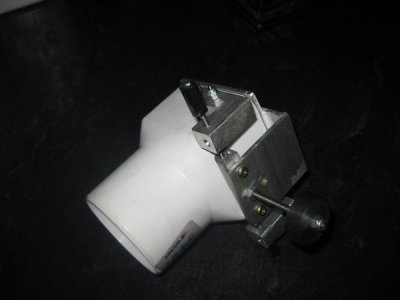
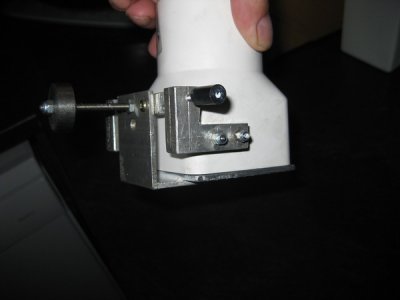
Here's my POTD .. guess what it is ?
It's made from scrap save the white plastic converter nuts , bolts studding & two pop rivets threads nut . I used the lathe to turn off centre to get the hinge pare clearance when it opens /closes. Turned off 5 mm of the 4 mm thread form to make tiny spigots .& turned the knobs on the threaded spigot bars as well as the counter weight .
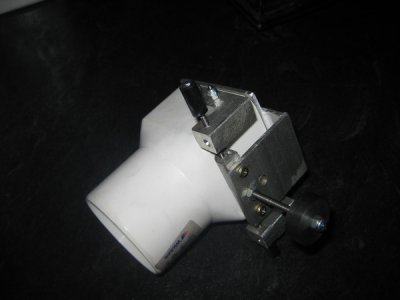


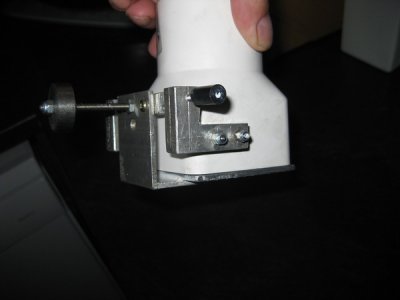
I also used the lathe to turn the right angle heavy aluminium letter " L 's " just to see how easy /difficult it might be using the four jaw chuck and two chuck keys to set the centres I used .
It's been an interesting exercise I've learnt a lot .
Horror of horrors .......... I also broke a 2.8 mm twist drill in the drill press ..something I've not done for years and years & years .
Luckily I have a pair of box joint electronic engineers end cutters which came in very handy to unscrew the old broken bit out first try because there was just enough stump left to get the end cutters to grip it.
It's made from scrap save the white plastic converter nuts , bolts studding & two pop rivets threads nut . I used the lathe to turn off centre to get the hinge pare clearance when it opens /closes. Turned off 5 mm of the 4 mm thread form to make tiny spigots .& turned the knobs on the threaded spigot bars as well as the counter weight .


I also used the lathe to turn the right angle heavy aluminium letter " L 's " just to see how easy /difficult it might be using the four jaw chuck and two chuck keys to set the centres I used .
It's been an interesting exercise I've learnt a lot .
Horror of horrors .......... I also broke a 2.8 mm twist drill in the drill press ..something I've not done for years and years & years .
Luckily I have a pair of box joint electronic engineers end cutters which came in very handy to unscrew the old broken bit out first try because there was just enough stump left to get the end cutters to grip it.
Last edited:
- Joined
- Jun 15, 2013
- Messages
- 1,199
Yeah it really sucks, I was running a no3 center drill, 1100rpm, pecking, figured I'd get the spot and countersink in one hit. Oh well the other 73 holes went off without a hitch. The tap is gonna be a pain though, no collet to fit and the drill chuck wants to spin on it..... gonna try wrapping the tap in paper, see if that ups the grip any
- Joined
- Jan 23, 2012
- Messages
- 1,216
Here's my POTD .. guess what it is ?
It's made from scrap save the white plastic converter nuts , bolts studding & two pop rivets threads nut . I used the lathe to turn off centre to get the hinge pare clearance when it opens /closes. Turned off 5 mm of the 4 mm thread form to make tiny spigots .& turned the knobs on the threaded spigot bars as well as the counter weight .
I also used the lathe to turn the right angle heavy aluminium letter " L 's " just to see how easy /difficult it might be using the four jaw chuck and two chuck keys to set the centres I used .
It's been an interesting exercise I've learnt a lot .
Horror of horrors .......... I also broke a 2.8 mm twist drill in the drill press ..something I've not done for years and years & years .
Luckily I have a pair of box joint electronic engineers end cutters which came in very handy to unscrew the old broken bit out first try because there was just enough stump left to get the end cutters to grip it.
- Joined
- Jul 11, 2014
- Messages
- 496
It's not machine work specifically but a project none the less.
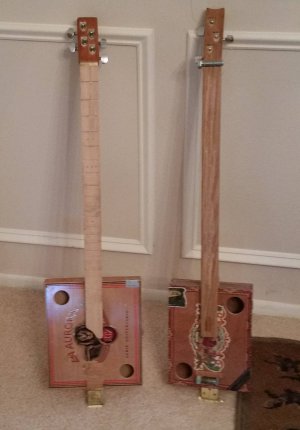
I worked on a Cigar Box Guitar for the gran'daughter. She recently began to learn to play guitar and had asked me for a CBG before she got her electric. I had done one, kinda as a prototype, several years ago ( the one on the right). I started the one on the left sometime ago and then put it aside, for whatever reason. I dragged it out again when my wife had company and I needed something to occupy myself. Today I took it to the shop and added the tuning keys and some grooves for fret markers (no frets since it will be for slide guitar only if I ever get it finished). I need to fill the grooves with some dark epoxy. Then set the strings with the brass 'nut' and brass bridge I had turned previously.
That was my day in the shop.

- Joined
- Jul 9, 2014
- Messages
- 613
i'll bite, what is it ? how does it work etc. . . . .
It is a very sensitive pivoting counter balance flap valve set in a 3 " rain water down pipe connector that goes from 3 " round pipe to 3 inch square pipe .
I've made it to fit on the discharge pipe of the pond cleaning vacuum cleaner , so that when the timer or the float actuates and cuts off the power to the motor the air bleed hole in the vacuum cleaner destroys the vacuum . Thus causing the water in the reservoir to cascade out along the discharge hose . The weight of the water being discharge will trip the flap valve open and discharge all mud , weed and small stones .
Once the reservoir is empty , the counter weight brings the flap to almost closed , when the vacuum motor starts automatically , the depression created then draws air in via the flap valve & in a fraction of a second that movement of air seals the orifice and is held there as a fully sealed port by the developed vacuum ( if it is weed free ) .
Then the operating cycle repeats itself every 20 or so seconds.
It's an quite effective initial set up , but unfortunately the rubber flap valve supplied as fitted inside the discharge hose was so strong a mix of rubber that the discharge water was not heavy enough to open the valve sufficiently to let out the majority of the holding tanks contents.
I made a Mk 1 version.
Slightly different valve using a & 3/4 " dia kiddies play ball and an up right lengh of 3 inch rain pipe , cutting out most of the sides of the pipe to leave me with two pieces that held the pipe up right and still contained the ball ..I inserted a cut down yoghurt pot that made the seat for the ball float to sit on . It worked well till I got weed or leafs hanging over the edges ,then the ball would not seat on the vacuum cycle .
The Mk 2 version was about six times bigger than the Mk 3 final version and had a 18 inch long plastic car number plate as the glued on counter balance to close the flap .
Again it worked well till the bloody dog decided it was time to attack and try to eat the moving counter balance whilst my back was turned .
Result ... the dog won ...... I didn't BTD!
Last edited:


