An Electronic Lead Screw controller using a Teensy 4.1

You all can implement whatever you like! Makes no never minds to me. This thread is about my implementation, and my decisions along the way.
That is an enlightened attitude, if you ask me.

So, I thought about all the connectors for the motor control box, and this is what I have come up with. A GX16-9 for the motor control signals and Alarm feedback.
As one can see from the pictures I posted a couple of pages back, I also chose GX aviation controllers for my interfaces to the servo, the encoder, and the control panel. The only cables I did not connectorize were the 115VAC and 5VDC power coming from the attached power strip. One thing that concerns me a lot is whenever two or more incompatible cables can be plugged into the same port on a device. Consequently, I used all GX connectors, but with differing pin numbers. I used a GX12-5 for the encoder because I had it on hand, and I used a GX16-8 for the control panel, a GX16-2 for DC power to the servo, and a GX16-4 for the servo data. There is no way one could be confused for another.
 
Got my git server all set up and tried it out. Now I can be sure that changes made upstairs in the comfort of my office, can be remotely accessible to the platform connected to my lathe. This helps out a lot. The git server is my repurposed RPI4 file server. Someday, when I can afford a pair or more decent HDD's or SSD's, I will set up a RAID array again.
Rather than spending very much at all on drives, what I do is use a pair of small, inexpensive SSDs for booting in RAID1 volumes - typically three partitions per SSD - and some number of fairly inexpensive spindles in RAID5 or usually RAID6 configurations with no partitions at all. One can put together a nice little 11T server for under $250 in drive costs, or a bit over $300 for RAID6.
 
Just finished all the inner GX connectors, and converted the DRO connectors to GX12's. Unfortunately I didn't get anything special for the DRO connectors, so they are both GX12-4's. However, one of the cable pairs is marked with red electrical tape for now, to designate the Z axis. All the other GX connectors are unique, so they cannot be mixed up. The inside panel connector solder joints are all covered with heat shrink tubing to minimize any issues.

I am using some cable glands for the stepper motor cable and the stepper motor encoder cable. They just arrived today. There is a disconnect for both cables up at the motor. Not my prefered solution, (with the cable glands and flying cable) but could not find GX connectors with sufficient current rating for the motor, so gave up on them. The GX pins are not rated at 7A, or even 5A.

Need to make the GX16-9 F to GX16-9 F cable, but I'm not quite sure of the final motor box location to get the proper length. Also left to do is the power wiring. Still waiting on an order from DigiKey, it has the terminals that I need and an LED panel light. I want to see at a glance that the motor power is on. Getting closer.

Big outstanding issue is the mounting of the Teensy and display in a box. I thought I had designed that ok, but I'm finding some little details that I left out and need to be solved. Need a little more separation between the top screw mounting the assembly to the cover and the bezel. I'll sort it out, but it's annoying at this point. I could always bottom mount the unit, up on a spacer of some sort. Couple ways of solving it, just need to go through the pluses and minuses.
 
Just finished all the inner GX connectors, and converted the DRO connectors to GX12's. Unfortunately I didn't get anything special for the DRO connectors, so they are both GX12-4's.
Well, that is not as big an issue as devices that are electrically incompatible. It doesn't blow anything up to swap the axes. I might well have decided to do the very same thing, if I were faced with the same situation. Indeed, I HAVE done the very same thing. My Christmas light strings, for example, all use the same 3-pin waterproof chassis connector (96 of them) to plug into the controllers. Each one goes in a specific position, but they are all electrically identical.

All the other GX connectors are unique, so they cannot be mixed up. The inside panel connector solder joints are all covered with heat shrink tubing to minimize any issues.
'Never a bad idea.

I am using some cable glands for the stepper motor cable and the stepper motor encoder cable. They just arrived today. There is a disconnect for both cables up at the motor. Not my prefered solution, (with the cable glands and flying cable) but could not find GX connectors with sufficient current rating for the motor, so gave up on them. The GX pins are not rated at 7A, or even 5A.
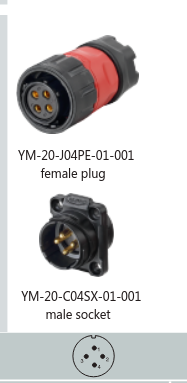
Yes, that is an issue with stepper motors. It is an additional point in favor of a servo, which only uses two power leads. GX16-2 connectors are rated at 15A. What I would consider, if it were me, would be to use something like this connector, and double up the pins on each lead. I have seen devices carry hundreds of amperes doing this.

Big outstanding issue is the mounting of the Teensy and display in a box. I thought I had designed that ok, but I'm finding some little details that I left out and need to be solved.
Welcome to my world.
 
What I would consider, if it were me, would be to use something like this connector, and double up the pins on each lead.
Pretty nice connector, but want the male pins in the panel, and female in the cable, similar to the GX connectors. Like this snapshot.
1666115328792.png
Unfortunately, this connector does not seem to be available, or at least not obviously searchable on the abomination of a search engine on A******.

Was thinking of using a doubled up GX16-9, but I am already using that connector on the box. It would be a disaster if those connectors were switched. For now, I'm going to use a cable gland. It's a 12mm hole, so if a decent connector is found, I can retrofit it later.

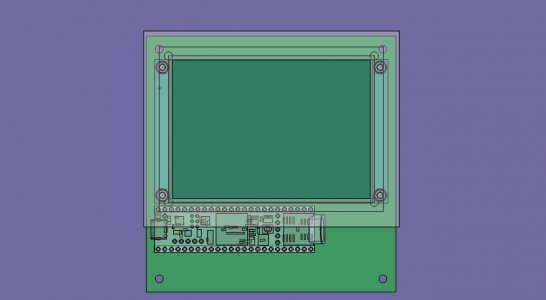
Cutting out the panel for the display is proving to be a little painful to do it via a drawing. Having a tough time using the assembly tool A2plus in FreeCAD. Probably easier (but riskier) to incrementally locate and cut the hole, then mark the drill holes. to enable front mounting to the panel. May have to install the terminal strips to the back side of the PCB, so the wires can be attached easily. I designed a bezel for the display, which fits the display, but neglected the fasteners. So I need to machine the bezel to clear the fasteners. So it's just a fiddly assembly. Slowly, I'll figure it out. I will need to relocate the panel mounting hole to be away from the bezel. For that I will make an offset block that the PCB screws to. Then I will drill the top of the block and tap it. All this, because - ahem, didn't think it all through before making the PCB. Basically, the top mounting holes of the PCB need to clear the bezel, or at least not interfere with it.
pcbdisplayandbezeltopview.jpg
 
Pretty nice connector, but want the male pins in the panel, and female in the cable, similar to the GX connectors. Like this snapshot.
View attachment 423854
For safety considerations, the standard calls for female connectors on the output side of the connection. It is rather dangerous to have pins sticking out with a potential across them. Although a DC potential under 60V is not generally a substantial shock risk, making contact with any piece of metal poses a significant risk of flash burns and potential eye damage. You are, of course, perfectly free to do whatever you please, but I definitely avoid male power outputs.

Was thinking of using a doubled up GX16-9, but I am already using that connector on the box. It would be a disaster if those connectors were switched. For now, I'm going to use a cable gland. It's a 12mm hole, so if a decent connector is found, I can retrofit it later.
A GX25-4 like this could work.
 
For safety considerations, the standard calls for female connectors on the output side of the connection. It is rather dangerous to have pins sticking out with a potential across them. Although a DC potential under 60V is not generally a substantial shock risk, making contact with any piece of metal poses a significant risk of flash burns and potential eye damage. You are, of course, perfectly free to do whatever you please, but I definitely avoid male power outputs.


A GX25-4 like this could work.
That makes sense. I have a 48V system at the moment. Seems to be adequate, for most use. Not sure if it is quite good enough for 4TPI, but my 10x22 is marginal for that too.

That GX25 is big! A 42mm flange is tough to fit in the edge of a box. I'll poke around some more for connectors. I will go back to look at some in the GX20 size range in 4 pin.
 
Do you do 4TPI very often? Or at all? I must admit I have never done anything coarser than 8TPI / 3mm.
 
Just once, to prove I could do it, using the ELS. Wasn't that good of a thread, but the work piece was too thin, so there was deflection. Cutting 4 TPI on a 3/4" steel rod is asking for trouble, and I received it :) Should have used thicker rod, but just didn't want to "waste the stock" on fooling around. I've done 8 TPI for my back plate. One day I will revisit it, but for now, 4 TPI is not a requirement, for me. Darn engineers, always wanting to test the limits...
 
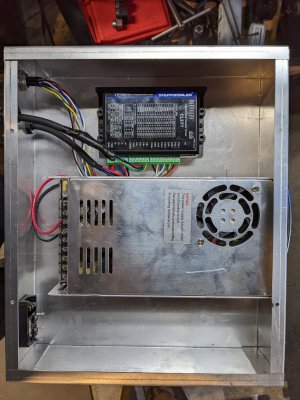
Made a little progress today. Started wiring inside the motor control box. Installed the power supply on stand offs, using M4 screws through the control box, through the spacers into threaded holes in the power supply. Drilling the holes on the mill exposed one of my peeves with this small mill, limited Y travel. I ended up removing the accordion, to get the tiny bit extra travel I needed. I didn't do that for the power supply and I had to elongate the holes. Really irritated me. For the stepper driver, I just removed the accordion. The bracket for the accordion hits the DRO guard. Probably will make a replacement accordion that looks like a window shade. I do know that I will get back at least an inch of travel.

Installed some M5 PEM nuts using the arbor press on the outside of the box. I chose the PEM nuts so the stepper driver would be flush to the box. If they fail I will use rivnuts.
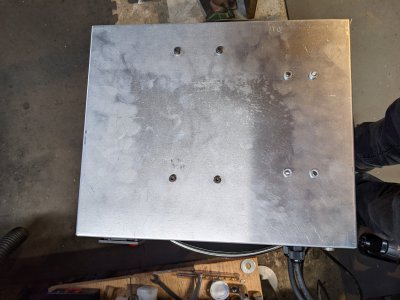
PXL_20221020_212704920.jpgPXL_20221020_212458901.jpg
Been experimenting with lugs to figure out what color I needed to hold two 14AWG wires. The answer is yellow.

Tomorrow will wire up the mains and the ground. I need to install a power indicator, and install the fan covers, on on the back panel, and one on the cover. Probably use M4 rivnuts into the sheet metal for that. Have plenty of them now.

The power indicator is just a green LED that is connected to +48V, through a 4.7K 2W resistor. The LED needs a 6mm hole. Closest I have is a B drill, which is quite close, so that will have to do.

If I get decent connectors, I will replace the two cable glands on the box with those connectors. Things have been taking a while to ship, so its been frustrating. Still waiting on some heat shrink, so I can clean things up a bit.
 
Back
Top