
It's more than a felling WachukoBrother-in-law recommended a record brush... arrived today. Turns out it is too low for my turntable. The 1/4" adjustment is not enough to make it work.
View attachment 404854
So I figured that I would make a base for it to raise it. Testing here the height needed for the spacer...
View attachment 404855
View attachment 404856
Yeah, that should do it... but now I need to make it look better... I do not have cylinder bars of Delrin... but since the lathe is to make square things round... let's do this!
And yeah, I changed the cutter for another one... I used the boring bar on a second step...
View attachment 404857
There you are...
View attachment 404858
Boring bar was used to carve out the center so the base of the brush would sit inside securely...
View attachment 404859
I then took this to the bandsaw and proceeded to cut it short of the cylinder. Placed it back in the lathe and machined the left over rectangle in the bottom... also made a recess... well, because I see other folks doing that, lol...
View attachment 404860
Man, I am new to all this... but I am so frigging proud of how this came out!!
View attachment 404861
Poifect!!
View attachment 404862
View attachment 404863

-
Welcome back Guest! Did you know you can mentor other members here at H-M? If not, please check out our Relaunch of Hobby Machinist Mentoring Program!
You are using an out of date browser. It may not display this or other websites correctly.
You should upgrade or use an alternative browser.
You should upgrade or use an alternative browser.
POTD- PROJECT OF THE DAY: What Did You Make In Your Shop Today?
- Thread starter wachuko
- Start date
- Joined
- Jun 12, 2014
- Messages
- 4,810
Through the years have always wanted to have a Pizza oven, but didn't want to do a built in permanent type as they take too long to heat. Ended up with a mobile base type, still weighs in at around 450 lbs, it is stainless steel with a Corten liner on the firebox end. I have had it for a year and slowly learning the different preparation and cooking methods when cooking Pizza's at 850F. The cooking time of the pizza is 90-120 seconds. One of the issues I had is there was no place to put the front door and the different pizza peels when cooking, so I made a hanger button for the main pizza peel on one side, the turning pizza peel has two brackets to lock it in on the other side and I added a hook under the oven to hang the removable front oven door while cooking the pizza.
Making pizza's is a time consuming process, the pizza dough starts the day before, rises twice and then the a third slow rise in the refrigerator over night to allow the dough to mature and become more elastic. When cooking at high heat the dough water content must be reduced (ideal is 57%), I stretch out the dough by hand, place it on the larger pizza peel, add ingredients and immediately place it in the pizza oven. The smaller turning peel is used to incrementally turn the pizza so the it gets evenly heated from the hot coals on the side. Then back to the larger peel to slide it out and then the door back into place to keep the heat in the chamber for the next pizza.
Hanger for main pizza peel

Hanger and foot for turning peel and hook for front door.


Making pizza's is a time consuming process, the pizza dough starts the day before, rises twice and then the a third slow rise in the refrigerator over night to allow the dough to mature and become more elastic. When cooking at high heat the dough water content must be reduced (ideal is 57%), I stretch out the dough by hand, place it on the larger pizza peel, add ingredients and immediately place it in the pizza oven. The smaller turning peel is used to incrementally turn the pizza so the it gets evenly heated from the hot coals on the side. Then back to the larger peel to slide it out and then the door back into place to keep the heat in the chamber for the next pizza.
Hanger for main pizza peel
Hanger and foot for turning peel and hook for front door.
Well now you've done it it's midnight and Pizza Hut is closed. Do you deliver? Very nicely done!
I have been making pizzas on my grill for a couple years now using a stone, but at only 600-650F and store bought dough.
Your process sounds amazing!
I have been making pizzas on my grill for a couple years now using a stone, but at only 600-650F and store bought dough.
Your process sounds amazing!
- Joined
- Nov 25, 2015
- Messages
- 8,287
Pizza Hut... you call that pizza... yuk.Well now you've done it it's midnight and Pizza Hut is closed. Do you deliver? Very nicely done!
I have been making pizzas on my grill for a couple years now using a stone, but at only 600-650F and store bought dough.
Your process sounds amazing!
- Joined
- Jul 14, 2017
- Messages
- 2,446
Today i finally got the parts to fix the Astra. The new crank sensor fix the engine, no picture is behind the driver's axle only accessible by feel. I also replaced the tie rod ends on both sides, also the sway bar links caught my eye, someone cut and extended them with a bolt. I used the wrench and jack method on one side because it was very tight. I did not noticed when i used it, but it was a russian wrench. On tuesday it's going to get an alignment. Suprasing how bad how quickly those tie rod ends got, i inspected this vehicle about a month ago and check them. They are genuine GM parts and are very low quality.


- Joined
- Nov 25, 2015
- Messages
- 8,287
After completing my arbor last night, I went back after dinner and finished this screw.
I needed to test one screw for a quote. It's a 12-20 screw for a handplane.
After making the arbor, I was able to slot it.
Nothing big... but there's a lack of new stuff here, so just adding some content.


I needed to test one screw for a quote. It's a 12-20 screw for a handplane.
After making the arbor, I was able to slot it.
Nothing big... but there's a lack of new stuff here, so just adding some content.
- Joined
- Jan 1, 2018
- Messages
- 1,153
My few year old 70" Vizio TV died on me (Out of warranty of course). It won't turn on. So I broke it open and found this:
.jpg")
4 capacitors on the power board. Bulging and obviously bad.
.jpg")
I had a heck of a time prying them up out of the cement without tearing the jackets off so I could see the values.
.jpg")
I ordered 25v 1000uf 20,000 hr. est. lifespan to replace the 16v 1000uf cheapo's. The new caps are a wee bit bigger.
.jpg")
I used some de-soldering wick to suck out the solder. Soldering the new caps in was pretty easy.
.jpg")
I put a good bed of silicone in to secure them.
.jpg")
The very left cap looks like the leads are very close together. They aren't, it is just the angle. It would be very hard to accidentally short the legs.
.jpg")
After I reinstalled the power board and plugged it in, it fired right up. I put the back on and hung it up. I think the new capacitors should last a lot longer than the originals. The hardest part was moving around the TV, pulling it off the wall and putting it back on the wall.
P.S. On the last TV I repaired (helped repair) my father took me down to the drug store and he taught me how to check the tubes to see if they were good or not.
4 capacitors on the power board. Bulging and obviously bad.
I had a heck of a time prying them up out of the cement without tearing the jackets off so I could see the values.
I ordered 25v 1000uf 20,000 hr. est. lifespan to replace the 16v 1000uf cheapo's. The new caps are a wee bit bigger.
I used some de-soldering wick to suck out the solder. Soldering the new caps in was pretty easy.
I put a good bed of silicone in to secure them.
The very left cap looks like the leads are very close together. They aren't, it is just the angle. It would be very hard to accidentally short the legs.
After I reinstalled the power board and plugged it in, it fired right up. I put the back on and hung it up. I think the new capacitors should last a lot longer than the originals. The hardest part was moving around the TV, pulling it off the wall and putting it back on the wall.
P.S. On the last TV I repaired (helped repair) my father took me down to the drug store and he taught me how to check the tubes to see if they were good or not.
Last edited:
- Joined
- Nov 19, 2014
- Messages
- 991
I've often that Mortar Golf might be a fun challenge.That ought to help with the old handicap.
- Joined
- Nov 19, 2014
- Messages
- 991
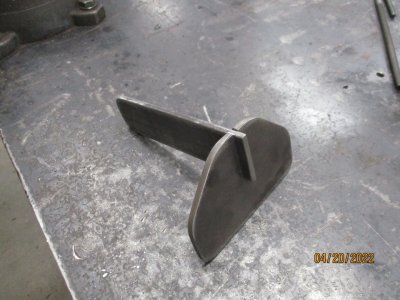
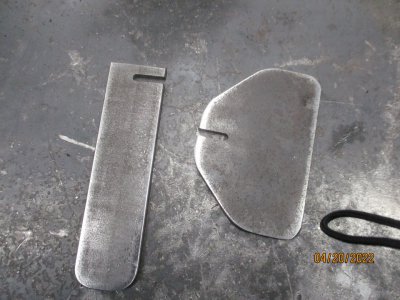
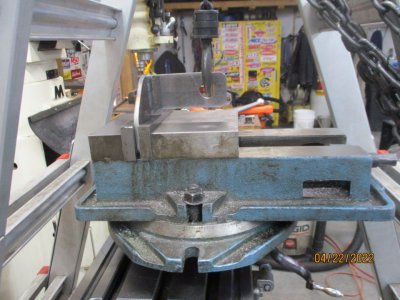
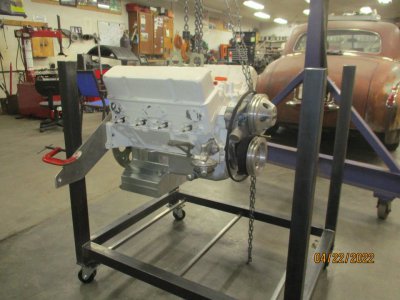
Due to an old injury that's come back to haunt me I can no longer lift my milling vice onto the machine table. I've long used the combination of a Little Giant ladder and a 1/2 ton chain fall to mount the rotary table so I built an offset rigging device for the vice. A simple fillet weld was too simple and I needed to get one of my machines involved so I made a dado joint. My "Golden Arm " son came over and welded it up for me and we spent the remainder of the day building an engine run in stand
Attachments

- Joined
- Jul 14, 2017
- Messages
- 2,446
Happy easter, having some time to spare usually means i'm in the garages. So it was over do to change back to summer tires on my vehicles, two car changed and on the third my jack seem to get a flat, in fact the nut come off and the little steel wheel fell off. The nut was the same size as the car wheel nuts so i just zip it on with the impact. I did found a screw that i miss in one of the summer tires, i'll have to get it repaired.

