What job did you do today in your shop?

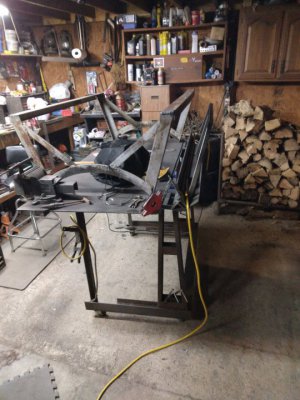
Made this accordion fold way cover for my Smithy 1324. Rubberized fabric glued to posterboard. Tedious but not real hard. Haven't decided how to secure the left end yet. Kinda hate to drill and tap holes...yet.
DanK
I wonder if you could do something with strong magnets? That would also allow you to easily remove the accordion when needed.
 
I made a gear. My first gear. It’s a modulus 1.5 62 tooth change gear for the Takisawa, with a 22mm hole with a 3/16” key, I tell you, if you read the page after page in Machinery’s Handbook, it looks formidable. But “metric” gears, identified with a mod number, are a cinch. Here’s how it goes: First, you need to know the outside diameter of the gear. Ok, it’s the number of teeth plus two, times the mod number, answer is in mm. So, (62+2)*1.5=96mm. Make a blank that diameter, thickness whatever your other gears are. Then, buy a set of mod 1.5 cutters, $80 on eBay. Mine were a 22mm arbor hole, so I had (got) to make an arbor. Easy, and making it all in one lathe setup means zero runout issues. Then get a $275 dividing head, also eBay. It’s a 40:1 crank ratio, so for 62 teeth, 40/62 is zero remainder 40/62, from third grade math or so. 40/62 is also 20/31, so use the 31 hole ring on the dividing plate, and move 20 holes for each teeth. I had an expanding mandrel that I stuck the gear blank on and chucked in the dividing head. Align the dividing head on the mill table so the mandrel indicates square with X axis and parallel to the table. Position the midpoint of the cutter vertically with the midpoint of the blank, touch off and advance the cutter to a depth of (2.25) *mod number = 2.25*1.5 = 3.375mm depth of cut. Now just make the cut, turn the dividing head crank 20 holes, and repeat 62 times.

Maybe that one gear doesn’t look like a bargain, but the next one is only half as much. :)
Bravo!
 
maybe get a slab of wood, dress it up draw lines on it n drill along the line
or turn a piec wood round put concentric circles on it in the lathe , too easy
I have a wood block for my S & D drills and don't really like it as the drills tend to grab in the block. I would prefer a composite material. One solution that I used for my ER collet chucks was to use PVC https://www.menards.com/main/doors-...58-c-9561.htm?tid=3027973043904928914&ipos=95 But for 115 different drill sizes, it would take up too much space. I have two 29 pc fractional indices and a 115 pc index. It is storing all my replicate drills so they are eay t locate when needed that is the issue. Currently, I am sorting them out into various size ranges and measuring them with calipers or a micrometer when looking dor a replacement but I'm looking for a more efficient way.
 
I wonder if you could do something with strong magnets? That would also allow you to easily remove the accordion when needed.
The strong magnets would attract all kinds of debris and be difficult to clean. Still haven't committed and in the procrastination have found that it's kinda handy to not have that end fastened down. Haven't use the mill a lot with it unfastened, but under the lathe it works perfectly. Thanks for the suggestion.
 
The strong magnets would attract all kinds of debris and be difficult to clean. Still haven't committed and in the procrastination have found that it's kinda handy to not have that end fastened down. Haven't use the mill a lot with it unfastened, but under the lathe it works perfectly. Thanks for the suggestion.


Make sure the magnets aren’t exposed. I use a piece of oven mat on the lathe with aluminum strips sandwiched on both ends. Epoxied neodymium magnets on the under side of the strips. The magnets will attract chips but can be brushed off.


Sent from my iPhone using Tapatalk
 
A few days ago, there was strong evidence of a mouse intrusion in our kitchen. Occasionally, mice will find their way into the basement and I set traps for them which solves the problem for a while. But we have a nosy canine with an appetite for cheese living with us so we have been reluctant to set any traps in the living area.

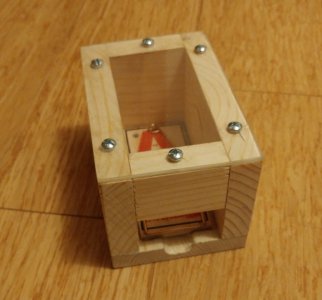
I decided to make an enclosure for the trap which would prevent our dog for putting his nose where it should be. The enclosure is made from some scrap white pine fastened with 1-5/8" construction screws. I made the enclosure just large enough to hold the classic Victor mouse trap but so it could slide under the toe kick of the cabinets. There is an 1/8" deep pocket on the bottom plate to prevent the trap from sliding out and an acrylic top so the the contents can easily be viewed. While I could have cut the pocket with a chisel or with my router, it was easier to use the mill/drill with a 3/4" carbide router bit. I also cut a groove at the entrance to facilitate removal of the trap without endangering my fingers.

Yeah, I know the acrylic is cracked but it's just a mouse restaurant, OK?
Mouse House .JPG
 
it's just a mouse restaurant....

How are the Mousies going to know it's open for business? Methinks you need some signage...perhaps a Chuck-e-Cheese logo and tiny neon "Open" sign? 8^)

When I've needed to place mousetraps in the living quarters, I've slipped them under things (like the couch) where the dog can't reach them.

-Pete
 
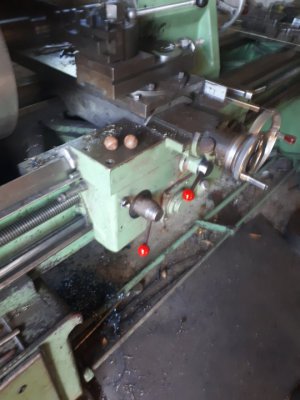
well there was a few knobs missing on the lathe
so, having a never-ending supply of old roller races I annealed some, put em in the lathe, drilled em for 8mm thread size, lick o red paint, have to wait for some 11/16 balls from races bought home by sons, from SULZER where they are both electrical fitters
 

Attachments

  • 20220118_154845.jpg
    20220118_154845.jpg
    64.5 KB · Views: 41
I always salvage the balls from old bearings. With 25 microinch typical spherocity, they are arguably the most precise objects that we have access to. My collection ranges from 3/32" to 1" diameters.
 
Back
Top