2020 POTD Thread Archive

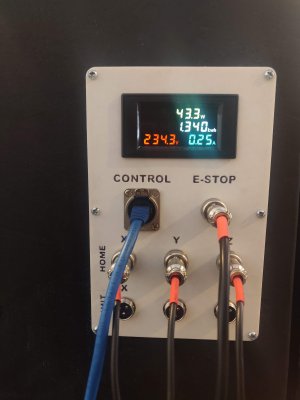
Finally finished the electrical work for my CNC mill conversion.
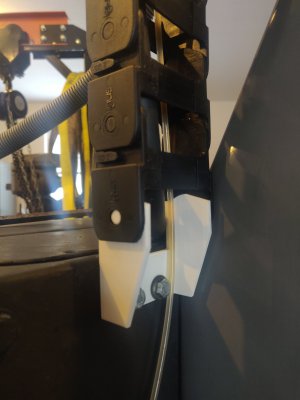
Lots of wire stripping, crimping, and soldering to make the connectors, and the 3D printer came in useful several times to make brackets.
With a bit of software tinkering, chucked up a marker and drew a test image.
After over a year of head-scratching, it's satisfying to watch the mill finally move around.


IMG_20200106_152632.jpg

IMG_20200108_134326.jpg


IMG_20200108_134530.jpg

IMG_20200108_135034.jpg

IMG_20200108_134243.jpg

IMG_20200108_134523.jpg
 

Attachments

  • IMG_20200108_134250.jpg
    IMG_20200108_134250.jpg
    2.2 MB · Views: 28
  • IMG_20200108_134306.jpg
    IMG_20200108_134306.jpg
    1.7 MB · Views: 27
Today i spent almost entire day doing bodywork on my dally. Started by applying bondo to the rocker panel, then sending it, this does not need to be perfect because i'll be undercoating it. Then i started on the dents and peeling hood, i sanded them to blend the edges. Then i used the DA sander with some P40 to take off all the old paint and filler from the front bumper. This took long time and was a very dirty job. Then i mix up some more body filler and apply it. The hood and bumper are a lot worse than i even thought, also because the temp in the garage is only 7 degrees the plastic filler won't harden quickly so i left it overnight to harden.
IMG_20200108_133520.jpgIMG_20200108_133536_1.jpgIMG_20200108_133543.jpgIMG_20200108_140609.jpg
 
I made this recently.
It is a change to the original keyboard workstation that was designed for a laptop or ipad.
It upgrades to a Mac Mini and a 21" monitor. I also added a keyboard rack and drawer and mouse and touchpad.
It's made of 1/2" baltic birch plywood painted with truck bed coating.

kb stand 2.JPG

The new stand with monitor is heavier than the original and the base of the cart wasn't stiff enough.
The two spindly cross pieces flexed and cause the stand to wiggle and shake.
I welded up a new base for the stand which fixed the shaky problem with 1x2" 14g steel tube.
I also intalled better casters. The locking casters have a star gear that locks them from turning when locked.
I've never seen locking casters that would do that.

IMG_1357.JPG

The spacing of the new cross braces makes a handy shelf for some small monitor speakers.

IMG_1360.JPG


/
Choose from:
 
Today i got an early start on finishing the mud work on my dally, i did 2 coats on some parts and 3 on the fenders and bumpers of plastic filler and a lot of sending in between. Then i prepared all the pieces that need hi build primer and applied couple of coats of it on the hood, fenders and the entire front bumper. I'll leave it to cure and shrink back as long as i can also i'll move it in the small garage because is warmer there.
IMG_20200108_160035_1.jpgIMG_20200108_174235.jpgIMG_20200108_190646.jpg
 
Last edited:
After seeing a build by Stefan Gotteswinter on his channel I blatantly stole some of his design and built a carbide hone.
Sorry no photos of the build, my camera phone died.
Recycled a small 1800 rpm motor from the tilting mechanism in a hospital bed. Cut away the gearbox and matted a pulley to the 1/4 gear it had for a shaft. The disk spins at 500 rpm, speed stollen from Accu-Finish.
The disks came from China via Aliexpress 800,1000 and 2000 grit at about $1.50 each plus shipping.
The aluminum backing plate has a centering hub, two drive pins and two magnets to secure the disks. Interestingly I epoxied the magnets in, the epoxy expanded as it cured, had to grind the magnets down to sit flush.
Leaves a near mirror like finish on carbide, photo doesn't show it on the old insert I tired.

IMG_4337.jpg

IMG_4340.jpg

IMG_4338.jpg

Greg
 
the epoxy expanded as it cured, had to grind the magnets down to sit flush.

Hey Greg, did you perhaps use a metal-filled epoxy like JB Weld? I learned my lesson with that a while ago — the metal filings in the JB will move to the poles of magnet, exactly like those fun science experiments that involved iron filings and magnets, creating all sorts of interesting results as the epoxy carrier cures. With me, I couldn’t figure out why I had to keep smoothing the JB out time after time, and it even seemed to be flowing uphill o_O I remember having a good chuckle at myself when I finally twigged.

Nice project though. I have an old Furuno radar spinner here waiting to be cannibalized for one whenever I get around to it...

-frank
 
Just the 5 minute epoxy that comes in the double syringe. Should have put a clamp on it, next time. Interesting phenomena with the JB Weld, will try and remember that one.

Greg
 
It may well be that you trapped an air bubble behind the magnet. This has happened to me more than once!

Nowadays, whenever I embed magnets, I C-clamp a flat piece of steel to the surface of the part. Attracted to the steel, the magnets stay at the surface, and the steel keeps the magnets from being pushed out by trapped air. I'll sometimes lay a sheet of wax paper between the part and the steel if I'm concerned about gluing the two together.
 
Yesterday i moved My dally from the big garage to the small, i also turn on couple of heaters and left them on all night so it has almost 24 hours and close to 40 degrees celsius to harden and shrink back. So today i started wet sending, started with the drivers fender, then moved on the the front bumper, then the passenger fender and finally the hood. This was not fun and my hands barely have any skin left but finally i finished all the panels in P800. Then i give it a quick wash just to get all filler slime off and apply undercoating to the rocker panel. Both of my garages are extremely dirty and not suitable for painting so like the little niva i'll be looking for a paint booth to get it painted, the paint itself because of the pearl is very expensive and i bought a good quality clear coat. Thanks for watching.
IMG_20200109_103446.jpgIMG_20200109_180915_1.jpgIMG_20200109_185350_1.jpgIMG_20200109_200722.jpgIMG_20200110_110523_1.jpgIMG_20200110_114237.jpgIMG_20200110_120715_1.jpg
 
Back
Top