2020 POTD Thread Archive

Just the 5 minute epoxy that comes in the double syringe. Should have put a clamp on it, next time. Interesting phenomena with the JB Weld, will try and remember that one.

Greg
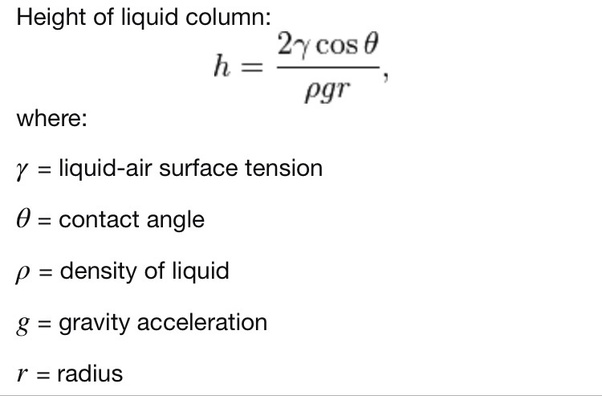
This is most likely the reason your epoxy ended up rising proud of the surface. High surface tension and a tight gap results in capillary action before the epoxy sets. A looser fit between the magnet and the recess would reduce this effect by increasing capillary radius. Just in case you were interested in some nerd trivia...
96310f8309bd24366508e84b5a91b7de.jpg
 
The magnet itself came up, guessing the bubble theory makes sense. Only had a small amount of epoxy in the hole, it stayed put.

Greg
 
Finally finished my mill vise speed handle. Way more complicated than it needs to be but it looks pretty and I'll use it alot! Made from various bits of scrap (including some lab stand bracket for the main body) and two 12mm sockets turned down a la Tundra Twin Track. Works very nicely and doesn't foul the Y axis handle which was a design goal. The aim was to have it somewhat balanced which didn't happen, but it's not too far off.
IMG_9049.JPG
fetch

IMG_9050.JPG
fetch

fetch

IMG_9051.JPG
anodised it because I could and I need the practice. Still more to learn!
 
thanks! I hadn't really thought of the sockets as replaceable, but that would be really handy if I ever got a vise with a different hex size. Thanks for the idea :)
 
Today I built a LED light fixture for a small reef aquarium I'm setting up. Purchased the heat sink and a piece of quarter round 80/20 extrusion. I machined the end plates, spacers and the special slide in nuts that hold it together. I may paint it all black later but it looks good now with the black and silver combo.

led2.jpgled3.jpg
 
Installed the 1 shot lube system on the mill and only had to remove 6 screws from the DRO setup to access the oil ports. Everything went back together with no issues and no interference between the DRO scales, the oil lines or any other bits of the machine. Hardest part of the whole thing was getting the tube to seat in the shark bite fittings when they had the spring armor on them. Just couldn't get a grip on the inner tube with the spring in the way and it took plenty of wrestling but I got them installed and it all works. Woohoo.

Now to figure out power feed on the X axis.
 
Last few days i've been phoning body shops all around my city and nobody has a heated paint booth. This usually doesn't concern me but the paint i bought had instruction that it must be sprayed in 25+ degrees because of the flake to float up on top. I asked what if we brought in electric heaters, and i got the same answer it can cause an explosion because of all the flammable fumes. So i finally phoned a friend who snuck it in a bus factory with huge paint booth that is heated. We had to get it in at shift change and get it out also at the next shift change i also had to drive it back at sundown partially masked without any headlights, fun fun. The paint matches perfectly and following the instructions to bake the paint when painting should make it last longer. I'll leave to cure a bit more and i'll start on masking and painting the black part on the bumper and assembling it. I hope this inspires someone to do something about how their vehicle looks.
IMG_20200111_124647.jpgIMG_20200111_131048.jpgIMG_20200111_131846.jpg
 
Ha Ha, what I thought was a mediocre paint job at first was actually a reflection of the surroundings.
Excellent finish.
 
Ha Ha, what I thought was a mediocre paint job at first was actually a reflection of the surroundings.
Excellent finish.

Yeah, savarin with automotive paints is always the prep that counts, especially metallic paint, because the base coat is so thin, very tiny scratches show in the final product if not prepared correctly i do all my finish sanding in 3 stages, P400, P600, P800 and i've gotten good results. The reflection is the window above with a bottle of blue antifreeze on the edge, this picture may show it better.
IMG_20200111_124652.jpg
 
Back
Top