Having problem milling 120 degree sections

Thank you extropic

I actually had the 2 piece set saved in my list for future purchase. I ordered both. It will take a few days to get so I will look at cutting something as you suggested. I should be able to use the RT for that, yes? Cut angle and trim top/outer and bottom/inner to approx dimension of the slot?

Thank you
 
There may actually be a way for you to measure the angles using something you have on hand, or you can turn a couple pieces to the necessary diameter to fit. Using the method below, if you have a couple diameters round stock and a parallel, you can place the parallel across two teeth on the inside diameter side, measure to the first diameter as shown in the picture below, then use a different size round bar to measure the second distance and use the formulas in the pictures to calculate the angle.
 

Attachments

  • image.jpg
    image.jpg
    445.9 KB · Views: 12
  • image.jpg
    image.jpg
    437.3 KB · Views: 11
  • image.jpg
    image.jpg
    505.7 KB · Views: 12
Thank you IschgI99;

1 - For the suggested means to measure the angles
2 - For the confidence in my abilities

I will need to study this a bit, probably longer to work it out. I get the concept. If by couple diameter rods, will drill bits work as instruments to use. I have parallel's.

But that's where #2 comes in.

My question is, back in earlier post using chord lines, the tapers are exposed so can I measure along any given point?

I am willing to try though.

Thank you
 

Attachments

  • factory part trying to duplicate.jpg
    factory part trying to duplicate.jpg
    112 KB · Views: 5
Thank you extropic

I actually had the 2 piece set saved in my list for future purchase. I ordered both. It will take a few days to get so I will look at cutting something as you suggested. I should be able to use the RT for that, yes? Cut angle and trim top/outer and bottom/inner to approx dimension of the slot?

Thank you
Yes regarding the RT.

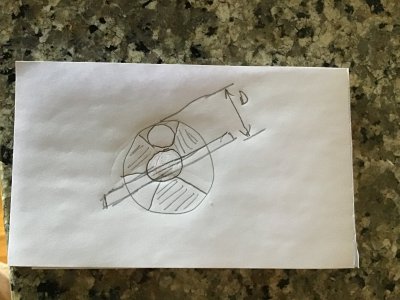
I'm not sure what the bold statement means. What I was trying to describe was making a pie wedge with 67° included angle. By using 3/4" stock it wouldn't be difficult to make it an overall size that will fill the OEM slot.

By the way, I haven't seen the need for the .760 diameter counterbore to be included in your new parts. I suspect it is an artifact of the OEM casting tooling configuration and doesn't serve any function on the mill. Unless you see a need for it, I would not reproduce it on the new parts.

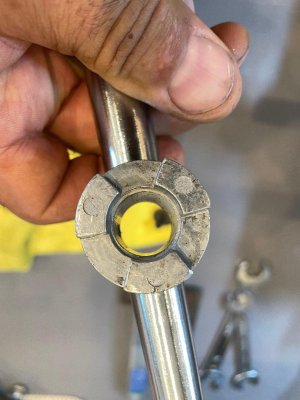
Also, because the grooves on the handle are wider than the protrusions, the opposite is true of the mating part. if we call the handle configuration the female (larger grooves) and the mating parts are the male (larger protrusions), then the extensions that you are intending to machine are male-female adapters. Not the same configuration on both ends. Right?

One last thing (for now) that I've been wondering about. So far we've been dealing with radial angles but we haven't talked about axial angles. What I want to know is whether or not there is axial taper in the planar walls of the protrusions/slots. When you mate/demate the handles, do you see increasing radial clearance (axial taper) between mating grooves/protrusions as you withdraw a handle or is the clearance constant (axially parallel)? If there is axial taper, the parts should mate with zero clearance on the axial faces. If the faces are parallel to the central (leadscrew) axis, the slip fit clearance is always present. let me know.

The pie wedge gage I have described should highlight any axial taper in the handle because the pie wedge will have none. Therefore, showing snug fit at the bottom of slot with visible clearance at the top.

PS: Determine the correct size of the pins (did you earlier say roll pins?) so you are prepared to remove and replace the mating part on the leadscrew(s). I would expect you could get them at a good ACE Hardware. You can certainly order them from McMaster-Carr. If you're not yet familiar with McMaster, you should be soon. They have an excellent web catalog and ordering/fulfilment process. If you know what search terms to use, you can probably find it at McMaster. Well, not everything.

Remember how easy/simple it was going to be? :grin: Hang in there.
 
Thank you IschgI99;

1 - For the suggested means to measure the angles
2 - For the confidence in my abilities

I will need to study this a bit, probably longer to work it out. I get the concept. If by couple diameter rods, will drill bits work as instruments to use. I have parallel's.

But that's where #2 comes in.

My question is, back in earlier post using chord lines, the tapers are exposed so can I measure along any given point?

I am willing to try though.

Thank you
You’re welcome, and you get better by pushing yourself. Even if it doesn’t work right the first time, you will learn something by trying something new.

Anything round will work, you could even turn something on the lathe to fit, it just needs to be two different diameters. You just need to make sure the round object you are using to measure is touching on the angled portion of each side like in the book pictures I showed above. It might take some experimenting to find something that fits. It doesn’t matter what the diameters are, you just need to be able to measure them to use in the formula. You can even measure to the far side OD if you couldn’t fit a parallel in there.
 
Thank you extropic; not sure why your text came out bold. I looked at my reply and nothing is bold so something got messed up in transmitting it. It was just saying what I was going to attempt. I will look at all the other things when I get my orders.

IschI99; I will try the rod application as well, in my early days of management, one of my Directors taught me that no one solution is to be used to determine if you proceed. Look at all the different approaches, if they all produce similar outcomes, then re verify and proceed. I have used that on many different subjects. Same here. Several ideas on checking these angles. If all of them produce the same results it should be what they are.

Thank you
 
extropic; just caught the little note on your last post "easy/simple". I was young and dumb back then, I cant say old and wise yet, but I'm getting there.

Thank you
 
Thank you extropic; not sure why your text came out bold. I looked at my reply and nothing is bold so something got messed up in transmitting it. It was just saying what I was going to attempt. I will look at all the other things when I get my orders.

Go back to reply #54 and look at your message that I quoted and "BOLD"ed some text. It's what I do if I want to highlight part of a previous reply.
 
extropic; got it now, sorry. I was trying to say that I would trim the 67 degree cut angle to the proper width top and bottom so when I place it in the original piece I could see any clearance issues, basically a wedge shape on the end of a rod. What you describe is cutting a complete wedge shaped piece and dropping it in the slot, I believe? And also that the piece I need to check it to is on the machine, not the handle side. I dont believe there is any axial taper on these parts, if there is it is negligible but I will check. I think a large scale version of axial taper would be a like a dove tail shape? I don't recall seeing that on these pieces they just slide in from the end. I did not include the counter bore on my extension. Same thought not necessary. I have ordered from McMaster Carr, so I am familiar with the company, just not for these applications.

Thank you

Lots of good answers there.
I still don't comprehend your explanation of the pie shaped gage piece.
This is what I had in mind. Click to enlarge.
want2drive 1.jpg

Do you intend to make longer replacements for the OEM parts, currently attached to the leadscrews, or do you intend to make additional extension parts and leave the OEM parts on the leadscrews?

If it were me, I would check the slot angle on the handle rather than the mating part, The handle is easiest to remove from the machine and once we know the configuration of the handle, we will also know the configuration of the mating part.
 
Back
Top