2018 POTD Thread Archive

fixed a fix this weekend.

Added a piece of stainless wire to the aluminium freehub on my new wheels, so that the cassette gears wouldn't chew into the soft metal. Didn't work.
https://www.hobby-machinist.com/thr...-in-your-shop-today.67833/page-20#post-604495

So I made a bunch of inserts out of O1, hardened them and cut corresponding pockets in the freehub. Had a bit of a snafu when I realised that I was cutting into the freehub threads, so I had to modify the inserts. First time cutting hardened steel with carbide, went ok thankfully.

Cutting the first pocket with my soon to be deceased new end mill. You can see the wear on the next spline along.
attachment.php


Test fit after the pockets were finished. Did a bunch of grinding after this pic to match the curve of the freehub body so the cassette would slide on
attachment.php


Added a bit of cold blue after grinding and held the looser ones in place with a dab of superglue
attachment.php


All done
attachment.php


we'll see how they wear in the next 250 miles before a scheduled chain swap/ cassette clean

dead 2mm cobalt endmill. Only managed to cut 2 pockets before I got over enthusiastic with the slotting and it snapped :( Very sad..
attachment.php
 
If you don't have belt grinder, that motor would be an outstanding candidate.
Randy

yup, that's on my list too, got a couple of motors and controllers on the shelf. I already have TM motors on my lathe, drill press and mill (recent addition) and they're amazing. I machined some hardened O1 with a 3/8 carbide end mill at ~800rpm today, then upped the speed to ~1800rpm to use a 5/64 endmill to cut some pockets in aluminium. All on the same belt.
 
I have a treadmill motor on my bandsaw and sb lathe. The controller in the pic is very easy to set up. Hook up a 10k potentiometer and you have full variable speed. The transformer looking thing is a choke. It smooths out the dc current and reduces arcing on the brushes. You really only need the one board. If you can you may want try to salvage the mount from the treadmill. I machine the grooves off the flywheel and make a pulley to fit it. The flywheel is usually attached with left hand threads. If you have more questions let me know.

Thanks for the info Chris. When the time comes, I'll have lots of questions. :) Right now I have a VFD on my lathe, so that's covered. I am
actually thinking about a band saw, and that would be a good candidate, especially if I were to convert a wood saw to a speed appropriate
for metal. It just needs to move up the budget list a bit before I get serious about it.
I did salvage the motor mount from the treadmill.

If you don't have belt grinder, that motor would be an outstanding candidate.
Randy

Thanks for the suggestion Randy. I do have a small belt grinder, but I'm pretty happy with it as it is.
 
Last edited:
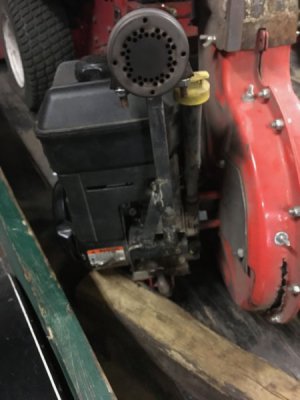
Time for revision #3 of my muffler brace (v2 is here https://www.hobby-machinist.com/thr...you-make-in-your-shop-today.67833/post-605327)

The 1/4" bolt holding the previous bracket broke off, slightly in the engine block. I spent an hour trying to drill a hole in it to get it out before giving up. I forgot about trying to weld a nut to it (not particularly hard, as the bolt is still and the block is aluminum).

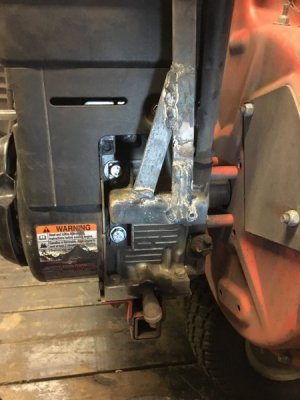
There are two other threaded holes just below the one that broke off, 8mm for some reason (don't know why 1/2 the nuts and bolts on the engine are SAE and the other half are metric), so I reworked the previous mount to use these two to mount it.

IMG_1268.jpgIMG_1269.jpg
You can see the end of the broken off bolt, it's just above the top bolt head, in the corner that the black plastic housing forms, in that little dark patch.

I think I also need to remove the fan (inside the orange housing), clean and at least statically balance it to reduce the vibration of the engine. I know that without the fan installed, the engine doesn't vibrate much.
 
Dave, it may be worth rubber isolating some of these components - you can fight fatigue with thicker and stiffer materials, but sometimes isolating them from vibration is also effective. Balancing the fan won't hurt though :)
 
A piece of rubber somewhere on this mount might help this mount from failing, but I think it might wind up causing more problems with where the exhaust mounts to the head. There are just 2 6mm bolts holding it down, and both have been stripped/helicoiled due to the exhaust vibrating and the extra force applied both because the exhaust is heavier and sticking out further than it's OEM position.
 
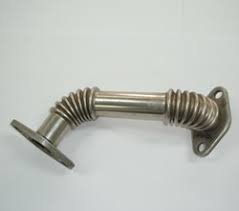
I've been here, less mass is better than the muffler stays on, but if you need it to be longer to clear something or exit in a different place, you must use a flex joint and mount the muffler solid to the frame or the engine block, i've used flex joint for car EGR valves they even have very similar flanges some times they can be an bolt on part.
download.jpg
 
Back
Top