What job did you do today in your shop?

Woodchucker, I wish a solution, however temporary, would be that simple. I'm posting some pictures now because I have an idea that seems simple enough to do and will probably be the final solution in this case.

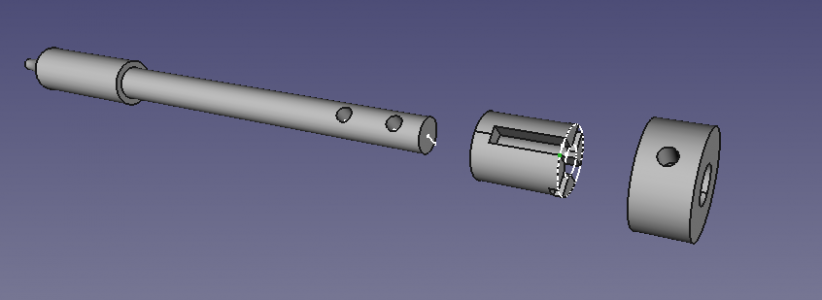
The big spring is enclosed in a barrel that is held in a crank arm hole with a set screw, the foot print of which can be seen on the middle barrel. The locking pin goes all the way through the nesting barrels and is pinned to the outer barrel which one grips to hold the pin back. The spring is compressed in the middle barrel against the shoulder of the locking pin.


temp.JPG
temp2.JPG

By extending the skinny end of the locking pin about 1", I can put a notched spacer between the outer barrel and a new pin puller knob turned for the purpose. Then when the knob is pulled, the notched spacer is rotated 90° to engage a new cross pin in the extended locking pin. So I'll be making a maximum of three new pieces, the locking pin extended, the notched spacer, and a pulling knob. I might challenge my welding skills to extend the pin and turn it true because there is no big loss if I ruin it.

temp3.JPG
Short of making a whole new mechanism, this is the best I can come up with for now. Freecad image is crude, but a masterpiece of determination.
DanK
 

Attachments

  • 1658095703378.png
    1658095703378.png
    23.9 KB · Views: 5
Woodchucker, I did eventually find a way to use your idea for quick and not so dirty. It works well and will be used until I can get motivated to do something better. Thanks.

DanK
 
Had a spindle bearing going out on one of the mowers. When I tried to remove the drive pulley, it just said unh-uh. Tried everything I could think of, including heat, and no joy. No real means to get a puller on it. So I cut off a slice of drill pipe, and welded it to the hub of the pulley giving me something to grab with the puller. Even with the 1400lbft Milwaukee it was a battle to see what would let go first. Went ahead, and did the same to the other one, then cut the pipe off on the lathe and leaned up the welded areas. Was going to put the pulleys back on after getting all the new bearings in and the hubs reinstalled, and decided to add a permanent feature for removing them. Cut two more pieces of pipe to go over the top of the pulley hubs. Then found some 1/8" rod to fill in the gap between the pipe and hub. Tacked one end of the rod to a piece of scrap the same size as the hub, heated it with the torch, and wrapped it around making two nice little rings to fill the gaps. Installed the pieces on the hubs an welded them in all the way around, being careful not to get into the key-way. Then back to the lathe, turned everything flush and concentric. One more little task out of the way. The last pic is the dog sticking her nose up through the mower deck. Mike

IMG_20220629_171120848_HDR.jpgIMG_20220629_171329589_HDR.jpgIMG_20220629_172714647_HDR.jpgIMG_20220629_185200052_HDR.jpgIMG_20220710_191236721_HDR (1).jpgIMG_20220709_181613886_HDR.jpgIMG_20220709_185107556_HDR.jpgIMG_20220712_100809717_HDR.jpgIMG_20220713_185328768_HDR.jpgIMG_20220713_175336496_HDR.jpg
 
Last edited:
Nice work there, FOMOGO. I have become a big fan of neversieze having used it long enough to find out that in such difficult situations it really does work. It also helps keep water out and pretty well eliminates rust issues most times.

Here's the result of today's efforts. The little gear is being cut with a single cutter in a home made holder secured in an end mill holder. The scratch pass turned out perfect and the cutting action was as smooth as a full rack of cutters, but then it was only scratching, not really cutting. It takes a pretty good focus to turn 8 turns and 6 holes so I practiced a lot using a marker as a cutter. Once the routine is established, remembering to move the counting fingers after each spin, the process gets easier. The space is close and I have to pay attention at the ends of the strokes to keep from hitting something I shouldn't. So tomorrow, there should be a gear to test.
temp.jpg
temp2.JPG
It finally sank in how I could use Woodchuck's idea on this thing. My mind set was someplace else when it came up, but this works nicely. Replacing the too strong spring with a just right one helped a lot, too. It was good to see after the scratch pass completed that I was "at home" in the starting hole! Hope that keeps up tomorrow! I do have a check mark on the chuck plate for each tooth.

I'm open to wire management ideas. It kinda activates my CDO (OCD in alphabetical order like it should be) to see those cables scrambled like that.

DanK
 
Yes, I've been using never seize for 50yrs. I got this mower for free, after sitting outside uncovered for 4-5 yrs of high country winters. So it required a little help. Mike

Nice work there, FOMOGO. I have become a big fan of neversieze having used it long enough to find out that in such difficult situations it really does work. It also helps keep water out and pretty well eliminates rust issues most times.
 
Yes, I've been using never seize for 50yrs. I got this mower for free, after sitting outside uncovered for 4-5 yrs of high country winters. So it required a little help. Mike
Did I tell you about how Never Seize wound up seizing my press fit.. I had heated the part to get it in, and it got cold before seating, so I put never seize on it, then started pushing with a hydraulic press. Well that wasn't working, so I hit it with heat. And the Aluminum in the never sieze wound up melting and solidifying, making it NEVER MOVE AGAIN.
 
Spent the last few days working with my son on the engine I donated to his 67 Galaxie. This one was intended for my 60 T-bird, but seems kids come first, even when they're 35. This was a 360 Ford FE block that was bored and stroked to 434 c.i. with cross bolted billet steel mains, roller cam, and ported Edlebrock heads. Should pump out in excess of 530 hp, and an equal amount of torque. Painted the short block two weeks ago, and my son came up Monday and we started cleaning, bead blasting, and painting ancillary parts. Got the heads on, and valve train geometry worked out. Now waiting on custom length pushrods, that are 3 1/2 weeks out. A few pics of the engine where we are now, and mocked up with the intake and valve covers on. Cheers, Mike

IMG_20220722_114010164_HDR.jpgIMG_20220722_114029511_HDR.jpgIMG_20220722_120139745_HDR.jpgIMG_20220722_114505291_HDR.jpgIMG_20220722_114524305_HDR.jpg
 
Back
Top