-
Welcome back Guest! Did you know you can mentor other members here at H-M? If not, please check out our Relaunch of Hobby Machinist Mentoring Program!
You are using an out of date browser. It may not display this or other websites correctly.
You should upgrade or use an alternative browser.
You should upgrade or use an alternative browser.
What job did you do today in your shop?
- Thread starter HMF
- Start date
- Joined
- Sep 2, 2021
- Messages
- 156
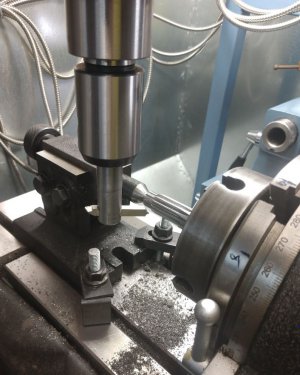
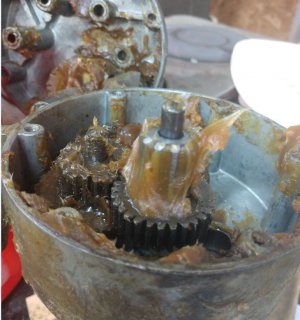
Finished up my gear project today and got to test fit it. Perfect. Very happy to have this 8 year or more project off my list. I wish I'd taken a picture before the grease, because it is a beautiful result if I do say so myself! First ever gear cutting effort. The single cutter was very time consuming and I'll not do that again unless the difference in hardness is much greater than this time! 11 teeth and .005" passes each one and the cutter was shot. I lost about 1/3 of that cutter stock just sharpening to remove the wear. And I probably put 5 years of heavy commercial use wear on the spindle bearings. Lesson learned...buy the involute cutter because it's cost effective! I did notice how easy it was to know when the cutter was not cutting properly. Fresh sharpened it kinda hissed through the cut. By the end, it was hammering like bad valves.
DanK


DanK
I love the smell of a fresh engine’s first start up, I don’t like the stress of a fresh engine’s first start up! Very nice!Spent the last few days working with my son on the engine I donated to his 67 Galaxie. This one was intended for my 60 T-bird, but seems kids come first, even when they're 35. This was a 360 Ford FE block that was bored and stroked to 434 c.i. with cross bolted billet steel mains, roller cam, and ported Edlebrock heads. Should pump out in excess of 530 hp, and an equal amount of torque. Painted the short block two weeks ago, and my son came up Monday and we started cleaning, bead blasting, and painting ancillary parts. Got the heads on, and valve train geometry worked out. Now waiting on custom length pushrods, that are 3 1/2 weeks out. A few pics of the engine where we are now, and mocked up with the intake and valve covers on. Cheers, Mike
View attachment 414656View attachment 414657View attachment 414658View attachment 414659View attachment 414660
- Joined
- Sep 2, 2021
- Messages
- 156
I can't help myself here....I'm celebrating big time. The gear pictured above is as smooth as the original and hopefully much stronger. It is the next to the last gear in the train so it takes the greatest strain. I'd post a video of it running, but it's kinda like watching paint dry.
The moral of the story is, don't put off doing something because you've never done it before. Some of my excuse was not having all the tooling, but that's easily cured once you have the knowledge.
DanK
The moral of the story is, don't put off doing something because you've never done it before. Some of my excuse was not having all the tooling, but that's easily cured once you have the knowledge.
DanK
- Joined
- Dec 7, 2013
- Messages
- 229
So, my thing for yesterday and today was finally getting to the project of lifting my 4 x 6 band saw. It's always been a pain bending over to set up parts for cutting so it is time for the upgrade. I have an older saw made in Taiwan so to me the stand is pretty stout so just added 6in to the legs. I was going to use angle iron (cost was very high), thought of 2x4s another high cost due to lumber prices so on hand and left over from other wood builds had some pine 1x6 boards. Made up 4 legs 12in long 2 pieces 2.5x2.5 screwed together to fit the factory legs on all 4 corners. Came out great but they looked a bit out of place being bare wood and the machine being green so today painted them black and now they look like they belong. Sure, wish I would have done this long ago just one of those things you keep putting off till you got nothing better to do. Also forgot had to extend the framing for the wheeled cart for the saw not a big deal because it is adjustable for different size machines.
- Joined
- Jan 25, 2015
- Messages
- 2,558
Needed wider tires on my “yard cart” that I tow with my JD X750 so it doesn’t sink into the lawn with heavy loads.
Problem was the axle wasn’t wide enough to take the ATV rims and tires I wanted to use.
So removed the axle and split it in half. Its just a cheap trailer kit so the axle stubs were connected by a piece of c channel.
Found a piece of scrap square tube that just fit in the c channel with a little “encouragement” and then through bolted each side with two bolts a side.
Then back on the trailer and the rims (after I redrilled them for the bolt pattern) bolted right up.
Only issue is now the ball reciever is too high on the trailer and its got the “stinkbug” look.
Time to get out the cutoff wheels and mig….
- Joined
- Oct 28, 2020
- Messages
- 528
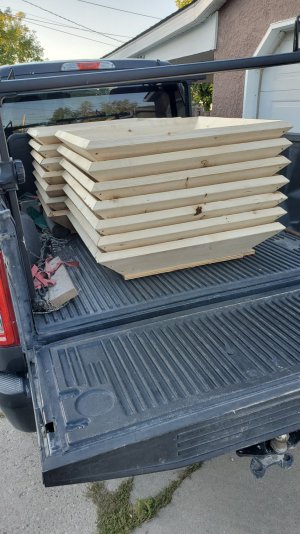
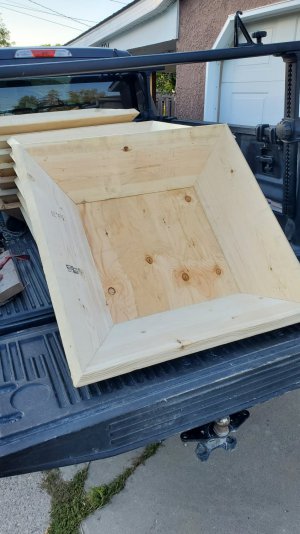
Not in my shop but in my carport. A bit of wood working, a paying gig. These are concrete test panels, they get filled with concrete and then when cured, core samples are taken and tested. 2 foot square base from 3/4" plywood and sides from 2 x 10 lumber at 45 degree angle. The job was for 20 pieces this is the last 14. I used a 1/4" plywood jig and a skill saw to make the miters.


- Joined
- Oct 7, 2020
- Messages
- 2,117


