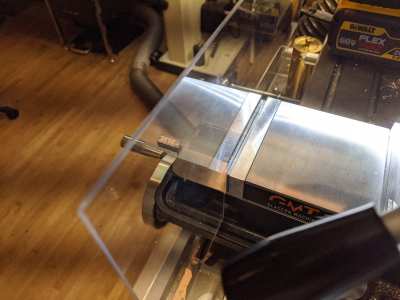
@projectnut clicking on the 'xx Minutes Ago' link on the right will take you to the last post of a thread.
-
Welcome back Guest! Did you know you can mentor other members here at H-M? If not, please check out our Relaunch of Hobby Machinist Mentoring Program!
- Forums
- THE PROJECTS AREA
- PROJECT OF THE DAY --- WHAT DID YOU DO IN YOUR SHOP TODAY?
- Project of the Day Mega-Thread Archives
You are using an out of date browser. It may not display this or other websites correctly.
You should upgrade or use an alternative browser.
You should upgrade or use an alternative browser.
2020 POTD Thread Archive
- Thread starter eugene13
- Start date
- Joined
- Jul 14, 2017
- Messages
- 2,451
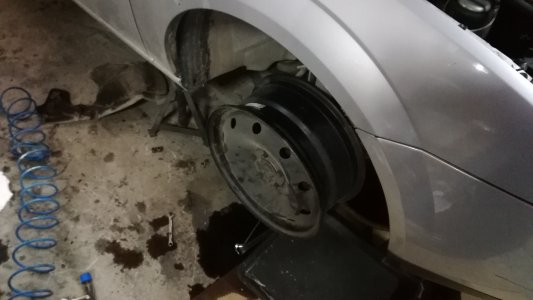
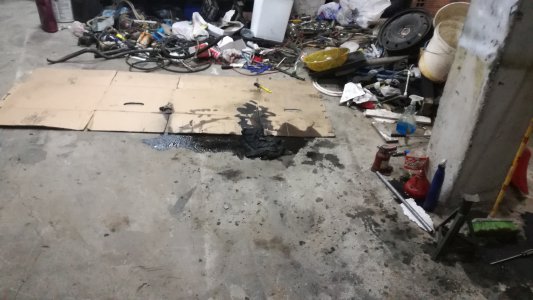
My brother calls me, bro, i hit some debris on the road now my car is leaking oil, i told him check it add and put it in the big garage, when i come back i'll take a look at it. I got back very late that day, next morning i found this, it wasn't on jack stand but most of the oil was on my floor, on a rim the tire was completely missing, broken engine mount and drain plug which is plastic on a ford was broken off. I ask my brother where is the tire, which tire he drove it close to 2 km on a rim and parked it in the garage without noticing. I had to cut new threads in the oil pan and installed a peugeot oil plug. New oil and air filters, new engine mount and found a small coolant leak, traced it to the coolant expansion tank, replaced it, change the tires, checked all the suspension, and he was back on the road, now i have a mess to clean up.


- Joined
- Sep 20, 2019
- Messages
- 1,347
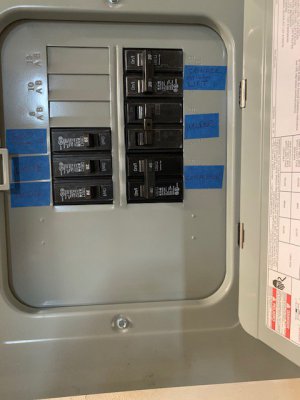
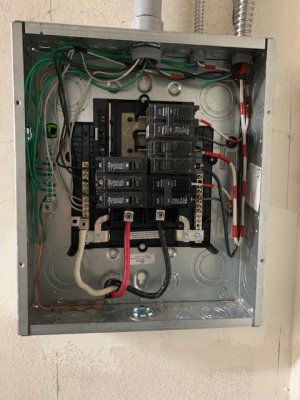
I've spent the past several weekends and some weeknights installing a 90 amp subpanel in my garage and dedicated branch circuits to my machines, and a few extra outlets scattered around. The last thing to connect is the 110 outlet for mill accessories and the VFD, but the power drops are there. I have to study up on my VFD and read through the threads before I start cutting and mounting so I get it right the first time. I'm thrilled with the locations and functionality.


- Joined
- Nov 23, 2014
- Messages
- 2,610
POTD was making some reinforcing plates for my wife’s raised garden. My sanctuary is the shop, hers is the garden. It’s a lot of up-front work to make a raised garden, but it does a really good job keeping out the rabbits though chipmunks are still an issue. Looks like a 5-gallon pail with seeds floating on top will be tomorrow’s POTD.
She originally did the beds by dry-stacking 6” wide cinder blocks on a leveled sand base. As you can imagine, the walls started moving after less than a year. She’s been redoing a couple of beds every year or two using ¾” foundation grade plywood for a base. The bottom row of block is cleated on the outside to hold them in place. The blocks and coarses are glued together with cement construction adhesive. She trims out the top of the beds with 8” wide cedar boards. The miter joints in the corners are reinforced with a plate of 1/8” thick stainless steel.
One of the garden beds my wife did a couple of years ago. My part of the job was making the corner reinforcements on top of the 1" x 8" cedar top boards.

She has another couple of beds ready for trimming. She dresses out the sides with 1/2" pressure treated plywood for a "crate" look. Does a good job hiding the cinder blocks.
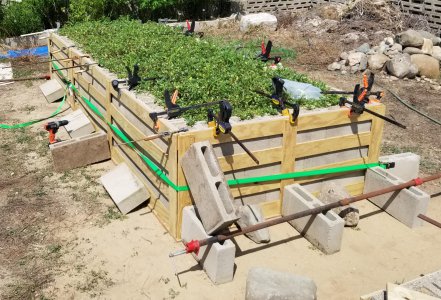
I made the plates for a couple of beds 2 years ago with my CNC Bridgeport mill. Did the job on my Tormach 1100 this time.
Used the PathPilot control software conversational routines to set up the spotting, drilling and double chamfering. It goes pretty quickly in PP; entered the coordinates for the 6 holes, picked the appropriate spotting drill tool and clearance hole drill. Select the RPMs, did peck drilling with 0.010” advance on each poke at the stainless, and set a final depth.
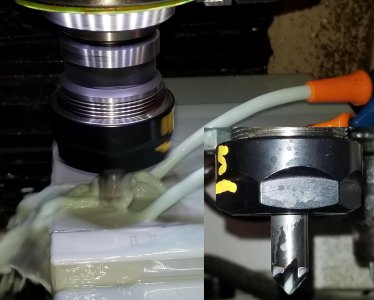
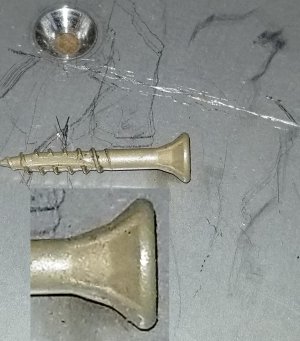
Used the same locations for the chamfering so the screws going through the plate into the cedar board set flush with the plate. I did the countersinking with a carbide 90 deg. bit and noticed with a test fit that the screw didn’t set down all the way. Turns out these screws have two chamfers on them, 90 deg. at the top and around 60 deg. at the base.
No problem with the CNC. Added an additional tool with a carbide center drill for the 60 deg. chamfer. Jogged the Z-axis down 0.010” at a time and test fit the screw until it set flat in the hole. Wrote down the depth in Z with the center drill and wrote a conversational routine to hit each hole with that tool to that depth.
Spot drilling (not that you can see the drill through the coolant)
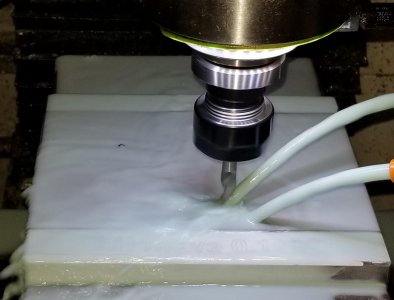
Drilling through holes for the deck screws
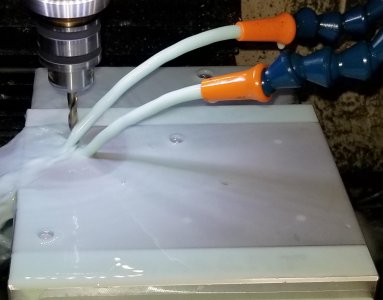
Chamfering the holes with a 90 deg. carbide bit
The deck screws have two chamfers; 60 deg. and 90 deg. I could have gone deeper with the 90 deg. chamfer, but went the double-chamfer route instead.
Putting in a 60 deg. chamfer with a center drill.
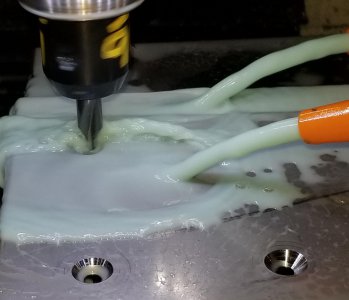
I have to admit to LOVING the CNC! So nice to set a plate in place, start the routine and walk away to do something else. Come back in around 10 minutes and the plate was done.
Gotta love flood coolant and 3-axis CNC to bang out multiples of something.
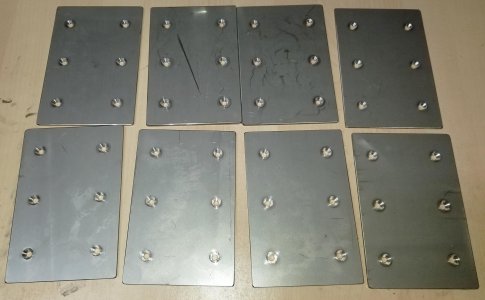
Thanks for looking,
Bruce
She originally did the beds by dry-stacking 6” wide cinder blocks on a leveled sand base. As you can imagine, the walls started moving after less than a year. She’s been redoing a couple of beds every year or two using ¾” foundation grade plywood for a base. The bottom row of block is cleated on the outside to hold them in place. The blocks and coarses are glued together with cement construction adhesive. She trims out the top of the beds with 8” wide cedar boards. The miter joints in the corners are reinforced with a plate of 1/8” thick stainless steel.
One of the garden beds my wife did a couple of years ago. My part of the job was making the corner reinforcements on top of the 1" x 8" cedar top boards.

She has another couple of beds ready for trimming. She dresses out the sides with 1/2" pressure treated plywood for a "crate" look. Does a good job hiding the cinder blocks.

I made the plates for a couple of beds 2 years ago with my CNC Bridgeport mill. Did the job on my Tormach 1100 this time.
Used the PathPilot control software conversational routines to set up the spotting, drilling and double chamfering. It goes pretty quickly in PP; entered the coordinates for the 6 holes, picked the appropriate spotting drill tool and clearance hole drill. Select the RPMs, did peck drilling with 0.010” advance on each poke at the stainless, and set a final depth.
Used the same locations for the chamfering so the screws going through the plate into the cedar board set flush with the plate. I did the countersinking with a carbide 90 deg. bit and noticed with a test fit that the screw didn’t set down all the way. Turns out these screws have two chamfers on them, 90 deg. at the top and around 60 deg. at the base.
No problem with the CNC. Added an additional tool with a carbide center drill for the 60 deg. chamfer. Jogged the Z-axis down 0.010” at a time and test fit the screw until it set flat in the hole. Wrote down the depth in Z with the center drill and wrote a conversational routine to hit each hole with that tool to that depth.
Spot drilling (not that you can see the drill through the coolant)

Drilling through holes for the deck screws

Chamfering the holes with a 90 deg. carbide bit

The deck screws have two chamfers; 60 deg. and 90 deg. I could have gone deeper with the 90 deg. chamfer, but went the double-chamfer route instead.

Putting in a 60 deg. chamfer with a center drill.

I have to admit to LOVING the CNC! So nice to set a plate in place, start the routine and walk away to do something else. Come back in around 10 minutes and the plate was done.
Gotta love flood coolant and 3-axis CNC to bang out multiples of something.

Thanks for looking,
Bruce
Last edited:
- Joined
- Jul 14, 2017
- Messages
- 2,451
Your brother has a very nice and helpful brother!!! What a nasty bunch of problems to have to deal with!
Yeah, tell me about it, i must do something about my working environment, i'm debating between a 2 post lift or a inspection pit. Both options have difficulties, lift can go only in the big garage that has only single phase power and it can't work, the pit can only go in the small garage, because the big garage has massive footings that hold up the building.
- Joined
- Jun 29, 2014
- Messages
- 4,063
I recently purchased some one year old rough sawn Red Oak. It was left in slab and log for about a year and then cut to my dimensional specs. So....not dry.
After having immersed myself in the internet abyss of indoor air drying rough sawn hardwood lumber...I decided that I need to dehumidify my shop. After coming up for air from the dark pool of air drying, I dipped my toe into online shopping for a dehumidifier. That lasted for all of 2.37 minutes.
Not one to give up so soon, I thought there must be a DIY way to do this. There is. Here are the instructions...
Materials Needed:
Bucket or pail. 1-3gal,
Screen material (something flexible),
Shop rags or thin towels. Think filter material,
Calcium Chloride (Ice Melter)
1) cut a piece of screen several inches larger in diameter than the opening of your bucket.
2) push the screen down into the bucket a few inches. If you want to dehumidify longer, cut a larger piece of screen in step one and push it down further into the bucket. Remember to leave a few inches for water.
3) lay a shop rag into the bottom of the screen. The idea is to not let any of the pellets through the screen.
4) fill the screen/filter basket you just made with calcium chloride. Fill it as my as possible without it spilling out or over your rags.
5) cover with more rags. One layer is fine.
6) i secure my top layer of rags with another layer of screen. You might not feel that is necessary or maybe you will.
Here is a photo of my setup:

I’ve pulled about 96 oz of calcium chloride water out of the shop with this simple setup. It’s slow, that is over a period of about 4 weeks.
However, prior to setting this up, I had the wood for three weeks and the moisture content wasn’t dropping. I was starting at 17-18%.
After four weeks, I’m down to 13-16% depending on board thickness and when it was cut. I’m optimistic that this method will continue to pull water out of the air.
Other hardwood in my shop that has been indoors for two years has a moisture content between 10-12%. This is with no real climate control outside of a pellet stove and opening windows and doors from time to time. It’s fully insulated and is often cooler than the outside in the summer and warmer in the winter.
I’m hopeful this method will work in assisting the drying process.
Sent from my iPhone using Tapatalk
After having immersed myself in the internet abyss of indoor air drying rough sawn hardwood lumber...I decided that I need to dehumidify my shop. After coming up for air from the dark pool of air drying, I dipped my toe into online shopping for a dehumidifier. That lasted for all of 2.37 minutes.
Not one to give up so soon, I thought there must be a DIY way to do this. There is. Here are the instructions...
Materials Needed:
Bucket or pail. 1-3gal,
Screen material (something flexible),
Shop rags or thin towels. Think filter material,
Calcium Chloride (Ice Melter)
1) cut a piece of screen several inches larger in diameter than the opening of your bucket.
2) push the screen down into the bucket a few inches. If you want to dehumidify longer, cut a larger piece of screen in step one and push it down further into the bucket. Remember to leave a few inches for water.
3) lay a shop rag into the bottom of the screen. The idea is to not let any of the pellets through the screen.
4) fill the screen/filter basket you just made with calcium chloride. Fill it as my as possible without it spilling out or over your rags.
5) cover with more rags. One layer is fine.
6) i secure my top layer of rags with another layer of screen. You might not feel that is necessary or maybe you will.
Here is a photo of my setup:

I’ve pulled about 96 oz of calcium chloride water out of the shop with this simple setup. It’s slow, that is over a period of about 4 weeks.
However, prior to setting this up, I had the wood for three weeks and the moisture content wasn’t dropping. I was starting at 17-18%.
After four weeks, I’m down to 13-16% depending on board thickness and when it was cut. I’m optimistic that this method will continue to pull water out of the air.
Other hardwood in my shop that has been indoors for two years has a moisture content between 10-12%. This is with no real climate control outside of a pellet stove and opening windows and doors from time to time. It’s fully insulated and is often cooler than the outside in the summer and warmer in the winter.
I’m hopeful this method will work in assisting the drying process.
Sent from my iPhone using Tapatalk
Yeah, tell me about it, i must do something about my working environment, i'm debating between a 2 post lift or a inspection pit. Both options have difficulties, lift can go only in the big garage that has only single phase power and it can't work, the pit can only go in the small garage, because the big garage has massive footings that hold up the building.
I recently saw this lift on Instagram.


